


Hardware components | ||||||
_ztBMuBhMHo.jpg?auto=compress%2Cformat&w=48&h=48&fit=fill&bg=ffffff) |
| × | 1 | |||
 |
| × | 1 | |||
 |
| × | 1 | |||
 |
| × | 1 | |||
Software apps and online services | ||||||
 |
| |||||
Hello Guys, In this Video I will Show You how to make simple weather station to sense temperature and humidity using DHT11 sensor
Supplies:Parts list : -Arduino UNO -16×2 LCD MODULE-Jumper Cable -DHT 11 -
Step 1: About DHT11 SensorDHT11 is a humidity and temperature sensor. It can be used as humidity sensor as well as the temperature sensor. You can find the dht11 sensor of 2 types in the market. One is with 4 pins and another is with 3 pins. In 3 pin dht11 sensor already 10k Ohm resistor is added inside the module. The operating voltage of this module is 3.3 V. The output of this sensor is digital.
Step 1: About DHT11 SensorDHT11 is a humidity and temperature sensor. It can be used as humidity sensor as well as the temperature sensor. You can find the dht11 sensor of 2 types in the market. One is with 4 pins and another is with 3 pins. In 3 pin dht11 sensor already 10k Ohm resistor is added inside the module. The operating voltage of this module is 3.3 V. The output of this sensor is digital.
Step 2: Connecting DHT11 With ArduinoConnect DHT 11 With Arduino UNO
DHT11 ARDUINO UNO
GND TO GND
VCC TO 3.3V
OUTPIN TO D11
Add TipAsk QuestionCommentDownload
Step 2: Connecting DHT11 With ArduinoConnect DHT 11 With Arduino UNODHT11 ARDUINO UNOGND TO GNDVCC TO 3.3VOUTPIN TO D11Add TipAsk QuestionCommentDownload
Step 3: I2C LCD DisplayThis is an 16x2 LCD display screen with I2C interface. It is able to display 16x2 characters on 2 lines, white characters on blue background.
Usually, Arduino LCD display projects will run out of pin resources easily, especially with Arduino Uno. And it is also very complicated with the wire soldering and connection. This I2C 16x2 Arduino LCD Screen is using an I2C communication interface. It means it only needs 4 pins for the LCD display: VCC, GND, SDA, SCL. It will saves at least 4 digital / analog pins on Arduino. All connector are standard XH2.54 (Breadboard type). You can connect with jumper wire directly.
Step 3: I2C LCD DisplayThis is an 16x2 LCD display screen with I2C interface. It is able to display 16x2 characters on 2 lines, white characters on blue background.Usually, Arduino LCD display projects will run out of pin resources easily, especially with Arduino Uno. And it is also very complicated with the wire soldering and connection. This I2C 16x2 Arduino LCD Screen is using an I2C communication interface. It means it only needs 4 pins for the LCD display: VCC, GND, SDA, SCL. It will saves at least 4 digital / analog pins on Arduino. All connector are standard XH2.54 (Breadboard type). You can connect with jumper wire directly.
Step 4: Connecting I2C LCD Display to ArduinoI2C LCD Arduino
GND <---> GND
VCC <---> 5V
SDA <---> A4
SCL <---> A5
Step 4: Connecting I2C LCD Display to ArduinoI2C LCD ArduinoGND <---> GNDVCC <---> 5VSDA <---> A4SCL <---> A5
Step 5: CodeCode
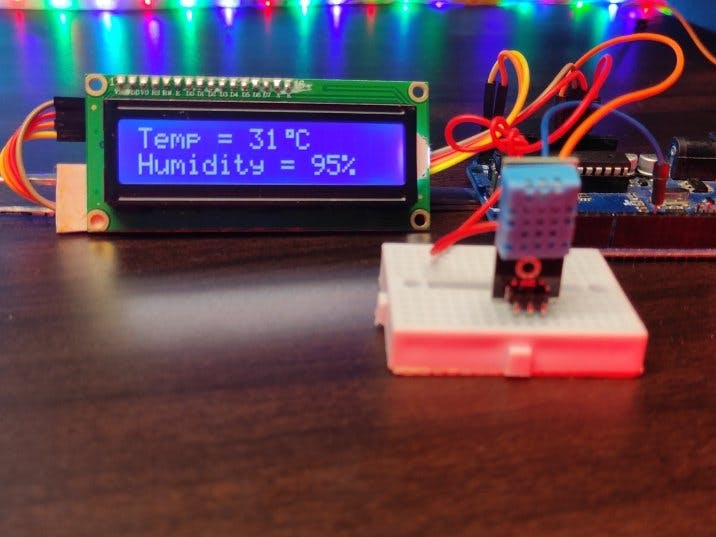
Step 6: Complete Construction and WorkingLike, Share, And Subscribe My Channel
Add TipAsk QuestionCommentDownload
Step 6: Complete Construction and WorkingVideoLike, Share, And Subscribe My Channel
Step 7: Sponsor by NEXTPCBIf you don't make your PCBs yourself, where do you make them?Personally, I do not have the space and the courage (nor the skill) to do them myself.For SF, I turn to Util-Pocket, because I find that the quality is excellent for the price.For the DF (with metallic holes), I tried several companies, all of which do a good job, but it costs a lot.This time I addressed myself here. I had 3 circuits to do, totaling an average surface of 49 cm2.When I saw that the minimum quantity to order was 5 PCBs, I continued my order out of curiosity, just to see the quote.And when I saw the asking price, I placed the order.NEXTPCB
Add TipAsk QuestionCommentDownload
e do you make them?Personally, I do not have the space and the courage (nor the skill) to do them myself.For SF, I turn to Util-Pocket, because I find that the quality is excellent for the price.For the DF (with metallic holes), I tried several companies, all of which do a good job, but it costs a lot.This time I addressed myself here. I had 3 circuits to do, totaling an average surface of 49 cm2.When I saw that the minimum quantity to order was 5 PCBs, I continued my order out of curiosity, just to see the quote.And when I saw the asking price, I placed the order.NEXTPCBAdd TipAsk QuestionCommentDownload
Step 8: NextPCB OffersNextpcb Provide PCBs Only 0$ That is for free
Step 8: NextPCB OffersNextpcb Provide PCBs Only 0$ That is for freeNextpcb


Comments
Please log in or sign up to comment.