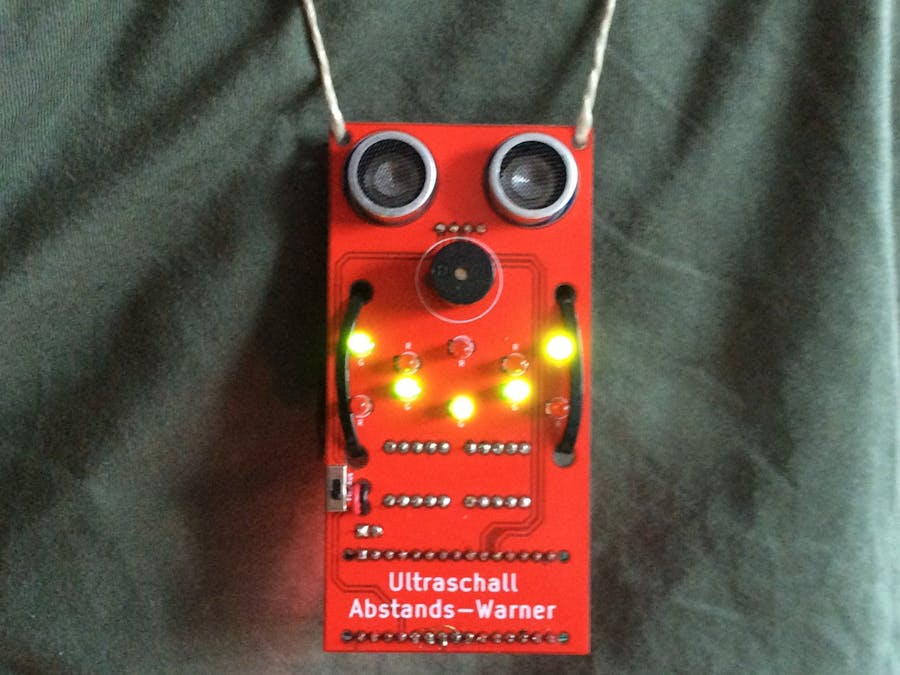
One of the most effective ways to prevent the spread of COVID-19 and other viral and cold diseases is to keep other people away. From my own experience I can confirm that this is not so easy outside of my own home. The best example is standing in line at the cash register or at a counter. A minimum distance of 1.5m (or more) should be maintained here. But who is walking around with a yardstick in front of them? :-)
The ideaThere should be something that at least automatically monitors the distance of the person in front of you and raises the alarm if necessary. So what do I need?
- a small micro controller (Arduino Nano)
- a distance sensor (HC-SR04)
- some LEDs
- a buzzer
- and some software/code to link this all together
At the beginning, with no idea how this solution might work in real live, I created together with my son a first prototype based on an Arduino Nano, some LEDs, the ultrasonic distance sensor HC-SR04 and a cheap plastic case:
It worked fine and a lot of people seeing this were exited and asked me to build one for them.
The goalWell, as you can see, this construction wasn't that reliable and also very time consuming in assembling. And of course not that easy to reproduce for others.
So I decided to create a PCB with the following project goals:
- All components must fit on one simple and small PCB
- Easy to assemble, all information on the board to build without reading manuals (who cares about documentation :-) )
- No need for a case (because this requires extensive possibilities on drilling or the availability of a 3D-printer)
- CHEAP - no usage of expensive or hard to find / distributor depending components
- Funny look to increase acceptance :-)
Here is the result (all necessary files to build are listed below):
In the pictures you can see the first PCB release of course with some minor bugs. The layout in the attachment has the fixes included - most important a potentiometer for adjusting the sound level (these small buzzers are really loud :-)) and English labels.
Assembly instructions:
- Prepare the Arduino Nano (solder the pin header to the bottom side)
- Solder the LEDs on the top side of the PCB - the color is marked with G (green) or R (red) on the PCB. (The square holes - left handed - are for the LEDs cathode (shorter pin)).
- Solder the 10 resistors - they are soldered on the bottom side of the PCB!
- Mount the ultrasonic distance sensor as shown in the pictures (from bottom side to the top). Check the pin description - ground must be on the right side. Depending on the sensor type you can just bend the pin headers upwards or replace them by 4 default straight pin headers. To improve stability you can also use glue to stick the crystal oscillator of the sensor on the PCB.
- solder the Switch on the top of the PCB.
- Solder the buzzer on the top side of the PCB. The "+" is marked on the PCB and the buzzer.
- Solder the Arduino Nano on the bottom side of the PCB. Check the orientation. The text on the PCB and the Arduino must be in the same direction and the USB connector must be on the left side - see the pictures.
- Lead the connecting cable for the battery through the 2 holes for strain relief and solder it to the "9V" pads on the PCB: red cable to "+", black cable to "-".
- Finally fix the battery with the cable ties on the bottom side of the PCB behind the LEDs. Don't forget to put some fitting cardboard between the PCB and the battery to prevent shortages. Alternatively you can try to use a 3xAA battery holder as shown in the pictures.
- Use a suitable cord to carry it around and pass it through the holes provided on the board before you knot it.
Here a small video on how the distance warning tool is working:
The futureNo project is ever finished. I am constantly thinking of new improvements that may be taken into account in future variants, e.g.
- Increase PCB size
- Add a better battery holder (on larger PCB)
- migrate to a housing version to be a little bit more water proof
- make distance intervals configurable via a dip-switch or similar
- ...
Your comments are welcome.
Disclaimer of liability
It is not a medical device. Everyone who replicates this tool is responsible for its implementation and use.
I take no responsibility for the consequences of the application. In particular, of course, this alone is not a full protection against infectious diseases.


Comments
Please log in or sign up to comment.