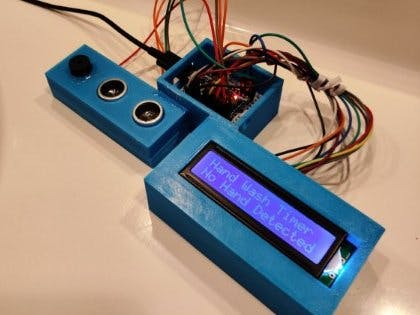
I created this project just to make sure that my family was protected and that they were washing their hands for the proper amount of time. It uses an ultrasonic sensor to detect a hand, and a 16x2 lcd to display the time left. The entire project is based around an arduino pro micro.
How does it work?This project uses an HC-SR04 ultrasonic sensor to detect a person's hand. The sensor works by sending out sound waves at 40kHz, and waiting to see if any sound waves bounce back. If any sound waves do bounce back, the sensor then sends a signal to the Arduino (see graphic below).
The Arduino takes the input from the ultrasonic sensor and then calculates how far away an object is. If an object is within 35 centimeters, the Arduino then sets the LCD's backlight pin (which is usually just connected to the 5v line) to high, so the backlight turns on (see video below).
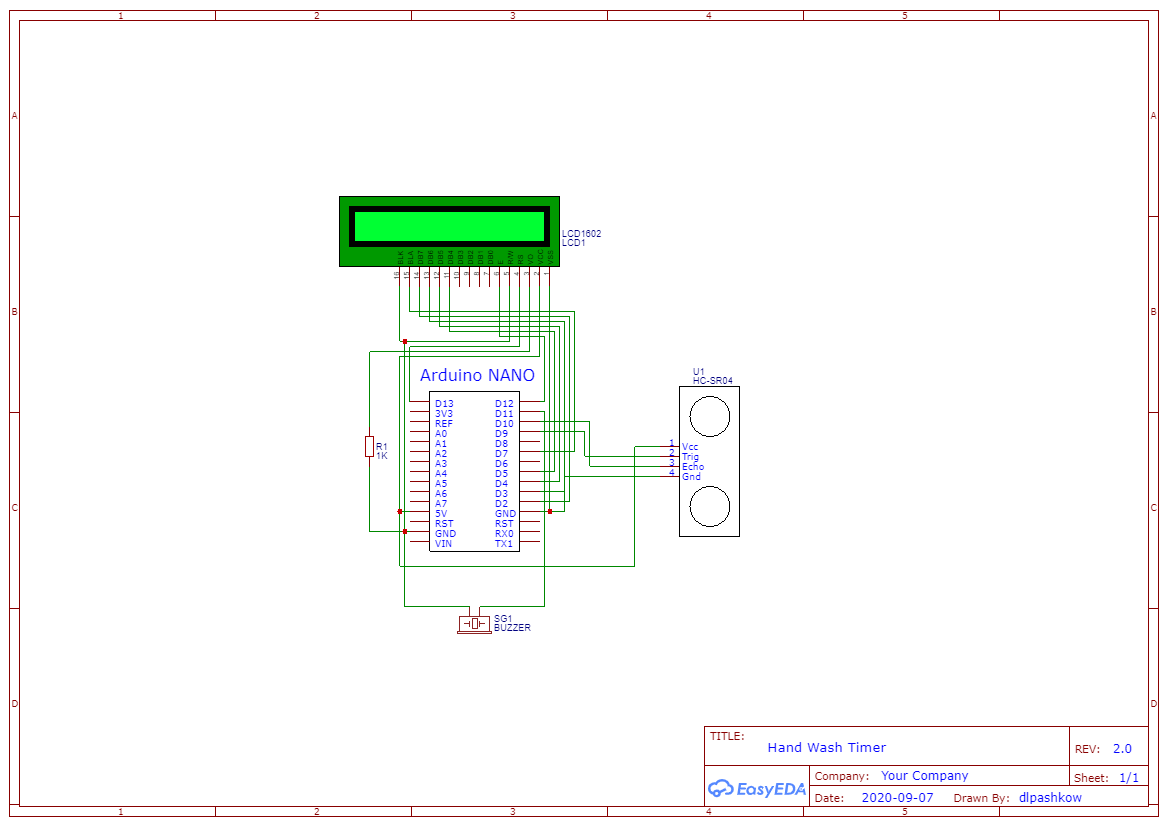
How does it go together?See schematic for a more detailed view.
Ultrasonic Sensor Pinout:
Vcc: 5V
Trig: Pin D9
Echo: Pin D10
Gnd: Gnd
LCD Pinout:
VSS: Gnd
VDD: 5V
VO: Gnd with 1k resistor (you should really use a potentiometer here to dial in the contrast better, this resistor is here just for the sake of being more compact)
RS: Pin D13
RW: Gnd
E: Pin D12
(Skip D0-D3)
D4: Pin D5
D5: Pin D4
D6: Pin D3
D7: Pin D2
A: Pin D7 (for backlight power on and off)
K: Gnd
How the code worksThis includes all of the libraries needed
#include <LiquidCrystal.h>
#include "pitches.h"
This sets up all of the variables and tone arrays
#define screenPower 7 //define screen power pin (to automatically turn lcd backlight on and off)
// defines HC-SR04 pin numbers
const int trigPin = 9;
const int echoPin = 10;
//variables for HC-SR04
long duration;
int distance;
// Create an LCD object. Parameters: (RS, E, D4, D5, D6, D7):
LiquidCrystal lcd = LiquidCrystal(13, 12, 5, 4, 3, 2);
int timeLeft = 20; //variable for displaying time left
int speakerPin = 11;
int toneDuration = 100;
int tickDuration = 25;
//array of notes for done tone
int doneTone[] = {
 NOTE_C4, NOTE_D4, NOTE_E4, NOTE_F4, NOTE_G4, NOTE_A4, NOTE_B4, NOTE_C5
};
//note of the ticking sound
int tick[] = {
 NOTE_C5
};
This sets up the LCD and starts the ultrasonic sensor
void setup() {
 pinMode(trigPin, OUTPUT); // Sets the trigPin as an Output
 pinMode(echoPin, INPUT); // Sets the echoPin as an Input
 Serial.begin(9600); // Starts the serial communication
 //Setup LCD rows and columns:
 pinMode(screenPower, OUTPUT);
 digitalWrite(screenPower, HIGH);
 delay(200);
 lcd.begin(16, 2);
 lcd.setCursor(0, 0);
 lcd.print("Hand Wash Timer");
 lcd.setCursor(0, 1);
 lcd.print("By:Danny Pashkow");
 delay(3000);
 lcd.clear();
 lcd.setCursor(0, 0);
 digitalWrite(screenPower, LOW);
}
This is what loops around every second to check for an object
void loop() {
 // Clears the trigPin
 digitalWrite(trigPin, LOW);
 delayMicroseconds(2);
 // Sets the trigPin on HIGH state for 10 micro seconds
 digitalWrite(trigPin, HIGH);
 delayMicroseconds(10);
 digitalWrite(trigPin, LOW);
 // Reads the echoPin, returns the sound wave travel time in microseconds
 duration = pulseIn(echoPin, HIGH);
 // Calculating the distance
 distance = duration * 0.034 / 2;
 // Prints the distance on the Serial Monitor
 Serial.print("Distance: ");
 Serial.println(distance);
 if (distance < 10) {
   Serial.println("Hand detected");
   isHand = true;
 }
 if (isHand == true) {
   handDetected();
 }
 if (timeLeft < 0) {
   noTimeLeft();
 }
}
This code runs when the 20 seconds are up
void noTimeLeft() {
 lcd.clear();
 lcd.setCursor(6, 0);
 lcd.print("Done!");
 for (int thisNote = 0; thisNote < 8; thisNote++) {
   tone(11, doneTone[thisNote], toneDuration);
   delay(100);
 }
 delay(5000);
 lcd.clear();
 digitalWrite(screenPower, LOW);
 timeLeft = 20;
 isHand = false;
 lcd.setCursor(0, 0);
}
And this code runs when the ultrasonic sensor detects an object
void handDetected() {
 digitalWrite(screenPower, HIGH);
 lcd.clear();
 lcd.setCursor(0, 0);
 lcd.print("Time Remaining: ");
 lcd.setCursor(0, 1);
 lcd.print(timeLeft);
 lcd.print(" seconds");
 timeLeft -= 1;
 for (int thisTick = 0; thisTick < 3; thisTick++) {
   tone(speakerPin, tick[thisTick], tickDuration);
 }
 delay(1000);
}
To fully finish this project and to help just a bit with water resistance, a 3d printer (or order from a website like Protolabs). Even though the casing helps a bit with the water issue, great care should be taken to not get water on the electronics next to the sink. This is an issue that can't really be taken care of unless there would be a watertight version (which would require a pcb, soldering skills, and a watertight case), so just be careful with it.
STL files:
https://www.thingiverse.com/thing:4365811
These files will also be included at the top of the project.
PriceThe final price for this build (not including jumper wires and 3d printer and filament price) comes to around $30 USD.
Final Video!***UPDATE***I switched from an Arduino Pro Micro to an Arduino Nano because the Nano is much more popular, and more people should have one instead of a Pro Micro. That messed up all of the wiring and therefore the code, so I have updated the code and schematic above for the Nano. If you're still using the Pro Micro, here's a guide.


_3u05Tpwasz.png?auto=compress%2Cformat&w=40&h=40&fit=fillmax&bg=fff&dpr=2)
Comments
Please log in or sign up to comment.