


Hardware components | ||||||
_ztBMuBhMHo.jpg?auto=compress%2Cformat&w=48&h=48&fit=fill&bg=ffffff) |
| × | 1 | |||
| × | 1 | ||||
 |
| × | 1 | |||
| × | 1 | ||||
| × | 1 | ||||
| × | 4 | ||||
| × | 4 | ||||
 |
| × | 8 | |||
 |
| × | 2 | |||
 |
| × | 8 | |||
| × | 1 | ||||
| × | 1 | ||||
| × | 1 | ||||
Software apps and online services | ||||||
 |
| |||||
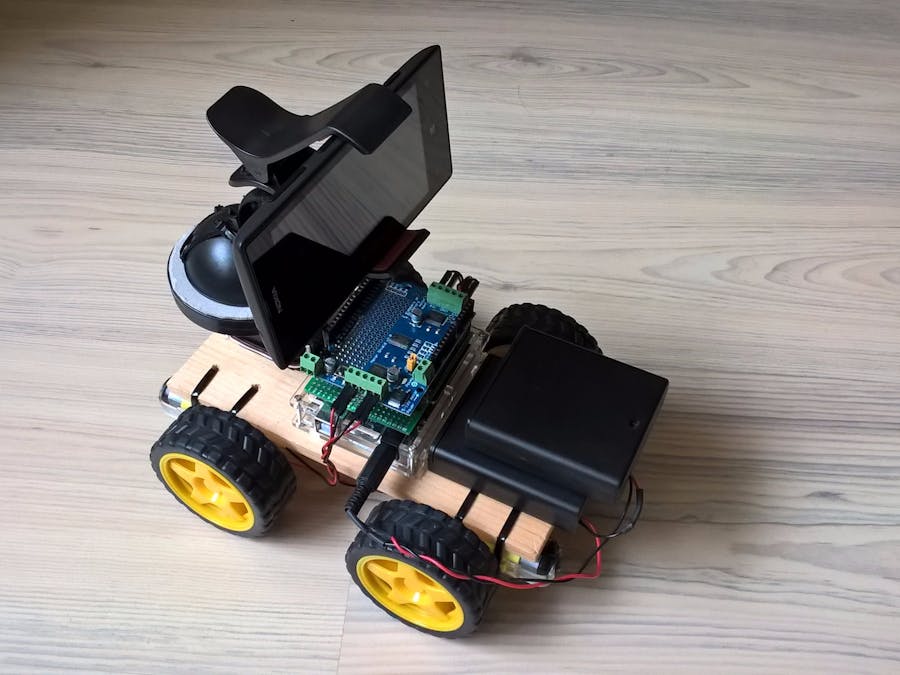
This is a simple four wheeled car which is controllable via bluetooth connection. The car can hold any mobile phone which can be used as an IP camera. I decided to make this robot with javascript using a node web server where I can monitor where the robot goes.
You can see the circuit of the main parts in figure 1.
After running the server I get a screen which contains some introduction about controlling and a window for camera view (figure 2).
And yes, this layout is responsive.
The chassisIn this version of the bot I decided to make the chassis on my own. If you do not have a drilling machine or just want an easier solution you can buy from a wide variety of plastic car bodies.
I went the way to make my own chassis and it was not as easy at seems like. The most important rule is that you have to put the tires as close as possible to each other if you would like to choose differential steering for turning around. You can read the main mistakes and basic physics rules in the following link:
http://www.rakeshmondal.info/4-Wheel-Drive-Robot-Design
Another challenge was how to attach the DC motors to the chassis. In my case I haven't got any special part for this so I decided to choose some cable ties (150/3,5) for the task. For proper attaching of the tires I had to drill the holes as precise as possible and use 2 cable ties for one DC motor. Unfortunately there is a chance that the motors won't fit as straight as enough and your car may move a bit to the left or the right when you control forward and backward.
The batteriesFor powering the boards and the motors I decided to choose a single DC power supply for the task. The chassis haven't got any space for an 8 x AA battery holder so I had to make some customization so attached two 4 x AA holders with 2 screws to each other. For this I had to drill the plastic as well.
PoweringIn my case I power the Arduino Uno board with 8 x AA rechargable batteries. This is enough power to serve the motor shield as well. There is a jumper on this shield which is removable so your motor shield won't get any power from the Arduino. In this case you can power your shield separately using the power pins on it. You can read about different powering options in the following link:
https://learn.adafruit.com/adafruit-motor-shield-v2-for-arduino/powering-motors
Wireless connectionI used an HC-06 bluetooth module to establish connection between the car and my computer. I wanted to use as less cables as possible so I decided to build a custom Arduino shield by putting the bluetooth module to and empty prototype shield, do the wiring under the shield and solder some pin headers for the correct attaching mechanism. You can have a quick view of the result in figure 3 and figure 4.
The good thing is that you have the ability to undock the bluetooth module from the shield anytime because it is not soldered to the board.
For setup the bluetooth module, please follow the instructions from this site:
MovementThe robot is able to move forward, backward and turning using differential steering. The camera holder is attached to a continuous rotation servo so you can look around with the phone without moving the car itself. You can view a short demonstration in the following video.
Mobile phoneI used a Nokia Lumia 520 for the project and Win IP Camera application which you can find in the store:
https://www.microsoft.com/en-us/store/p/win-ip-camera/9nblgggz4xb1
About the codeAs a javascript developer I decided to create a node web server for the control page and use some fancy libraries for the look and feel and code syntax enhancement. You can see the full list on my github page and the next section.
I decided to choose modularization both in the frontend and backend. Here is the entry point of the application:
var boardModule = require('./src/boardModule'),
    servoModule = require('./src/servoModule'),
    motorModule = require('./src/motorModule');

boardModule.initBoard().then(function() {
    motorModule.initMotors();
    servoModule.initServo();
});
In the front end side I also use separation for each module:
import {moveWheels, stopWheels} from './wheelsControl';
import {moveServo, stopServo} from './servoControl';

document.onkeydown = checkKeyDown;
document.onkeyup = checkKeyUp;

function checkKeyDown(e) {
    moveWheels(e.keyCode);
    moveServo(e.keyCode);
}

function checkKeyUp(e) {
    stopWheels(e.keyCode);
    stopServo(e.keyCode);
}
For the full codebase check my github repository above.
Sortware libraries- express.js - to enhance our Nodejs application
- johnny-five - for using Arduino Javascript controlling API
- socket.io- for using web sockets to establish communication between back-end and front-end
- susy - for creating the layout and responsive design
- google material design - for using material elements
- gulpJS - for task automatization
- BabelJS - for transpiling EcmaScript 6
- Browserify - for module supports
I am a beginner of this IoT world and this is my first project. I do not want to tell that I used optimal solutions but hopefully you can find some useful information from this guide.


Comments
Please log in or sign up to comment.