This is the second in a series of instructions on building LED cubes with the MEGA. The overall purpose is to build cubes without a lot of external hardware. They're typically hard to build because they require lots of shift registers, numerous ICs mounted on a PC board. Why do I want to avoid shift registers? Because they are absolutely horrible to hand wire. (I've tried it.) You really need to design and fabricate a PC board if you want to use them.
The first of these projects was a 5x5xx5 blue LED cube (single color). It is discussed in detail here. It was extremely easy to build, since the only external hardware to our Arduino Mega was 5 transistors and a bunch of resistors. I realized that with just 10 more transistors and 10 more digital pins, we could use the same design to build an RGB cube. That is this project.
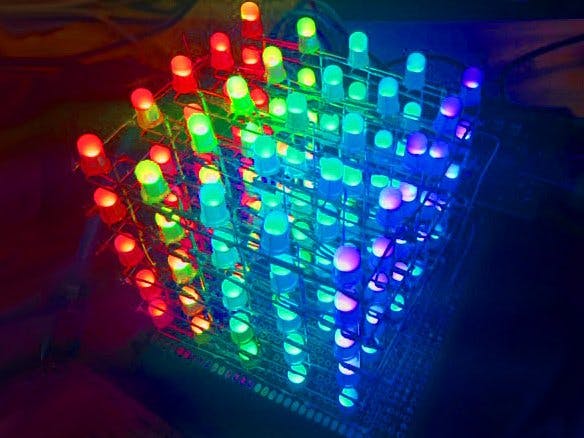
This is an RGB cube. RGB cubes are built using 4 lead RGB LEDs. They are harder to build and harder to program, but with the use of a coding scheme called bit-angle modulation, we can create a whole spectrum of colors and create a variety of animations and effects not possible with a single color cube.
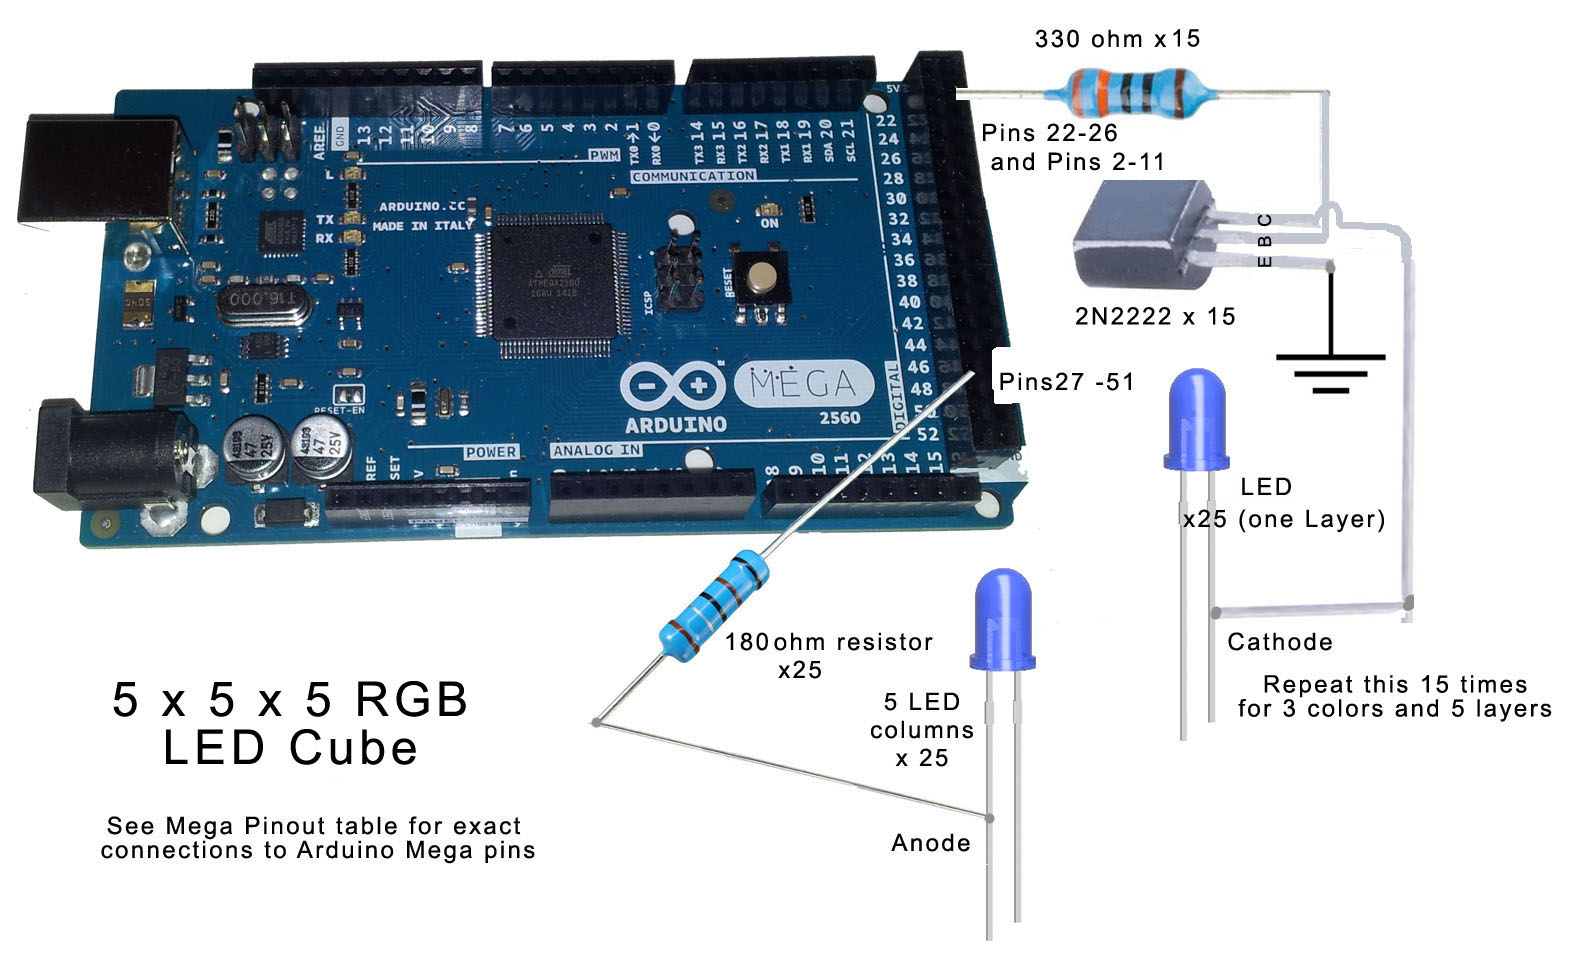
RGB cubes are typically very hard to build, requiring lots of external shift registers, high side drivers, etc. But this design can be powered directly from the Mega with minimum external hardware. We would normally build a common anode RGB cube by bringing all the cathodes down to the main board and just collecting common anodes by layer at the side of the cube. But that would result in 80 digital pins being required, So instead, in this design, we bring 25 anodes down to the main boards and collect 3 different sets of cathodes at the sides of the cube. The result is a 40 digital pin requirement - something the Mega can easily handle.
This all sounds great, and in fact I successfully built the cube described. The one caveat here though is that this is not an easy cube to physically build. I have labelled this project "Advanced" for only that reason. The hardware other than the cube itself is very simple - an easy project. But RGB cubes are notoriously hard to build and this one is a little harder than normal, because we are bring cathodes out on 3 different sides of the cube.
In order to keep this story relatively brief, I am breaking it up into three parts. In this part, I will provide an overview of both hardware and software. In separate PDF files I will give you details on 1) cube construction, and 2) a deep dive into the inner working of color cube software which is quite a bit different than single color cube software. The PDF file detailing cube construction can be downloaded in the Hardware CAD section of this project (a place I can upload PDF files). The PDF file explaining RGB cube software is included in the code files.
As I have already said, the design of this cube is identical to my single color cube except for the addition of 10 more cathode drivers. In fact, all my single color cube software runs without any modification on this cube. The green cathodes on this cube are connected to the cathodes pins of the single color cube, so everything in the single color software simple shows In green.
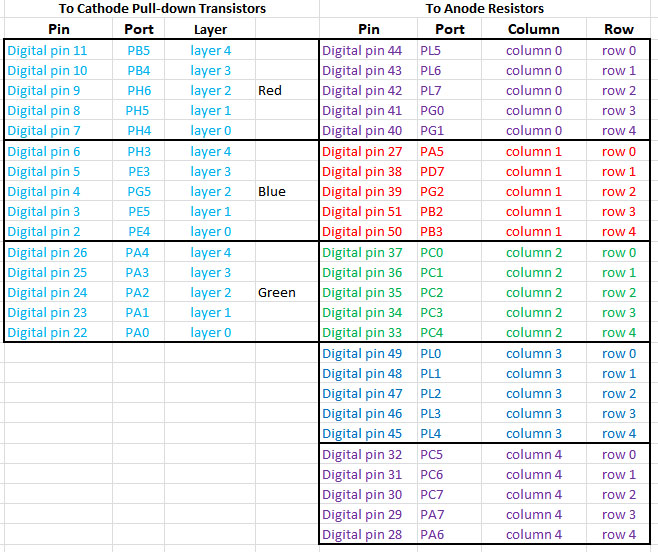
So the pin-out table above is identical to the single color cube except that we have added pins 2-6 to handle the blue cathodes and pins 7-11 to handle the red cathodes. Each cathode pin pulls 25 cathodes to ground at a time, so these cathode pins drive an NPN transistor base high, and the transistor then pulls the 25 cathodes to ground. I won't go through it all again here, but if you want more detail on current loads, voltage drops, etc. I have discussed all this in detail in the single color cube project. Everything there is true for this cube as well.
A discussion of software starts with the timed interrupt that refreshes the cube. I will discuss it in detail in the PDF file, but the short version is that we are using 3 bit BAM (bit angle modulation) to control the color intensity of each color in each LED. The LEDs are either on or off, but we vary the amount of time they are on, and our eyes perceive short times as dim and longer times as bright. So by varying the time each color is on, we can generate a whole spectrum of colors.
Once we have a refresh routine, everything else is pretty simple. I have a color management system that allows you to specify a specific color either by name (Red, Aqua, White, etc) or as a rainbow pallete consisting of 42 colors. Other support software gets us to where we can set the color of a specific LED by simply entering the code: LED(x, y, z, color);
As with the single color cube, I am including both cube test program that can be used to diagnose hardware problems and a complete show that I hope makes this cube worth building. The show in the video above includes 16 different animations and takes about 5 minutes to watch. A current BigShow has an additional eight animations and lasts for 8 minutes before repeating. If you are interested in creating your own cube software, you can take my CubeTest program, delete the content in the main loop, and created something of your own. It contain all the refresh, color management, and support routines to make creating your own animation relatively easy!


_wzec989qrF.jpg?auto=compress%2Cformat&w=48&h=48&fit=fill&bg=ffffff)


Comments
Please log in or sign up to comment.