


Hardware components | ||||||
| × | 45 | ||||
| × | 1 | ||||
_ztBMuBhMHo.jpg?auto=compress%2Cformat&w=48&h=48&fit=fill&bg=ffffff) |
| × | 1 | |||
| × | 1 | ||||
Hand tools and fabrication machines | ||||||
 |
| |||||
 |
| |||||
| ||||||
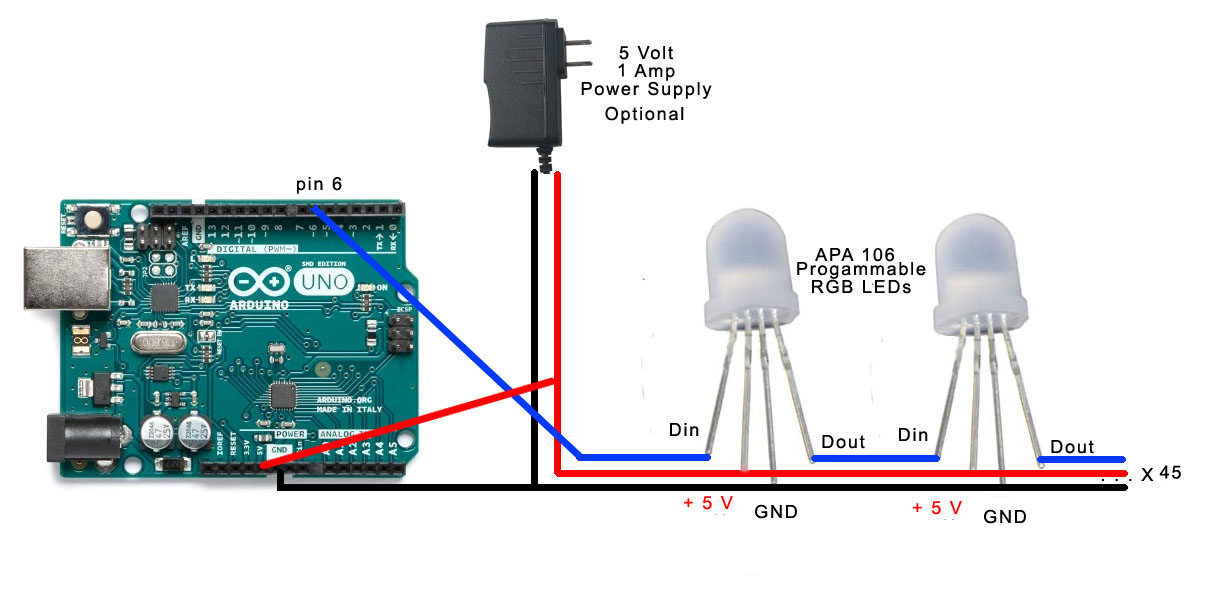
This project uses 45 APA-106 programmable LEDs controlled by an Arduino UNO. These LEDs are similar to individually programmable LED strips, so we are using Adafruit's Neo-pixel library to control them. A single pin on the UNO programs the entire display, as a single data line runs to all LEDs in a chain.
The inspiration for this design was two of my earlier projects. My second 5x5x5 RGB cube (Another 5x5x5 RGB Cube) used APA-106 programmable LEDs and I was left with about 75 extras. I could have built a 4x4x4 cube out of them, but I have built a lot of cubes recently - time for something else. My Servo Motor Art project was built as a triangle and that triangle design created many interesting patterns. So this project uses 45 APA-106 LEDs arranged in a triangle pattern to further explore triangle art.
This is a fairly easy project both from a hardware and software perspective. Let's look first at hardware and then the software.
HardwareHardware consists only of the UNO and 45 LEDs. These LEDs are insanely bright at full power, so I have the brightness of the whole display set at 30 on a 0 to 255 scale. At that level, the UNO and all LEDs can be powered directly from the UNO's USB input, so a 1 amp - 5 volt power supply is optional.
The first step in construction is getting holes drilled in a piece of 1/4 inch plywood. The board itself is 12 inches on each edge. The LEDs are spaced 1 inch apart in a carefully constructed equilateral triangle. The LEDs are 8mm, so I drilled 8 mm holes that gave the LEDs a tight fit - they didn't move at all once they were pressed in.
Above on the left is the APA-106 LED. The long lead is ground. Data out is the lead on the right next to the flat edge of the package. The first lead on the left is data in, and the next lead between data in and ground is +5V. These 4 leads are bend as shown on the right. The ground lead has a second bend at the end - its purpose is only to identify the ground lead, as it is difficult to see it once they are all bent.
The image above shows how the board is wired. First notice that the data line in blue moves back in forth as the LEDs are chained together. This means that in odd rows data flows from left to right, while in even rows, data flows from right to left. This also causes the power rails to be different for odd rows versus even rows. For odd rows, the ground lead goes up and the +5v lead goes down, then the opposite for even rows.
The photo above shows the wiring. It is all done with 22 gauge bare tinned copper wire. I collected the ground rails on the left and the +5V rails on the right. You should do just the opposite. Every data line connection on my board had to go over a power rail, but if you switch ground to the right and +5v to the left, the data lines won't have to cross anything!
Above is a close up view of the wiring. Notice how the data line on the right crosses over the top of the 5 volt power rail.
The photo above shows the finished board. I used some small pieces of plastic as standoffs for the UNO and mounted the UNO on the board with a little hot glue.
The photo above shows the triangle in a case. This one is a 3D print from the .stl file included here. You could also build one easily enough from plywood.
SoftwareSoftware is pretty straight forward thanks the Adafruit's neo-pixel library. It gives us setPixelColor(# in the chain, color) to define the color of any one LED and show() which updates the entire display to the latest changes. The library uses an unsigned 32 bit number to represent the color of an LED, storing 8 bits each for the intensity of red, green and blue. I used this scheme directly for brightening and dimming of the primary colors, but for everything else, I used my own simple color management scheme, borrowed from my LED cubes. It's a simple scheme where numbers 1 though 42 represent a rainbow color palette, adding 0 for Black (all off) and 43 for White (all on).
You may have noticed in the wiring diagram above that the LEDs were numbering starting with 0 at the top and numbers going left to right by row. This is the numbering system I used to identify LEDs. It doesn't go back and forth like the data line does, so I created my own version of setPixelColor that refers to LEDs by my number assignment and allows me to specify a color using my 0 to 43 color palette.
Almost all the animations or effects you see in the video are table driven. One table tells you how to sweep from the top corner. Two other tables translate that effect to the other two corners. Another table tells you the LEDs in the outer triangle, then the middle, then the inner most triangle. All these various tables are stored in program memory rather than RAM. I was initially concerned that all these tables would take up too much valuable program space. But using this table approach proved very efficient and program space was never a problem.
The program or sketch is divided into four files or tabs in the Arduino IDE. The first is declarations, tables and the setup routine. The second is the main loop which simply calls out a list of the various animations. The third is the animations themselves. The forth is the general purpose functions or subroutines that support all the animations.
In the video above you see the original show with 15 animations. It lasts about 3 minutes before repeating. Since then, however, I have expanded the show to include a number of new animations you can see in the video below.
All the animations in the video above are all done with calls to a single subroutine called rotation(). The triangle is made up of an outer triangle of 24 LEDs, and middle triangle of 15 LEDs and and inner triangle of 6 LEDs. The common denominator of these three numbers is 120. So in 120 steps we can rotate the content of the entire triangle 360 degrees. That is what the rotate() routine does. Change the starting patterns, change the direction of rotation, change the speed of rotation, and you get all the effects you see in the video above.
The show in the download now includes the original show, as well as all the animations above, producing a show with 26 animations that lasts 5 minutes before repeating.


Comments
Please log in or sign up to comment.