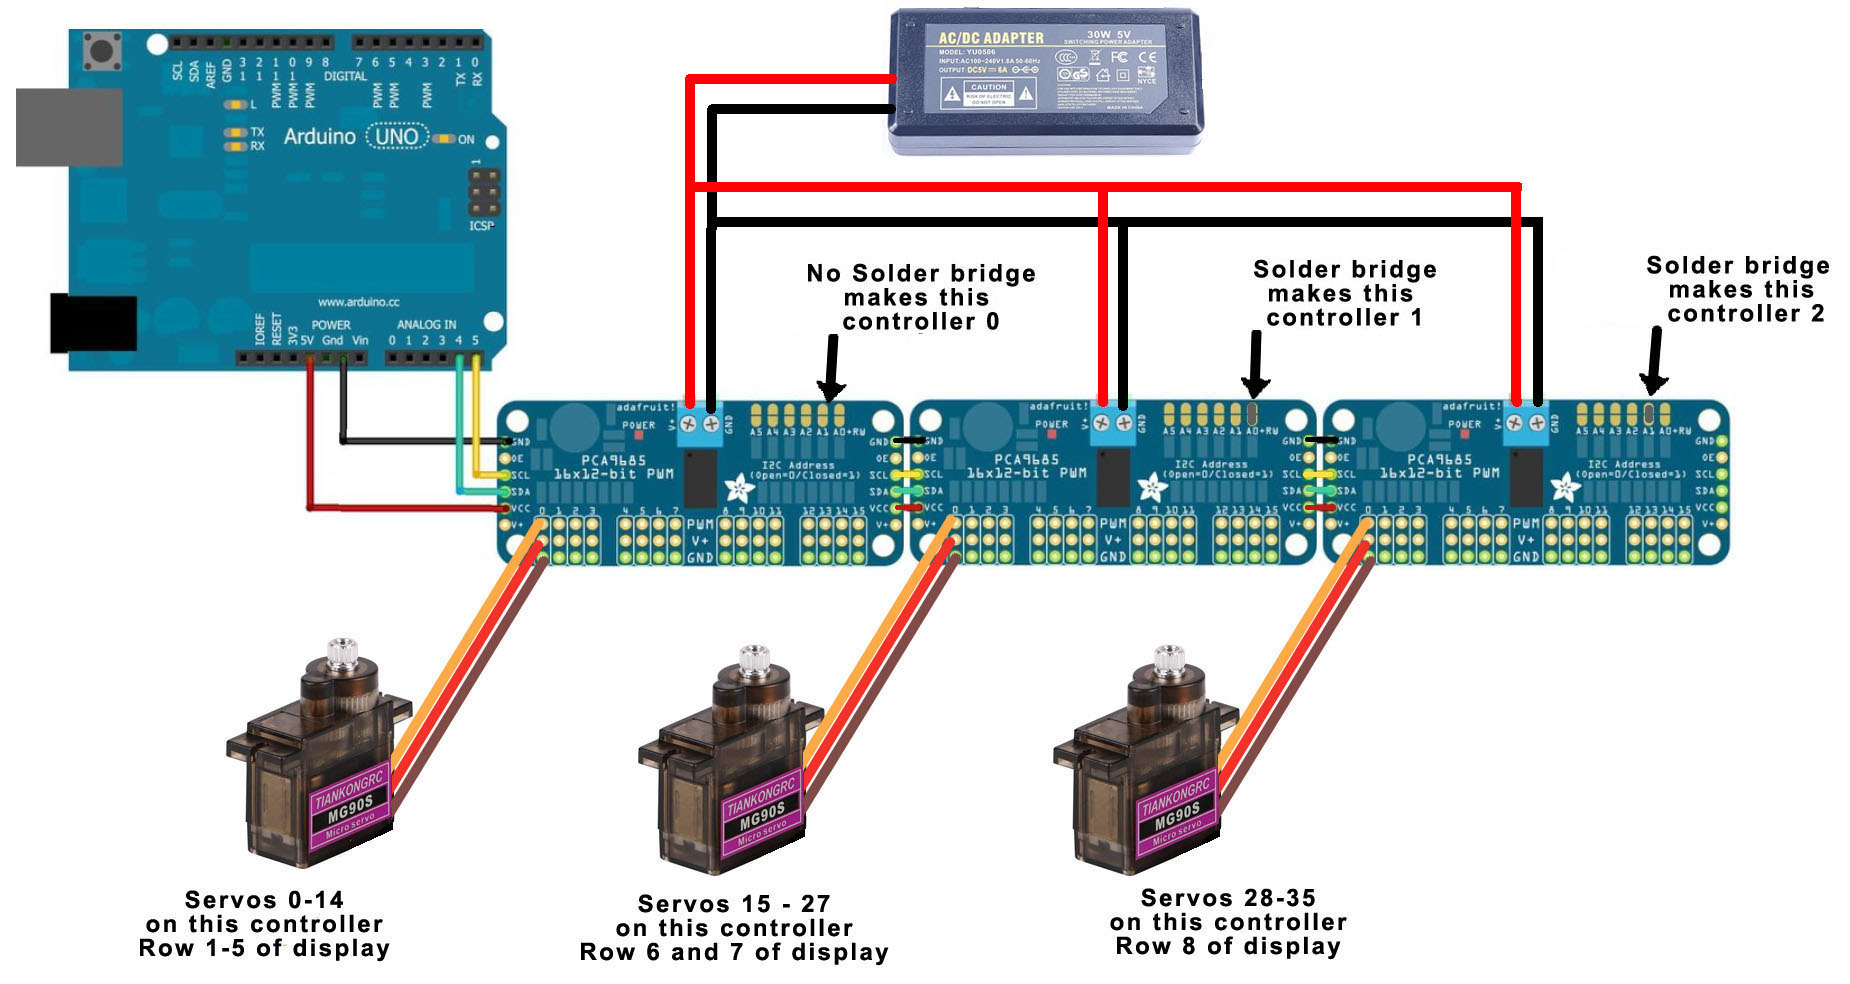
The video below shows the action as 36 servo motors create an electronic work of art. An Arduino Uno and three 16-channel PWM servo controllers are working behind the scenes. The original inspiration for this was a much larger version with 450 servos I saw at a modern art museum. But even this small version with only 36 servos provides some interesting effects.
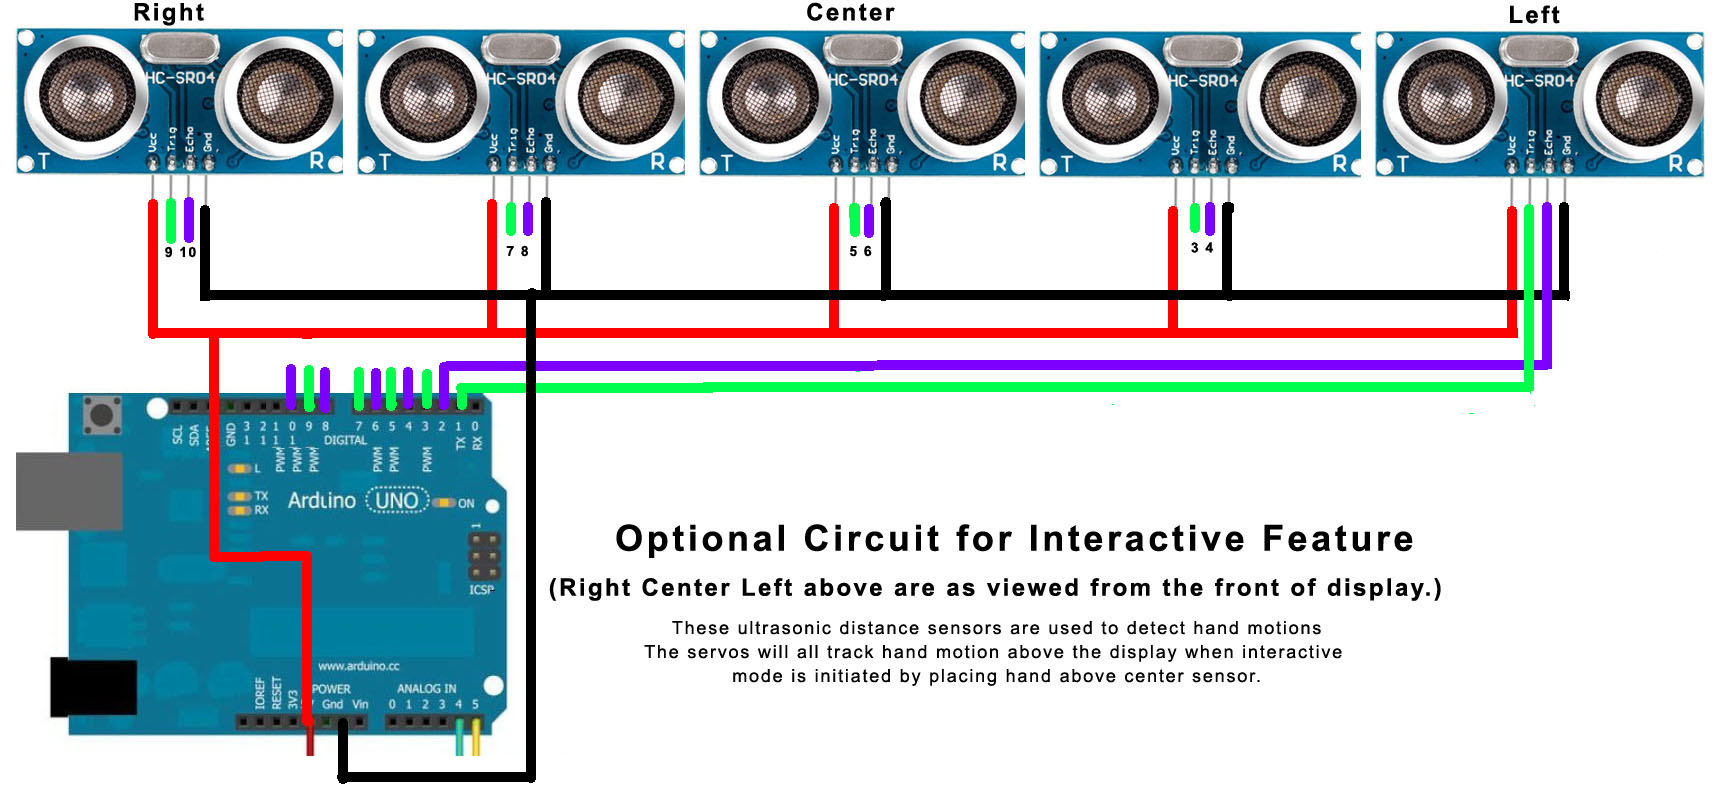
There is an optional feature that I haven't shown in the video, but it can be added to make the display interactive. It is purely optional, and the software will work fine without it. For this option five ultrasonic distance sensors are mounted along the backside of the upper edge to the display. When you put your hand above the center sensor, the Uno goes into interactive mode, and all the servos attempt to follow your hand as you move it around above the distance sensors. When you remove your hand for a few seconds, the program returns to its display show. Again, you can add this option if you wish. If you don't, the software will work just fine without it.
HardwareAs you can see, this project was built on a 24" by 48 " piece of peg board. The width was cut down to 32 inches. Servos are mounted 4 inches apart, and secured to the back of the peg board with hot glue. Popsicle sticks, cut down to 3 1/4 inches are mounted to the shafts of the servos, again using hot glue.
The SG90 servo motors are the only costly item in this project. You can get a set of 8 for $20 on Amazon. Even so, you need to invest $100 in servos. SG90s are suppose to all be 180º servos, but most don't quite make it. A few fall way short and should be discarded. If you buy 5 sets of 8, you should be able to find 36 goods ones that travel at least 160º.
The servos need to be set to their minimum position (position at PWM 150), and the popsicle sticks mounted pointing horizontal and to the right in this minimum position, as viewed from the the front. I have provided a small program you can use to insure the servos are in this minimum position : SetServosToMinimum.
The photo above shows the back side layout. The three PWM controllers are mounted on the left side of the servos. The 30 watt 5 volt supply is on the far right. The Arduino is powered separately through a USB power adapter. I do it that way only so that I can unplug the USB cable and, through a USB extension cable, plug it into my computer for program changes. It looks a little weird, but I find it convenient.
You can also see the optional ultrasound distance sensors mounted along the top of the display. Hot glue and extra popsicle sticks were employed to mount them. The small prototyping board you see below the Uno is there simply to facilitate getting power and ground to all the ultrasound sensors.
SoftwareI'm using Adafruit's PWM Servo Driver library to handle the 16 channel servo controllers, so you will need to get that from Adafruit and install in the Arduino libraries.. My software can be used as is with or without the optional ultrasonic sensors. It presents a variety of effects in a show that lasts a little over three minutes before repeating. If the optional sensors are installed, it will enter interactive mode whenever a hand is placed of the center sensor.
There is a lot of stuff in the software. I will not attempt to explain the whole thing here, but I will give you a little info about how it works. I have two tables. The curPos table stores the current position of each servo divided by three. The tarPos table stores the desired position of each servo divided by three. They are divided by 3 for two reasons. First, it allows them to be stored in a byte, and second, I am always moving the servos in increments of 3 steps.
The Uno does not initially know the positions of each servo, so the setup routine sets all of the servos to a vertical position, and sets all curPos and tarPos variables to match that vertical position. We can then move the servos from there to other positions by changing the desired positions in tarPos.
A subroutine called goToTargets() is the primary way the servos are moved. We control where the servos go by setting the targets at tarPos, Then we can control how fast they go there with the goToTargets routine. It has two ways to control the speed. It moves the servos toward their targets in 15 steps increments, where the reps input to the subroutine gives you multiples of 15 steps. The other input is mydelay, which just adds a delay in milliseconds to each call of goToTargets.
There is a lot of other stuff, but basically everything else is just various setups and implementations of the various effects presented.
The optional interactive function is handled by subroutine called trackRoutine. It is called when the goToTarget routine sees an object (your hand) somewhere over the center ultrasonic sensor. It attempts to make all the servos follow the motion of your hand as it moves over the sensors. When it hasn't sensed a hand for a few seconds it returns and the regular program resumes.


_ztBMuBhMHo.jpg?auto=compress%2Cformat&w=48&h=48&fit=fill&bg=ffffff)


Comments
Please log in or sign up to comment.