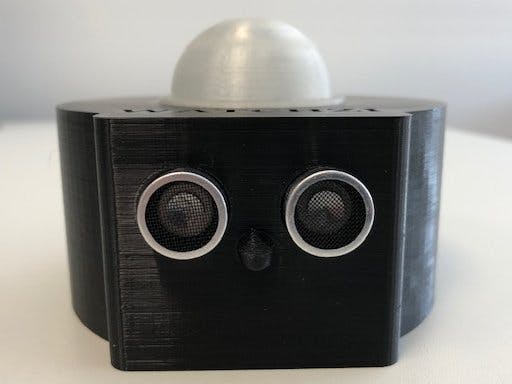
In this time with COVID-19 you see many people standing far too close to a desk, cash register or otherwise. People are not fully aware of the distance of 1, 5 meters (6 feet), for example.
I came up with the idea to make a friendly battery powered robot that can easily stand on a table desk or otherwise.
This robot measures the distance between it and the approaching person and gives a notification. The robot indicates a programmable tone and its hat lights up red. If you come at a safe distance again, the hat will turn green again.
At number 1 you can see how the compleet Watchzi must look like and how its working with 1, 5 mtr distance, futher in this document there is a video.
You can see the 3D printer drawing with his parts.
You can find the 3D STL files futher in this document, I choose for Black PLA and Natural (Had part) for the parts but you can make it in any color you like.
Components I used for Watchzi to compleet it. See list for how many you need
First print the 4 parts in the same color of whatever color you like, I used PLA. See settings in picture 5.
After print the first 4 parts, print the last had part in PLA transparant or natural. The NEOpixel has to shine through the had part because you want to see the red or green color.
Assembly after printing see pictures 7-11
Put the Heat inserts nuts M3 gently in the holes with the Solderpoint and hold them right up. Glue the Batteryholder with 3M tape or glue to the plate and turn it. The hole is for the black and red wire.
Cut 1 NEOPixel (see cutting lines) and stick it to the base, look for the right position of the Din en Dout. Dont glue the had before testing !!
Put the SR04 sensor into the holes and use a bit hot glue to stay in place. After that put the Arduino nano into the place, it will stuck with his headers. Insert the Heat nuts M3 gentle right up with a solder point in there holes.
Put the Active buzzer into the hole after remove the seal !!. The hole into the enclosure makes it to hear the sound. Insert the slide switch and hot glue into the right position. Insert 2x heat M3 on the buttom of the part, the other two you insert it before (7).
When you're finished putting the components on the right places you can wire them, dont use to long wires because you will not able to assembly watchzi at the end because the wires will stuck.
When your finished wiring you program the file into the Arduino nano and test if the watchzi is working well. You can adjust the settings ( look the comments in the INO file). After testing you use 8 Screws M3x8 to assembly the parts. At last you may glue the had on the right place and you have a nice own made friendly social distance robot watchzi.
You can play with the sound or color, even you can use ever color you like and sound, be creative
Enjoy this project and leave any comment or question


_t9PF3orMPd.png?auto=compress%2Cformat&w=40&h=40&fit=fillmax&bg=fff&dpr=2)


Comments
Please log in or sign up to comment.