


Hardware components | ||||||
 |
| × | 1 | |||
 |
| × | 1 | |||
Software apps and online services | ||||||
| ||||||
Hand tools and fabrication machines | ||||||
 |
| |||||
I've been playing guitar and bass for some years and really wanted to try out some cool effects: wah, volume, pitch. The most straightforward option would be to buy Guitar Rig processor, which takes a lot of space, hard to find and relatively expensive. So why not building what I need myself? A good opportunity to blow off dust from my 3D printer and ESP8266 leftovers from other projects.
How it works- Turn on the power switch
- Pedal controller will use hardcoded Wi-Fi password to connect to your network
- PC will initialize virtual MIDI connection with rtpMIDI driver (if your controller IP is the same, otherwise need a few clicks to reconfigure)
- Start Guitar Rig, right-click on an effect-control and select "Learn MIDI control" while rocking your pedal
- Rock out!
I used this 3D-print project as a baseline. It is designed to be used with encoder and gears. I don't like gears in 3D prints, so I cut off all internals, added some space for battery and electronics, added external sensor mount and bearing slots. I used bearings along with metal axle to avoid wear which would affect sensor calibration with time. Not everything went perfect and I had to replace sensor mount with metal one. I hope I'll fix it in further revisions.
I used an old gearbox sensor from my Alfa Romeo, which basically just a potentiometer with a spring inside. You can use any "throttle position sensor" + its connector, here's 15$ example: METZGER 0904020. Now the tricky part is, you will need to glue your axle in a certain position in order to have your pedal moving in acceptable range of the sensor readings. Also axle must have slotted tip to engage with the sensor.
Power supplyI used an old unused phone battery and it works pretty well. It's wired with a power switch and power-control board which is just a "DIY power-bank module" that provides USB slots and has a charging controller. I soldered wires directly to the battery pins for reliability. The white thingie is a "lock" to hold the battery in place. The USB power cable connects to the controller USB port.
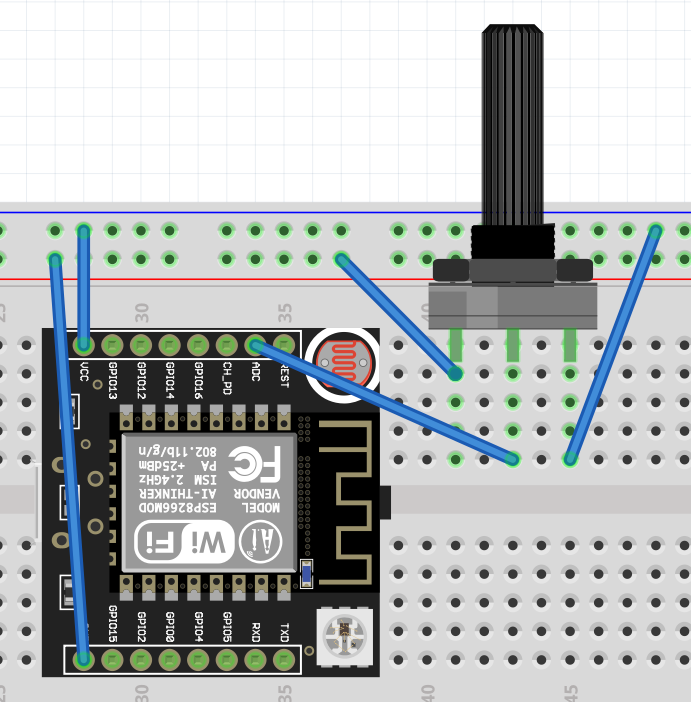
Wemos ESP8266 board fits well in this tight space. It has a shield with terminals for the sensor connection. And unfortunately, in this revision, I had to use a zip tie to keep it in place. Sensor occupies the only analog input, 3v power output, and Ground.
I used this sketch as a baseline, which depends on Arduino-AppleMIDI-Library. It should be paired with rtpMIDI driver installed on PC, which translates commands passed over network to MIDI commands, which should be compatible with any audio-software. You'll have to hardcode your Wi-Fi password and Hotspot ID, so be careful pushing it to public repositories. And most importantly, you'll have to manually calibrate your sensor after the pedal is assembled by changing some constants. Let's assume your sensor returns value X when pedal is released and Y when pedal is pressed. By changing stretchConstant, and shiftConstant you need to adjust X to be -10 and Y to be 137. It will ensure that ON and OFF states are consistent even though sensor values are not precise.
    byte note = 45;
    byte velocity = 55;
    byte channel = 1;
    byte sensorValue = analogRead(SENSOR_PIN);
    int maxNoteValue = 127;
    int stretchConstant = 1.5;
    int shiftConstant = 60;
    int output = maxNoteValue - (sensorValue * 1.5 - shiftConstant);
    if (output < 1){
      output = 0;
    } else if (output > maxNoteValue) {
      output = maxNoteValue;
    }
AppleMIDI.controlChange(note, output, channel);- If you take your foot off, the pedal will move to the OFF position because of the spring in the sensor
- Sometimes you have to reconfig rtpMIDI because the pedal changes its IP
- You have to hardcode WI-FI credentials and adjust the sensor manually by reflashing the controller
P.S: the project is far from perfect and I'm thinking about version 2.0 that is going to have: sick look and cable management, switches, indicators, (you name it).
P.P.S: there's a similar OS project that works with external analog expression pedals, check it out: https://github.com/alf45tar/PedalinoMini


Comments
Please log in or sign up to comment.