


Software apps and online services | ||||||
 |
| |||||
| ||||||
This is an example project for the Dronesmith API from Dronesmith Technologies. The Dronesmith API is an HTTP requests based API that enables software first drone development. You can test your code on virtual drones that are built into the API and then deploy the same code on a real drone. This project uses a virtual drone to accomplish a task in a made up scenario.
This project requires some basic experience with Python and HTML/CSS.
Before you begin we recommend you check out our Dronesmith API tutorials.
The ScenarioA deranged physics professor at Zurich University has been performing experiments in various buildings on the North side of the campus. Last night one of his experiments with radioactive materials went terribly wrong and the campus has become radioactive. Now it is up to you and your team to find the location of the failed experiment using a drone equipped with a radiation sensor.
The TaskBuild an app that flies a drone around the campus while measuring the radiation intensity level and identify the building that contains the radiation source.
Hint: The intensity of the radiation follows Newton's Inverse Square Law.
Before we dive into the workings of the app lets go over the Dronesmith API a bit. Commands to the drone take the form of HTTP requests. For example, to retrieve the position of the drone you would send a request to the URL http://api.dronesmith.io/api/drone/{drone-name}/position. Below is an example of this API call using the Python module Requests.
import json
import requests
USER_EMAIL      = 'example@example.com'
USER_API_KEY    = 'example-api-key'
DRONE_NAME      = 'prickly_galileo'

headers = {
   'user-email': USER_EMAIL,
   'user-key': USER_API_KEY,
   'Content-Type': 'application/json'
}
response = requests.get('http://api.dronesmith.io/api/drone/'+ DRONE_NAME + '/position', headers=headers)
jsonText = json.loads(response.text)
print json.dumps(jsonText, indent=2, sort_keys=True)
This code sends a GET request and prints the response from the server. The server responds with the following JSON object.
{
   "X": 0.004026684,
   "Y": -0.02161496,
   "Z": -0.11607925,
   "Latitude": 47.39774,
   "Longitude": 8.545593,
   "Altitude": 0.047,
   "Heading": 3.95
}
Some requests have BODY fields such as the following takeoff command.
import json
import requests
USER_EMAIL      = 'example@example.com'
USER_API_KEY    = 'example-api-key'
DRONE_NAME      = 'prickly_galileo'

headers = {
   'user-email': USER_EMAIL,
   'user-key': USER_API_KEY,
   'Content-Type': 'application/json'
}
# Command drone to takeoff and hover 20 meters above Lat: 47.399091, Lon: 8.549200
response = requests.post('http://api.dronesmith.io/api/drone/' + DRONE_NAME + '/takeoff', json={
   "lat": 47.399091,
   "lon": 8.549200,
   "altitude": 20
}, headers=headers)
jsonText = json.loads(response.text)
print json.dumps(jsonText, indent=2, sort_keys=True)
The response to this takeoff request is the following confirmation.
{
   "Command": 22,
   "Status": "Command accepted.",
   "StatusCode": 0
}
See our API Reference for more examples.
Using Python or any scripting language can be a bit of a hassle for single API requests. We highly recommend the Postman API tool for testing Dronesmith API requests.
PrerequisitesTo complete this project you need a Dronesmith API key. Go to api.dronesmith.io to request an API key. In a few minutes you will receive an email with your key.
You also need a Google Developers API key. https://developers.google.com/maps/documentation/javascript/get-api-key
Setup PythonInstalling Python: https://www.python.org/downloads/release/python-2712/
Note: Make sure you are using Python 2.7, not Python 3. Type python --version in the command line to verify your version.
If you're new to using Python, go through these two getting started exercises to set up your developer environment:
http://learnpythonthehardway.org/book/ex0.html
http://learnpythonthehardway.org/book/ex1.html
Install Python pip module:https://pip.pypa.io/en/stable/installing/
This should be included by default in latest Python version.
Install Python requests module: pip install requests
Install Python geopy module:pip install geopy
If you're on windows, you may need to run python -m pip instead of just pip.
You can download the example app from our Github.
https://github.com/dronesmith/Radiation-Detection-Example
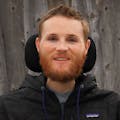
The app commands a virtual drone to fly in a path around the Zurich University campus while plotting the path on a map. It also displays the value of radiation intensity at each point along the flight path.
The app in its current form will not find the radiation source. It is up to you modify the app to suit your strategy for finding the building with the radiation source.
The app is composed of 4 files
- index.html
- server.py
- radiation_sensor.py
- user-account.json
The main workhorse of these files is server.py. In this file, a web server that operates on localhost though port 8080 is started. It serves the current position and sensor data of the drone.
The web server periodically retrieves the drone’s position and the intensity value of the drones radiation sensor by sending Dronesmith API requests. In a separate thread from the web server, the drone is instructed to fly in a scripted path around the campus by issuing Dronesmith API requests.
In index.html the position and intensity values are periodically retrieved by sending a GET request to http//:localhost:8080/data. Following each GET request, the drone marker and flight path are updated and a new circle with a radius proportional to radiation intensity is plotted at the latest position using the Google Maps API.
The file radiation_sensor.py serves as our mock radiation sensor. This file periodically gets a drones position and calculates a radiation intensity value using the latitude and longitude values. It then updates the intensity field value of the drones radiation sensor. You will need to run this code in a separate terminal before you run the server.py file.
The JSON file user-account.json is for storing Dronesmith API credentials.
Also included in the Github project is a setup script, drone_setup.py, that you can run to create a virtual drone with a radiation sensor object on your account.
Running the appFollow these steps to run the app and see it in action.
1. Download or clone the Github project.
https://github.com/dronesmith/Radiation-Detection-Example
2. Add your email and Dronesmith API key to user.json.
Leave drone_name field blank.
3. Add your Google Developers API key to index.html.
Find the script with the map.googleapis.com source in the HTML body and add your key to the key field in the URL.
<script src="https://maps.googleapis.com/maps/api/js?key=ADD-KEY-HERE&v=3.exp&libraries=visualization&callback=onGoogleReady" async defer></script>
4. Run python drone_setup.py.
This will create a new virtual drone on your account and add a radiation sensor to it.
5. Runpython radiation_sensor.py and leave it running.
6. In another terminal run python server.py.
7. Go to http://localhost:8080
You should immediately see a Google Maps view. The drone marker will show in about 10 seconds after the page loads. The marker will not move until after the drone has taken off and reached the desired altitude. You should then see the drone take a lap around the campus.
There are many different strategies you could take to locate the source of radiation. You might have a hunch about where the source is and alter the drone path to test your hypothesis or you might use a fancy triangulation algorithm. All that matters is you find the radiation source before it is too late.
Note: The actual source latitude and longitude can be found in radiation_sensor.py file when you are ready to check your solution.
Please let us know about your method of finding the radiation source.
Good luck fellow Dronesmiths!
Helpful Links


Comments
Please log in or sign up to comment.