


Hardware components | ||||||
 |
| × | 1 | |||
 |
| × | 1 | |||
Software apps and online services | ||||||
 |
| |||||
This project describes the implementation of a simple audible UV index meter using the the DFRobot Gravity:Analog UV Sensor V2
and the DFRobot UNIHIKER
For a general introduction to the idea and more details refer to the project Audible UV Meter here on Hackster.
ConnectionThe DFRobot Gravity:Analog UV Sensor V2 must be connected to the UNHIKER on P21:
# -*- coding: UTF-8 -*-
# Experiment Effect: Print the analog value of the UNIHIKER P21 pin
# Wiring: Connect a DFRobot Gravity:Analog UV Sensor V2 to the UNIHIKER P21 pin
import time
from pinpong.board import Board, Pin
from unihiker import GUIThe UV index is calculated by comparing the voltage value read from the sensor to the following mapping table for the GUVA-S12D sensor
# Function to convert sensor output voltage (mV) to UV index
# for a GUVA-S12D based analog UV sensor based on a conversion table.
# See http://www.esp32learning.com/code/esp32-and-guva-s12sd-uv-sensor-example.php
# for conversion table ...
def uv_index(mv):
    uvi_mv_thresholds = [50, 227, 318, 408, 503, 606, 696, 795, 881, 976, 1079, 1170];

    for threshold in uvi_mv_thresholds:
        if (mv < threshold ):
            break

    i = uvi_mv_thresholds.index(threshold)

    if (i < 11 ):
        uvi = mv/threshold*(i+1)
    else:
        uvi = 11

return uviThe UV level (𝑚𝑊/𝑐𝑚2𝑚𝑊/𝑐𝑚2) is calculated as follows "The output voltage is: 𝑉𝑜=4.3∗𝐷𝑖𝑜𝑑𝑒−𝐶𝑢𝑟𝑟𝑒𝑛𝑡−𝑖𝑛−𝜇𝐴𝑉𝑜=4.3∗𝐷𝑖𝑜𝑑𝑒−𝐶𝑢𝑟𝑟𝑒𝑛𝑡−𝑖𝑛−𝜇𝐴. So if the photocurrent is 1𝜇𝐴(∼9𝑚𝑊/𝑐𝑚2)1𝜇𝐴(∼9𝑚𝑊/𝑐𝑚2), the output voltage is 4.3𝑉4.3𝑉."
# Function to convert sensor output voltage (mV) to mW/m^2
# for a GUVA-S12D based analog UV sensor: "The output voltage is: Vo = 4.3 * Diode-Current-in-uA.
# So if the photocurrent is 1uA (~ 9 mW/cm^2), the output voltage is 4.3V."
def uv_level(mv):
return ( mv / 43 * 9 ) # 1 uA per 9 mW/cm^2 at 4.3Vdef uv_risk_level(uvi):
# UV risk level mapping (UV index threshold,risk level,display color)
risk_levels=[(2,"low","green"),(5,"moderate","yellow"),(7,"high","orange"),(10,"very high","red"),(11,"extreme","violet")]
for risk_level in risk_levels:
if (uvi <= risk_level[0]):
break
return risk_levelThe UV index is presented as a sequence of tones played via the internal buzzer:
One base tone C at the beginning of each sequence followed by
- a number of F tones corresponding to (rounded) UV index levels 1 - 5 or
- a number of A tones corresponding to (rounded) UV index levels 6 - 10 minus 5, following a sequence of five F tones or
- a sequence of five F tone followed by five A tone and one C tone (next octave) for (rounded) UV index levels 11+. For example, if the UV index is 4 the tone sequence is C,F,F,F,F and if the UV index is 6.7 the tone sequence is C,F,F,F,F,F,A,A
Represented as score the tone sequence looks like shown in the following image:
def buzzer_play_uv_index_melody(uvi):
    # Play the corresponding tone sequence for the measured UV index on the buzzer:
    # C5 (F5){UV index} for an UV index < 6,
    # C5 (F5){5} (A5){UV index - 5} for an UV index 6 - 10 and
    # C5 (F5){5} (A5){5} C6 for UV index 11 ...
    buzzer.set_tempo(4, 160)
    buzzer.pitch(523, 4) # C5
    for i in range(0,uvi):
        if i < 5:
            buzzer.pitch(698, 4) # F5
        elif i < 10:
            buzzer.pitch(880, 4) # A5
        else:
buzzer.pitch(1046, 4) # C6def btn_a_rasing_handler(pin): # Interrupt event callback function for button A rising edge
global btn_a_pressed
btn_a_pressed = TrueBoard().begin() # Initialize the UNIHIKER
gui = GUI() # Instantiate the GUI class# ADC analog input pins supported: P0 P1 P2 P3 P4 P10 P21 P22
# adc21 = ADC(Pin(Pin.P21)) # Use Pin object with ADC to enable analog input - Method 1
adc21 = Pin(Pin.P21, Pin.ANALOG) # Initialize the pin as an analog input - Method 2btn_a_pressed = False
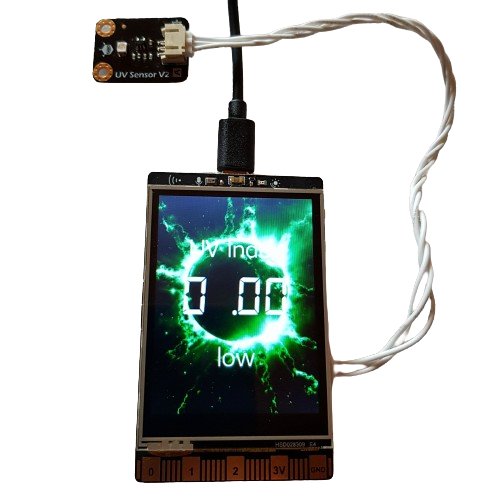
button_a.irq(trigger=Pin.IRQ_RISING, handler=btn_a_rasing_handler) # Trigger on rising edgeThe GUI displays the measured UV index and the associated risk level on a background image with a touch of the color associated with the risk level:
# GUI:
#   Display a background image with the color touch of the risk level,
#   the UV index and the risk level text ...
bg = gui.draw_image(x=0, y=0, h=320, w=240, image='img/background_green.jpg')
title = gui.draw_text(x=120, y=80, text="UV Index", origin="center", color="white", font_size=25)
uv_index_text = gui.draw_digit(x=120, y=160, text="UVI", origin="center", color="white", font_size=50) # Display UV index using 7-segment font
uv_risk_text = gui.draw_text(x=120, y=240, text="N/A", origin="center", color="white", font_size=25)r0 = None
while True:
# Read the sensor value ...
# v = adc21.read() # Read the analog signal value from pin A0 - Method 1
v = adc21.read_analog() # Read the analog signal value from pin A0 - Method 2
# Calculate UV index, level and risk ...
i = uv_index(v)
l = uv_level(v)
r = uv_risk_level(i)
# Print the data ...
# print("P21 =", v)
# print("UV index =",i)
# print("UV level =",l)
# print("Risk level:",r[1])
# print("-----------------------------------------------------------------------")
# Update UI ...
uv_index_text.config(text="%.2f" % i)
if r0 != r: # Update the background image and the risk level text only if the risk level changed ...
bg.config(image='img/background_'+r[2]+'.jpg')
uv_risk_text.config(text=r[1])
# If the button has been pressed, play the UV index 'melody' ...
if btn_a_pressed:
btn_a_pressed = False
buzzer_play_uv_index_melody(round(i))
i0 = i
l0 = l
r0 = r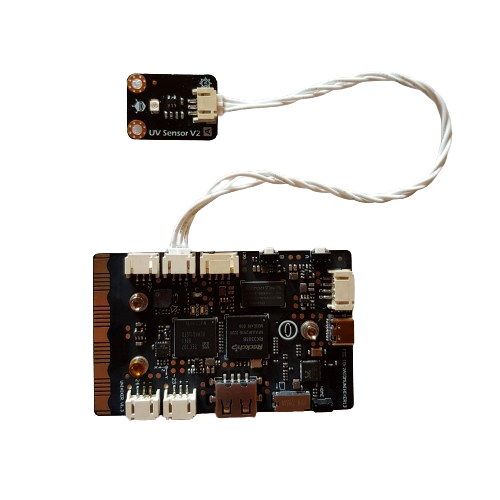

Comments
Please log in or sign up to comment.