

Hardware components | ||||||
 |
| × | 9 | |||
 |
| × | 3 | |||
 |
| × | 3 | |||
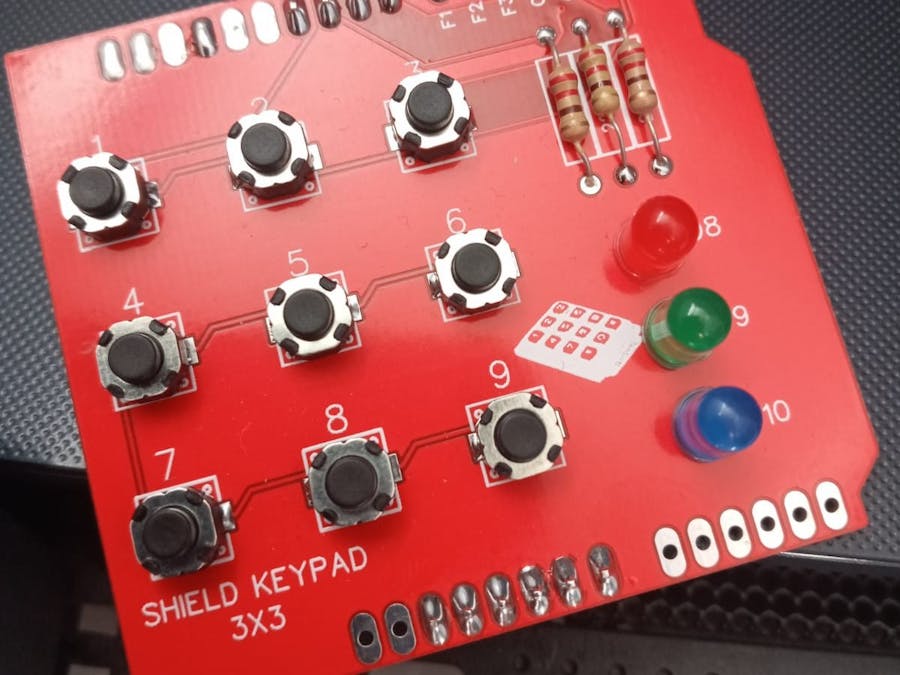
This project will allow us to open an electric door by means of a key, so if it is correct it will turn on a green led, but if it is incorrect it will turn on a blue led, we will press a 4 digit key on our 3x3 matrix PCB by push button and we will through ARDUINO UNO. All our shields are for our ARDUINO UNO.
GERBER PCB:
https://mega.nz/file/iBInRDaZ#UM1zr_WqdQiTgqlQLhWYgdXwZUa404LIk4jIMSq-orY
The Plastic Button Matrix Keyboard made up of 4 rows and 4 columns for a total of 16 keys allows you to add user input to your projects. The keyboard is membrane type, so among its advantages is the little space it requires to be installed. It has an adhesive cover and a flexible connection cable. It can be connected to any microcontroller or development boards like Arduino.
The 4x4 matrix keyboard is made up of a matrix of buttons arranged in rows (L1, L2, L3, L4) and columns (C1, C2, C3, C4), with the intention of reducing the number of pins necessary for its connection. The 16 keys require only 8 microcontroller pins instead of the 16 pins that would be required for connecting 16 independent keys. In order to read which key has been pressed, a scanning technique must be used and not just read a microcontroller pin.
Connecting the 4x4 matrix keyboard with Arduino or other microcontroller platform is simple: 8 digital pins in total are needed. It can work with 3.3V or 5V microcontrollers without problem. It is necessary to put pull-up resistors between the column pins and VCC or to software-enable the internal pull-up resistors on the Arduino. Regarding programming, the reading of the keys must be done by "scanning" the rows. Although it is possible to carry out this procedure within the main loop of the program, it is a better practice to carry out the sweep using TIMER interrupts and thus ensure the reading of the keys in a known and exact interval, in addition to leaving the loop free to perform other operations.
Technical specifications• 9 buttons with matrix organization (3 rows x 3 columns)
• Membrane type keyboard
• Greater resistance to water and dust
• Self adhesive on the back
• Bounce time: ≤5ms
• Maximum operating voltage: 24 V DC
• Maximum operating current: 30 mA
• Insulation resistance: 100 MΩ (@ 100 V)
• Dielectric withstand voltage: 250 VRMS (@ 60Hz, for 1 min)
• Life expectancy: 1, 000, 000 operations
• Keyboard dimensions: 69*77mm
• Flat ribbon cable approx. 8.5 cm long. (including connector)
• DuPont type connector single row and 8 contacts with standard separation 0.1" (2.54mm)
• Operating temperature: 0 to 50 °C
Applications:• Security systems
• Menu selection
• Data entry
Electronic components:• 3 resistors 1/4w 220 ohm
• 9 push-button
• 3 diodes 5mm any color
• 1 sprat (40 pins)
• 1PCB
Project features:• VIN 5V
• 3 DIGITAL OUTPUTS
• 3X3 MATRIX KEYBOARD
• IMAX 100mA
• 4-digit or 6-digit password
#include <Keypad.h>     // importa libreria Keypad


const byte FILAS = 3;     // define numero de filas
const byte COLUMNAS = 3;    // define numero de columnas
char keys[FILAS][COLUMNAS] = {    // define la distribucion de teclas
  {'1','2','3'},
  {'4','5','6'},
  {'7','8','9'},
};


byte pinesFilas[FILAS] = {7,6,5};   // pines correspondientes a las filas
byte pinesColumnas[COLUMNAS] = {4,3,2}; // pines correspondientes a las columnas


Keypad teclado = Keypad(makeKeymap(keys), pinesFilas, pinesColumnas, FILAS, COLUMNAS);  // crea objeto


char TECLA;       // almacena la tecla presionada
char CLAVE[5];        // almacena en un array 6 digitos ingresados
char CLAVE_MAESTRA[5] = "1715";   // almacena en un array la contraseña maestra
byte INDICE = 0;      // indice del array


void setup()
{
 pinMode(9, OUTPUT);
 pinMode(10, OUTPUT);
 Serial.begin(9600);      // inicializa comunicacion serie
}


void loop(){
 TECLA = teclado.getKey();   // obtiene tecla presionada y asigna a variable
 if (TECLA)        // comprueba que se haya presionado una tecla
 {
 CLAVE[INDICE] = TECLA;    // almacena en array la tecla presionada
 INDICE++;       // incrementa indice en uno
 Serial.print(TECLA);    // envia a monitor serial la tecla presionada
 }


 if(INDICE == 4)       // si ya se almacenaron los 6 digitos
 {
 if(!strcmp(CLAVE, CLAVE_MAESTRA)) {  // compara clave ingresada con clave maestra

 Serial.println(" Correcta"); // imprime en monitor serial que es correcta la clave
 digitalWrite(9, HIGH);
 delay(1500);
 digitalWrite(9, LOW);}
 else {
 Serial.println(" Incorrecta");  // imprime en monitor serial que es incorrecta la clave
 digitalWrite(10, HIGH);
 delay(1500);
 digitalWrite(10, LOW);}
 INDICE = 0;
  }
}
We thank JLCPCB for professional PCBs
Order your PCBs here
5PCBS AT $2
GERBER PCB:
https://mega.nz/file/iBInRDaZ#UM1zr_WqdQiTgqlQLhWYgdXwZUa404LIk4jIMSq-orY


_3u05Tpwasz.png?auto=compress%2Cformat&w=40&h=40&fit=fillmax&bg=fff&dpr=2)
Comments