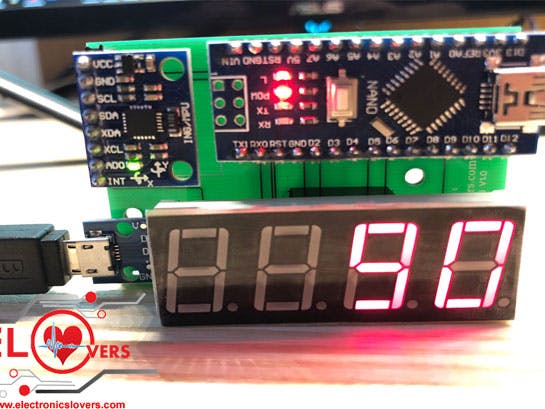
There is a time when you need to mount a piece of furniture or something similar in your home and for a straight mounting everybody usual use a spirit level. ElectronicsLovers Tech Team built this module, which has one difference from a usual one: it’s digital. This project also comes in handy for people who are building RC Models, since there might be mandatory to acquire angles in different directions to process them further for using in different calculations like stabilizing, for example.
In this project, we will use a GY-521 3 Axis Accelerometer for determining at which angle a surface is. For displaying the angle, we will use a 7 Segment 4 Digits display. The µC used will be an Arduino Nano, in order to keep everything compact on PCB.
Description of the used partsHere we will explain the most important details about the used parts.
GY-521 AccelerometerThis module is one of the best IMU (Inertia Measurement Unit) sensors which is compatible with Arduino. IMU sensors like the GY-521 are used in self-balancing robots, UAVs, smartphones, etc. The GY-521 sensor contains a MEMS accelerometer and a MEMSgyro in a single chip. It is very accurate, as it contains a 16-bit ADC for each channel. Furthermore, it captures the x, y, and z channel at the same time. The sensor uses the I2C-bus to interface with the Arduino. The GY-521 is not expensive, especially given the fact that it combines both an accelerometer and a gyro.
IMU sensors are one of the most common types of sensors used today in all kinds of electronic gadgets. They are seen in smartphones, wearables, controllers, etc. IMU sensors help us in getting the altitude of an object, attached to the sensor in three-dimensional space. These values which usually is measured in degrees, as an angle, help us to determine the altitude of the object. Thus, they are used in smartphones to detect its orientation, for example. And in wearable gadgets like the Nike fuel band or fit bit, which use IMU sensors to track movement.
How does it work?IMU sensors usually consist of two or more parts. Listing them by priority, they are an accelerometer, gyroscope, magnetometer, and altimeter. The GY-521 is a 6 DOF(Degrees of Freedom) or a six-axis sensor, which means that it gives six values as output. Three values from the accelerometer and three from the gyroscope. TheGY-521 is a sensor based on MEMS (Micro Electro Mechanical Systems) technology. Both the accelerometer and the gyroscope is embedded inside a single chip. This chip uses I2C Bus system for communication.
7 Segment – 4 Digit DisplayWhen using a 7-segment 4-digits display you need to remember that there are 2 types: a common anode and a common cathode. If your module is the common anode, the common anode pin connects to the power source; if it is the common cathode, the common cathode pin connects to the GND.
When using 7-segment 4-digits display, the common anode or common cathode pin is used to control which digit is displayed. Even though there is only one digit working, the principle of Persistence of Vision enables you to see all numbers displayed because each the scanning speed is so fast that you hardly notice the intervals.
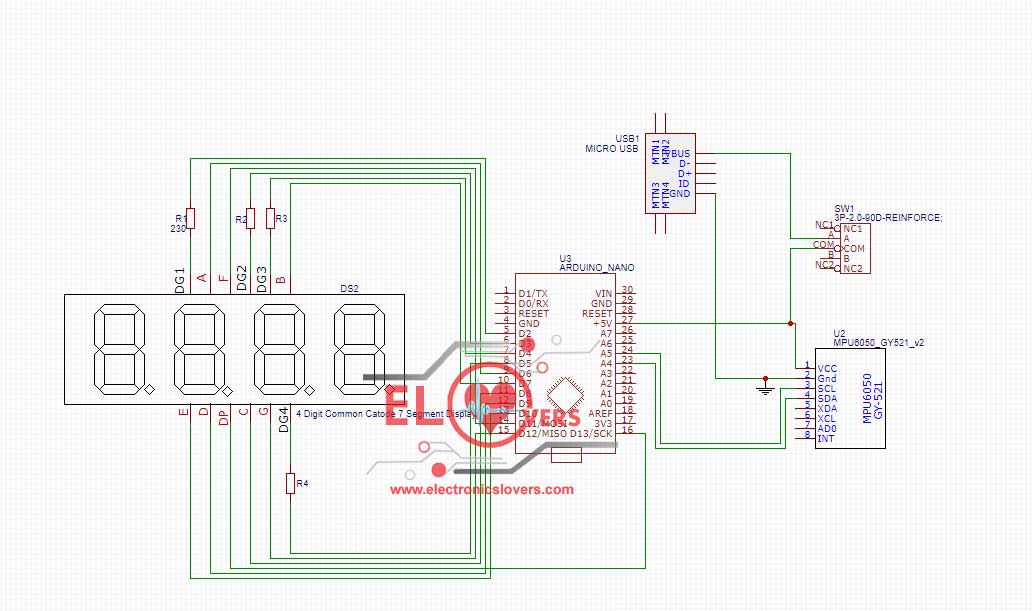
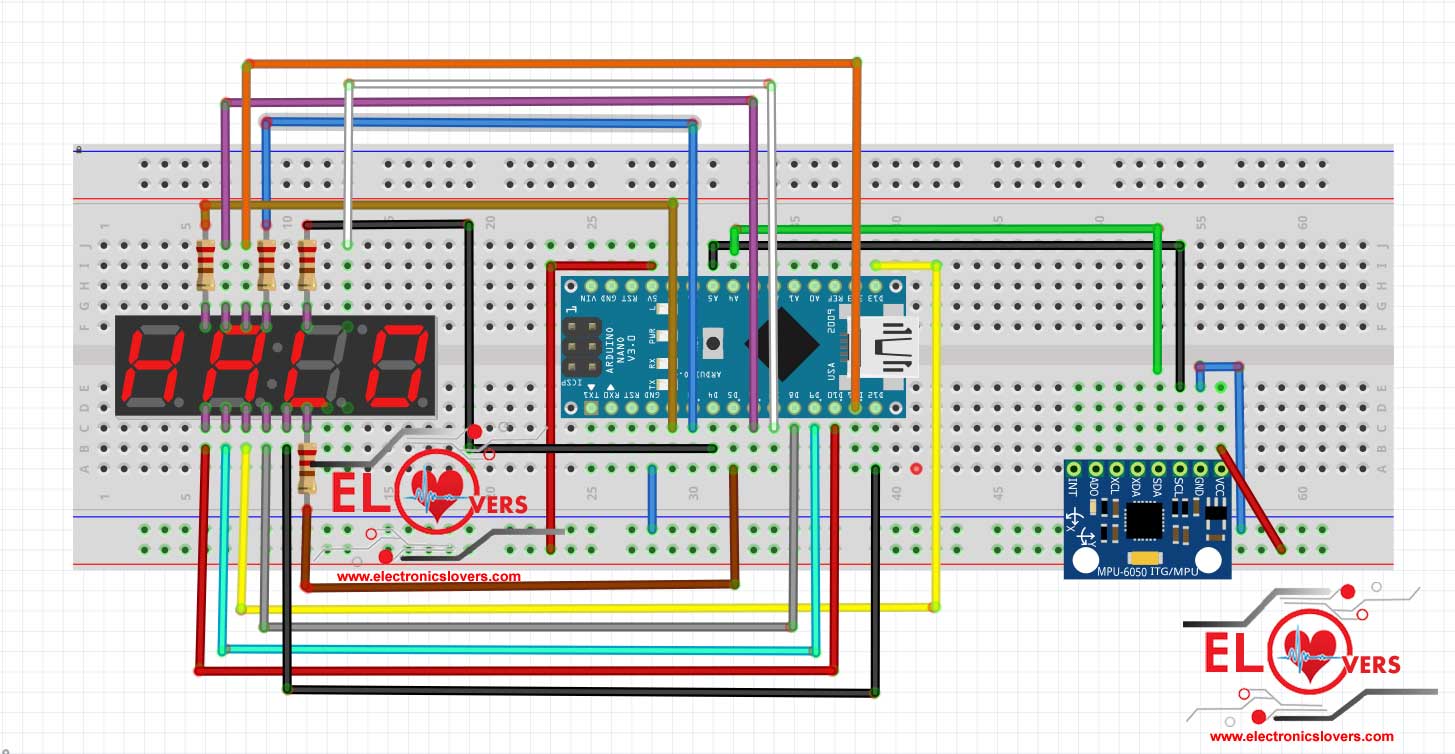
Project SchematicDisplaying the angle on the 7 Segment DisplayThe functioning principle of this project is very simple: using the I2C communication protocol, the Arduino continuously receives the angle for the Y direction (because that is the Axis a spirit level shows). The value of the angle is then given to a function that displays it on the Display.
Now, as you might already know, such a 16 Bit ADC gives a maximum value of 65536, for the maximum angle (which is 90 degrees). Because the chip’s ADC is split in 4 channels, we have a max. value of 16384 for each channel. So -16384 will mean -90 degrees, while +16384 will mean 90 degrees. For our Arduino this means nothing more than a simple map function:
Keep in mind that the variable AcY is of type long, which means that the mapped variable, in our case angle, also must be long.
I hope you enjoyed this tutorial and learned how an accelerometer in combination with a gyroscope can measure the acceleration for the 3 axis, and also how to interact with a 7 segment display.
PCB Design for the Digital Spirit Module :We Have Designed a PCB Model for our digital spirit module by using one of the Best online PCB simulation Tool is known as EasyEDA – Online PCB design & circuit simulator EasyEDA is the platform where you can test your skills, where you can learn new skills and where you can even modify your skills. It is a place which provides you great web based EDA tools for electronics engineers, educators, students, makers, and enthusiasts. You all are welcome to use these tools for free and to create your own online web-based Printed Circuit Boards. There’s no need to install any software. Just open EasyEDA in any HTML5 capable, standards-compliant web browser.
- Digital Spirit Module PCB Prototype Model
We ordered Online PCBs for our product Module from JLCPCB. They provided us the PCB’s for this project, which we used to assemble all the components to it. JLCPCB is the largest PCB prototype enterprise in China and a high-tech manufacturer specializing in quick PCB prototype production, They have the best offer for PCB’s: 10 pieces for only 2$. If you want to prototype your own PCB, go ahead to jlcpcb.com and upload your Gerber file to get high-quality PCB’s. $2 For 10 PCBs (24 Hour Quick Turn Around: https://jlcpcb.com/
- The PCBs were excellent, the quality robust, strong and very beautiful.
- Very good price.
- 100% guaranteed quality or rebirth.
- Good delivery time: 3 days by DHL.
- Online purchase order.
- Quick Production Process
- Technical support, in case someone responds. Regarding the design, you can use any platform that allows you to generate the Gerber file, maybe in the next tutorials you will do it from KiCAD, Eagle will use it some years ago but for now, I will try to use an Opensource.
Click Here To Know More about Version 2.0 and Source Code
Watch Final Video | PCB Quote | PCB Assembling | Digital Spirit Module Working Demonstration
Buy Source Code + PCB Gerber File Version 2.0
We are currently working on the next version of this project. We are willing to implement an OLED Display, for a better overview of the angles measured by the module. We also want to make this module more compact and portable. Stay tuned for updates!
Project Maker: Mr. Robert Poloboc © Electronicslovers


_3u05Tpwasz.png?auto=compress%2Cformat&w=40&h=40&fit=fillmax&bg=fff&dpr=2)
Comments
Please log in or sign up to comment.