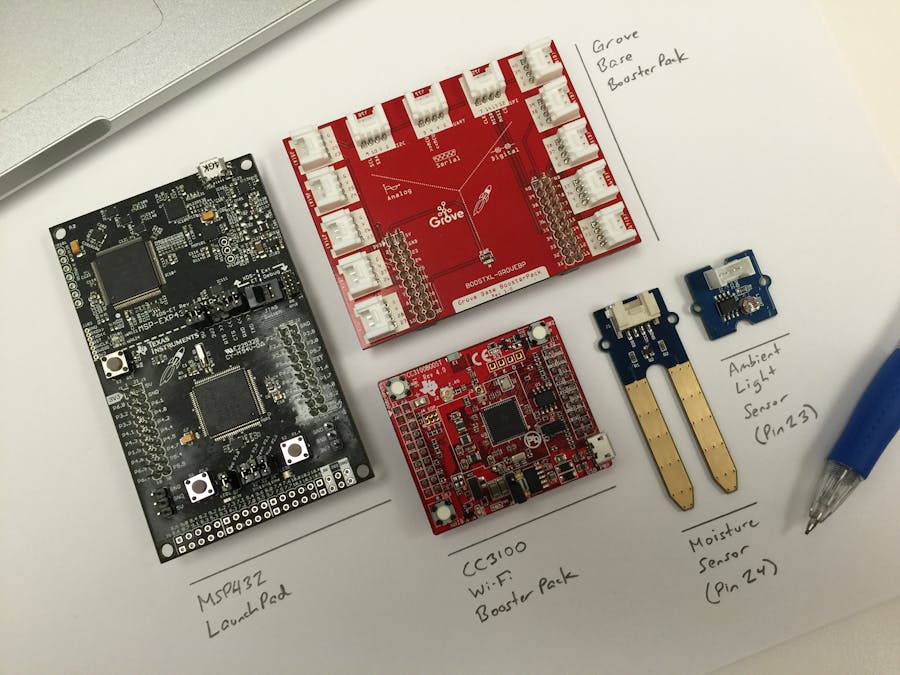
In this tutorial, we are going to create a Wi-Fi internet-connected sensor node using the MSP432 LaunchPad from Texas Instruments, the CC3100 Wi-Fi BoosterPack & various sensors from Seeed Studio.
Here's a quick preview video of it all working together!
RECORDED WEBINAR FEATURING THIS PROJECT!Our friends @PubNub were so kind to invite us to give a training/webinar featuring this tutorial.
Check out the recording here: goo.gl/7bHjOQ
Let's build the hardwareIn this system, we are using several modular components from the Texas Instruments LaunchPad ecosystem.
- MSP432 LaunchPad Development Kit
- CC3100 Wi-Fi BoosterPack
- Grove Base BoosterPack
- Grove Moisture Sensor
- Grove Ambient Light Sensor
Plug in the hardware as shown in the images above. Note the sensor connections. This will be helpful when we start looking at the embedded code/firmware.
- Ambient Light Sensor = PIN 23
- Moisture Sensor = PIN 24
Now that our hardware is setup, let's switch our attention to the firmware/code. In this demo, we use Energia, an easy to use programming tool for the TI LaunchPad development kits. Energia is a fork of the open source Arduino IDE, so it's a very familiar environment to those familiar with that coding style/language.
NOTE however, that Energia offers a unique feature called multi-tasking when used with certain LaunchPad development kits (including the MSP432 LaunchPad we are using). This multi-tasking feature allows you to run multiple Energia/Arduino sketches in parallel on the same microcontroller! This is a powerful concept that we will take some advantage of in this tutorial.
In this demo, we will have 3 tasks running in parallel.
- TASK 1: Reading the moisture sensor
- TASK 2: Reading the ambient light sensor
- TASK 3: Encoding the latest sensor data in JSON, then publish to PubNub!
We use simple global variables for inter-task communication. Task 1 & 2 will simply update a global variable periodically with the latest sensor readings. Task 3 takes the latest values in the global variables, encodes them into a JSON payload, then publishes it up to PubNub. The code for each task is below in the code section of this Hackster.io tutorial.
To create a new task in Energia, we simply need to create a separate "setup/loop" pair. Each setup/loop pair resides in it's own tab.
Be sure to modify the code examples with your own PubNub pub & sub keys & the desired channel!!! Also be sure to add in your Wi-Fi credentials.
The pictures below show how the three tasks can be setup into separate tabs in the Energia IDE. Be sure to select the MSP432 LaunchPad by going to Tools > Board > [select MSP432 LaunchPad].
Once your LaunchPad is flashed with the code shared in this tutorial, we can start building the web-side dashboard.
To test if you are indeed sending the appropriate JSON encoded data to PubNub, be sure to try PubNub's easy-to-use Developer Debug Console. Simply log into PubNub & click on the "Debug Console" link. This will allow you to see all of the messages across your various PubNub channels.
Here is a link to a jsFiddle for the web-side dashboard:
http://jsfiddle.net/qc3bzzjx/2/
Note that the jsFiddle is broken up into 3 code files (HTML, Javascript & CSS). Most of the magic resides in the Javascript file.
You can fork the jsfiddle above to make modifications & test out your own code. Remember to modify the jsfiddle to include the appropriate PubNub pub & sub keys. Also make sure to modify the jsfiddle to listen to the appropriate channel.
There are lots of documentation on how to modify the look & feel of these EON-based charts. Below are a few nifty links:
- PubNub EON reference/documentation: https://github.com/pubnub/eon
- Generic c3.js reference/documentation: http://c3js.org/reference.html


Comments
Please log in or sign up to comment.