I wanted to build an alarm clock with more features than the usual one you find in bedrooms, like mutiple alarms, only signaling on weekdays, having control over the display, sleep mode, preferably a web interface, syncing to the correct time after a power failure, etc.
Here is a video showing some of the features, like a simple example triggering an LED every 20 seconds:
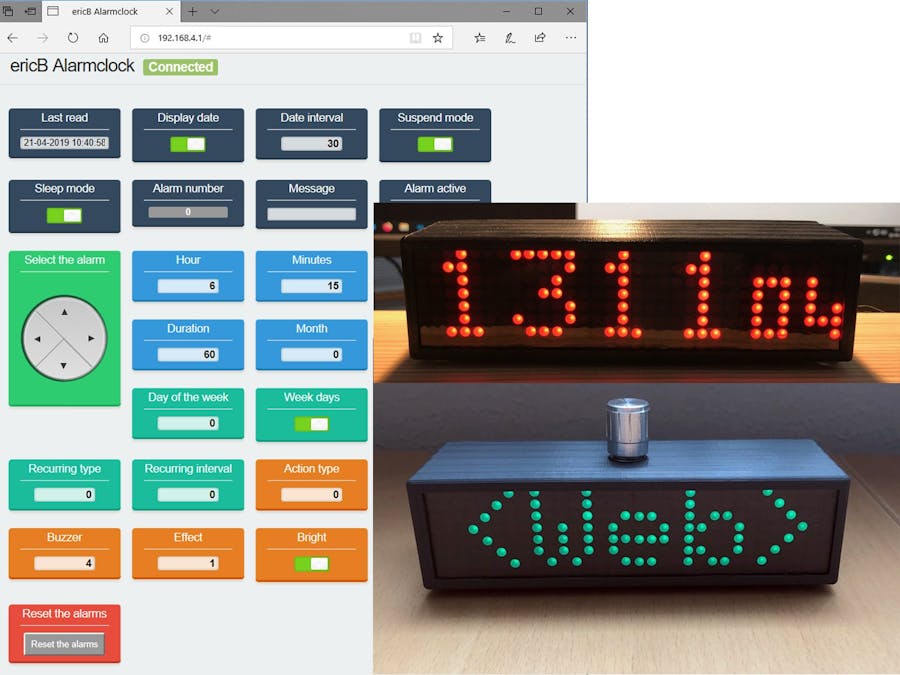
After some searching I ended up using the great ESPUI library for creating the web interface. The screen resizes dynamically to fit desktop, tablet and smartphone screens:
The alarm also features a flexibel WiFi connection without the need for hardcoded SSID and password settings. On startup, it will read the EEPROM and try to connect to the WiFi network. If there are no stored settings or if the SSID or password has changed it will create an access point which enables you to enter these settings. These will be stored into EEPROM and read at the next start.
Note: these are the WiFi settings needed to connect to (your router and) the internet to sync with a timeserver. The ESP will also set up a network (default at 192.168.4.1, default password ericBclock) for the web interface. You need to connect to this wireless network to get access to the web interface.
The code is very flexibel and powerful, it can set multiple alarms triggering at different times, dates, a day of the week, weekdays or weekend days, recurring at custom intervals, triggering GPIO pins to activate other equipment, even high voltage ones when using a relay, like lighting, a fan or air conditioning. Take extreme care when working with high voltages though!
A rotary encoder is installed so it can be used without the web interface to set the default alarm 0 on or off, adjust the alarm time and several other settings (with a menu). Here is a video of an early version:
Update 24 May 2019I added ESP32 support, the new code is uploaded.
And here is a picture of the first finished build with a 3D printed case:
You can find the 3D files over here: https://www.thingiverse.com/thing:3531227
I also improved my method for getting a smoother surface with more contrast for the 4 8x8 LED matrix board without visible gaps in between and an uneven surface:
Here is a video showing the initial setup - with a 'Big Ben' bonus intro ;-)
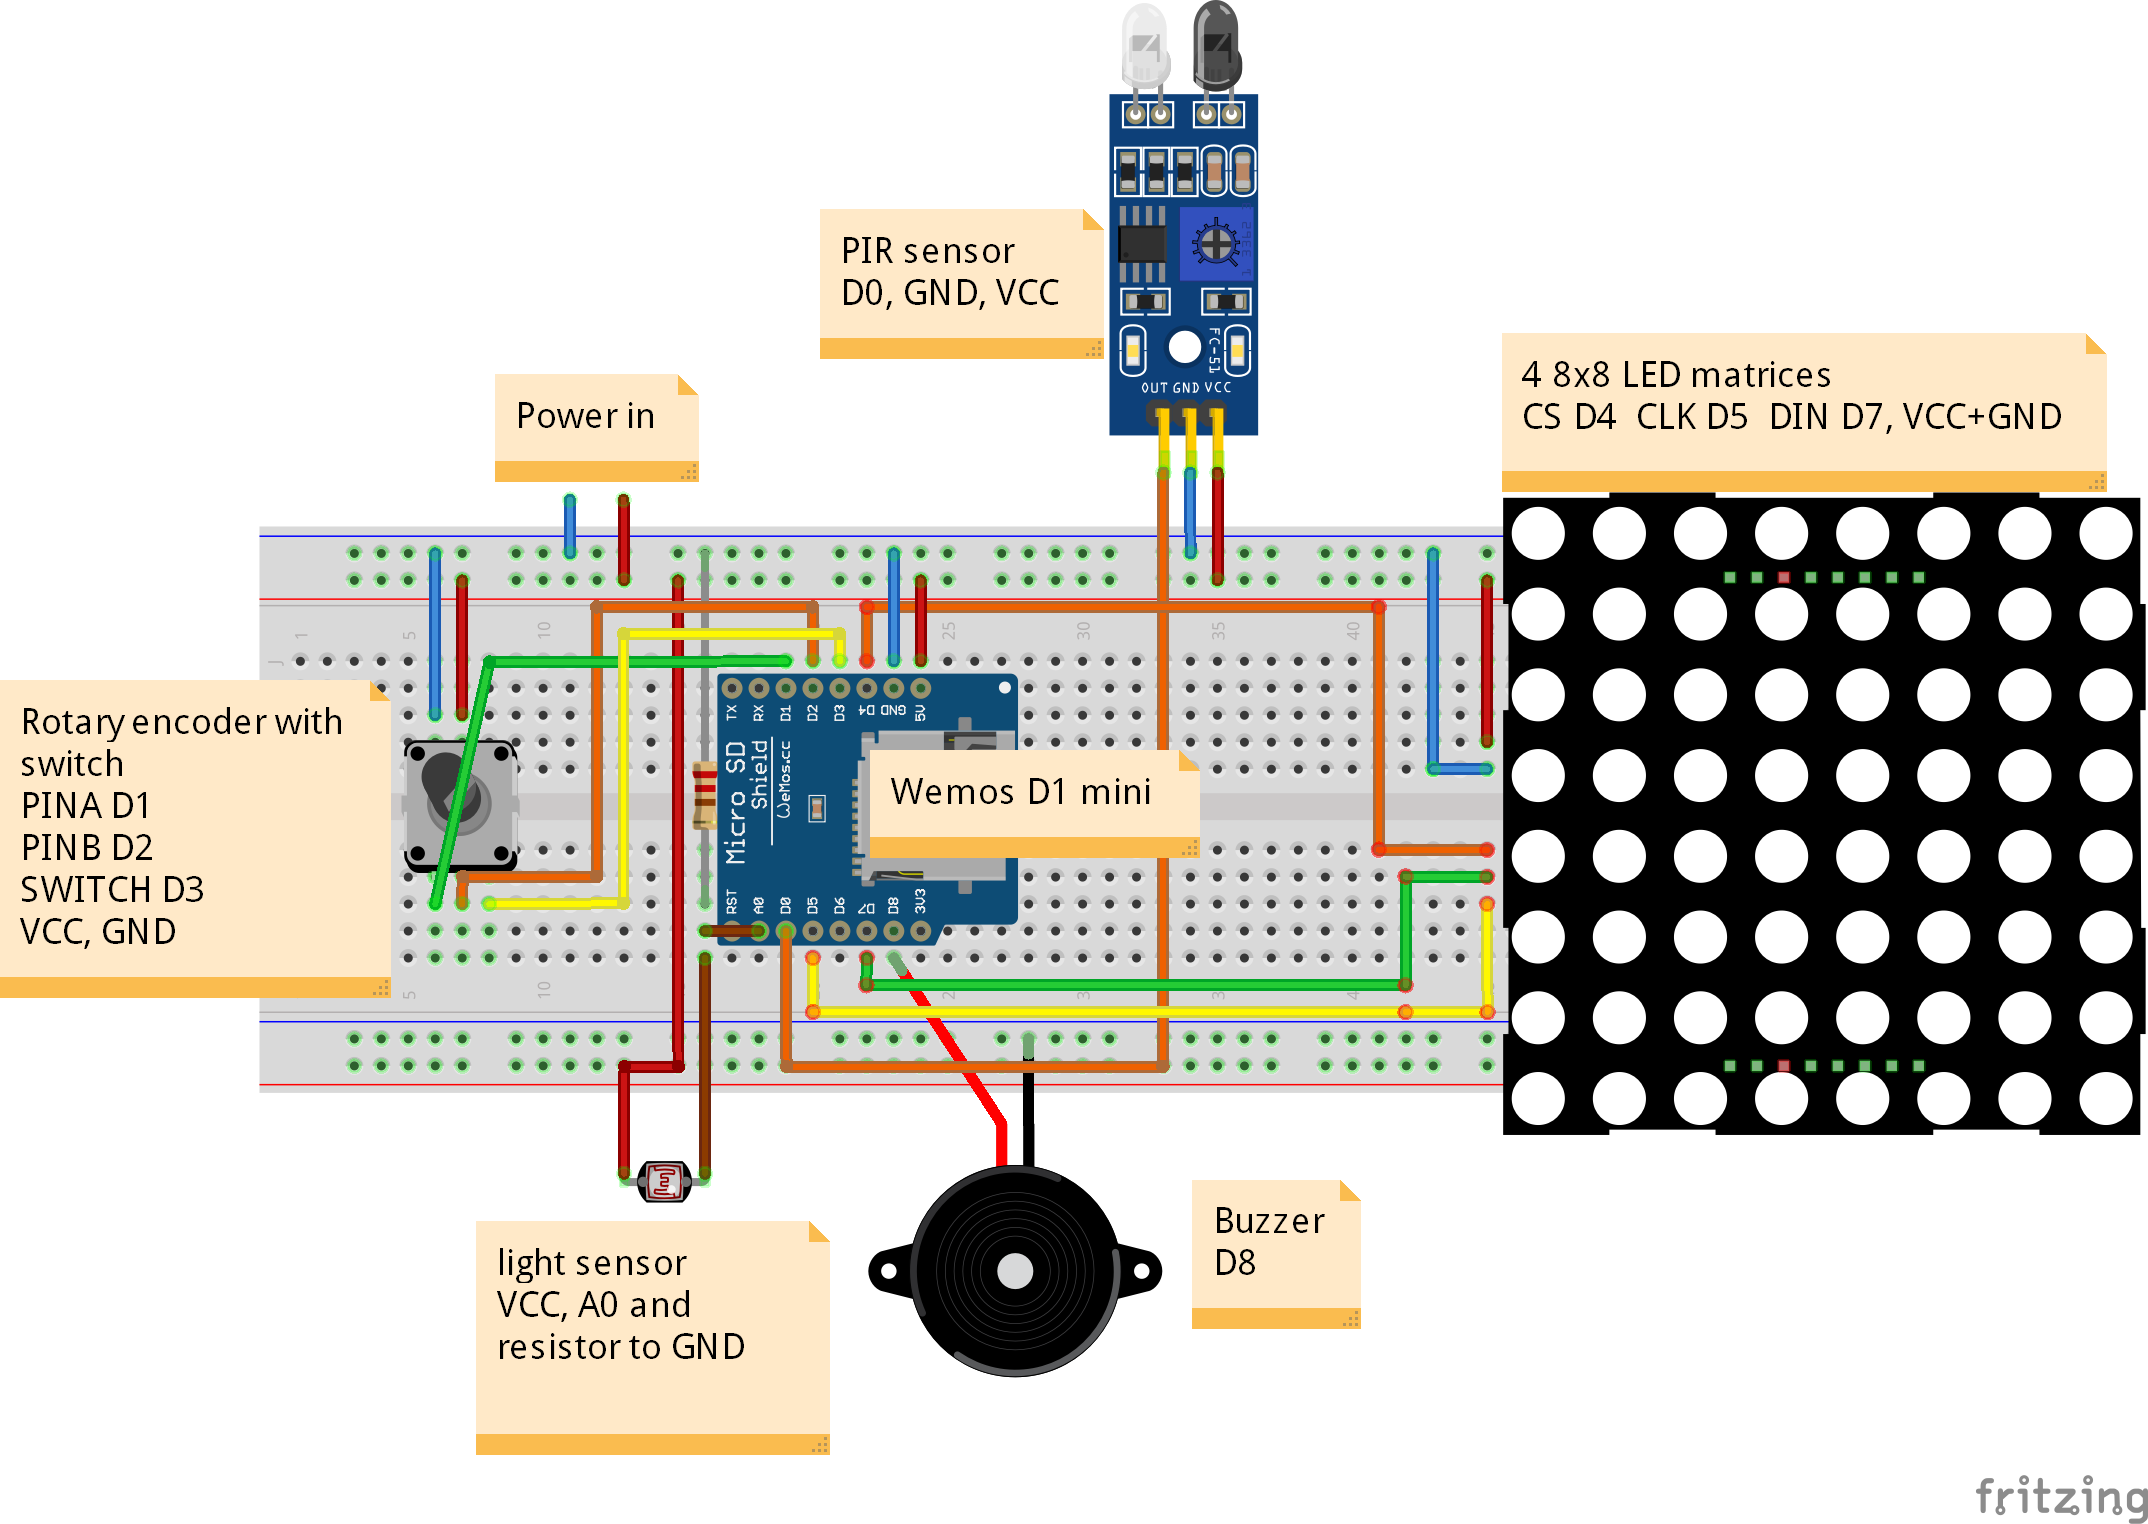
Update 2 Jun 2019I added PIR sensor and light sensor support. If the PIR detects motion it will end the sleep mode. The light sensor will change the LED brightness according to the available light (the more light, the brighter the LEDs will be).
Update 27 Oct 2019DST bugfix.
Update 25 Dec 2019Some bugfixes and more options for changing settings in the rotary encoder menu.
Update 26 Jul 2020 - Version 2.xI updated the code to support the ESPUI 2.x and ArduinoJSON 6.x libraries.
Update 6 Sep 2020New seconds display, AM/PM mode, over the air update and a lot of other updates.
I also created a custom 3D case which can fit the PIR and light sensor on the left of the matrix display.
Added a neopixel wake up light mode:
Update 24 Oct 2020Added time zone and daylight saving time settings to the web interface as well as several updates and enhancements.
Update 30 Oct 2020Added some animations ;-)
Update 9 Nov 2020I uploaded the STL file for 3D printing the case as pictured in the last updates:
Added BME280 sensor support for displaying the temperature, humidity and air pressure:
Uploaded the latest version.
Note: for neopixel it uses the Fastled instead of the Adafruit library because that one is buggy with ESP32 controllers.
Update 19 Nov 2020Bugfix web interface slow update and/or input getting lost.
Update 4 Dec 2020 - Version 3.xVersion 3 adds support for more than 4 matrices and a bigger font (and other enhancements):
Several updates, new features and German and Italian translations.
The setupComponents:
- ESP8266 or ESP32 board - I used a Wemos D1 mini.
Update: I would recommend an ESP32 over an ESP8266 when needing the web interface because the ESPUI library can have connection problems with the ESP8266. - a module with 4 MAX7219 8x8 LED matrices
- rotary encoder
- buzzer (or small speaker)
- optional: light sensor
- optional: motion sensor
- optional: neopixel strip or ring
- optional: BME280 sensor
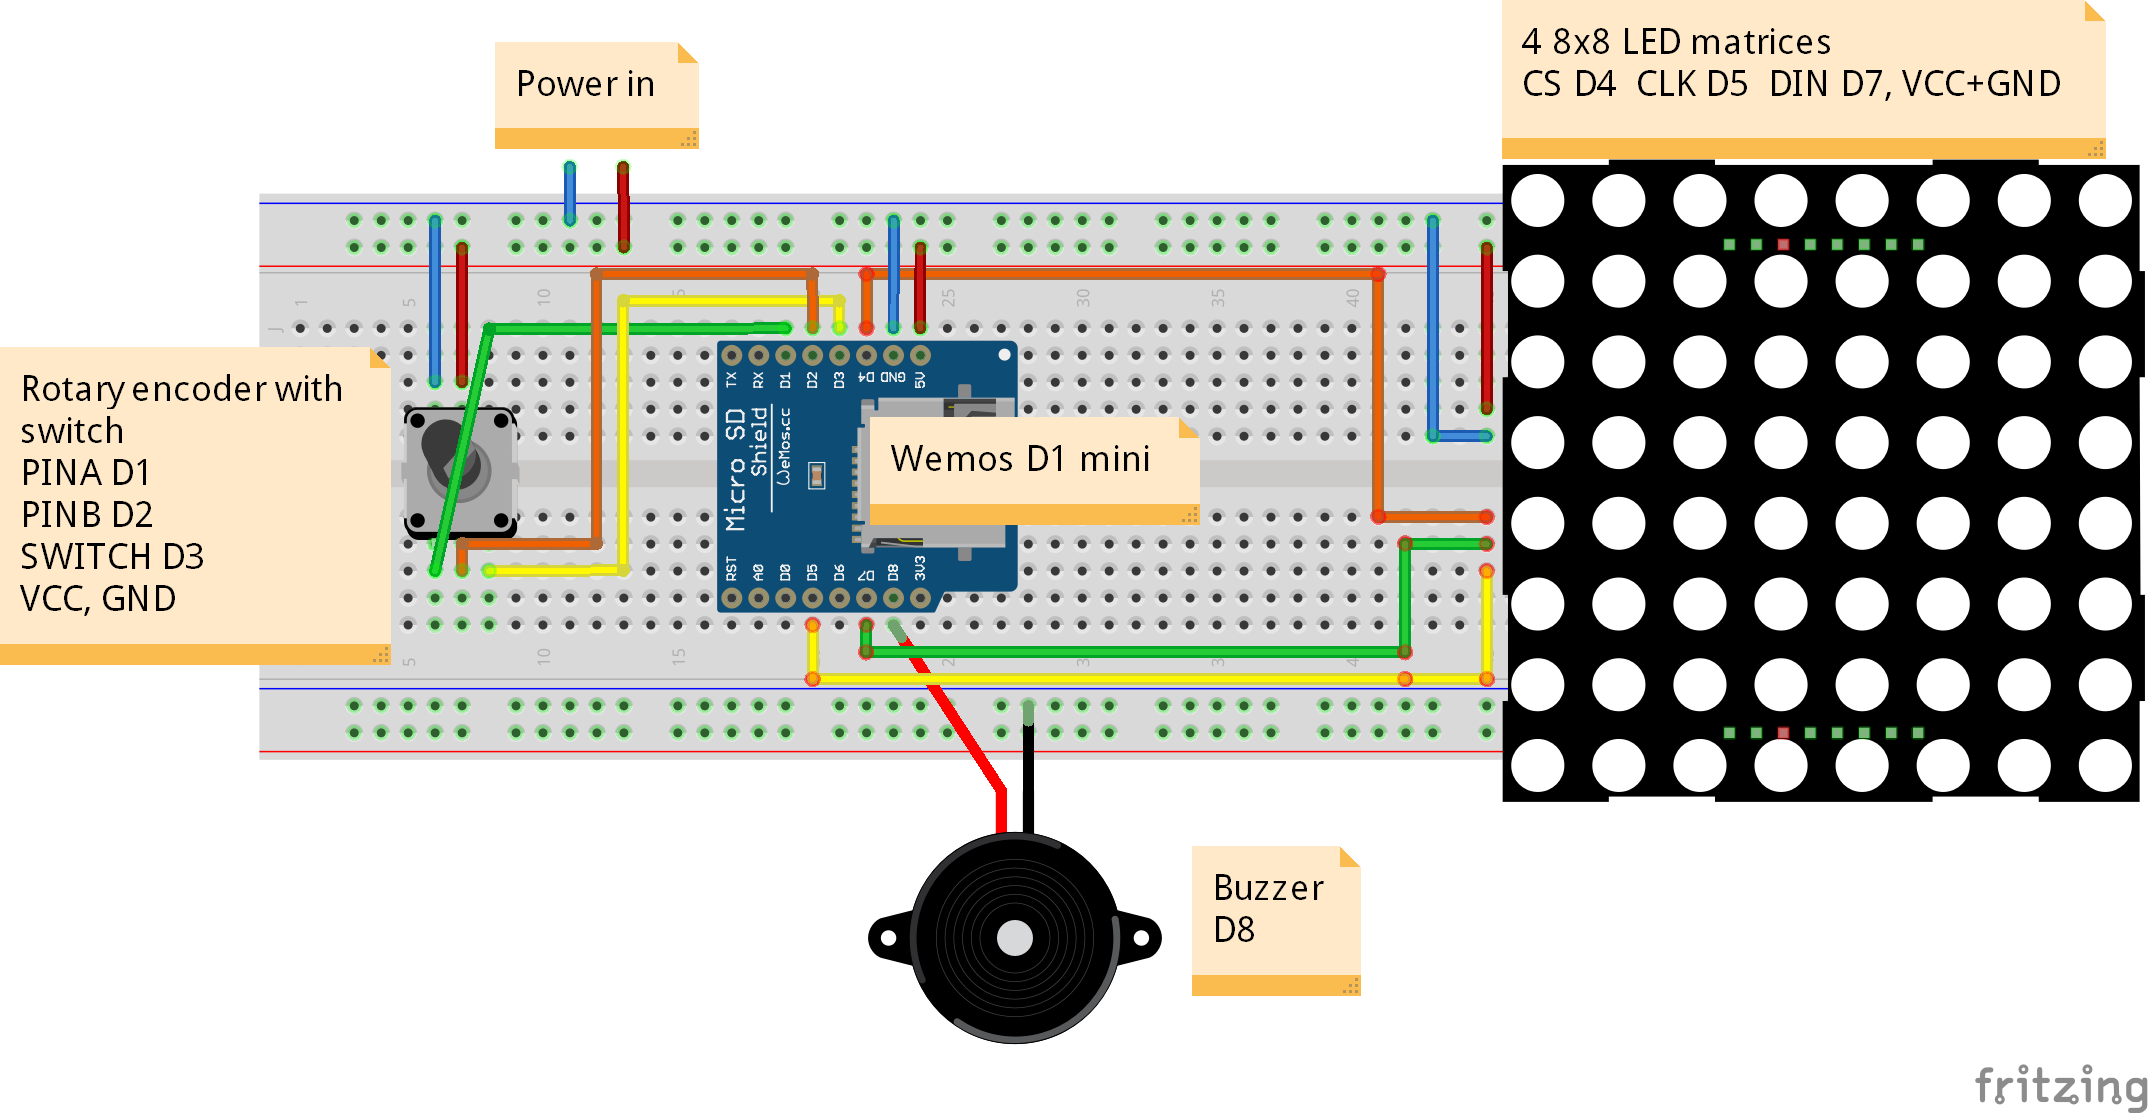
The setup is pretty straight forward, check the schematics for the pin connections.
Also check the comments in the code for the setup and custom settings.
Here is a picture of the inside of the soldered version (using a small speaker instead of a buzzer).
You can add a light and/or motion sensor and enable it in the code, check the remarks in the code for the setup.
Some of the features:- supports ESP8266 and ESP32 boards
- web interface for WiFi setup
- WiFi connected, syncs to a timeserver for accurate time
- web interface for programming and changing settings
- multiple alarms (default 12)
- neopixel wake up light feature
- settings saved to EEPROM so they are not lost after a power failure
- custom message and duration for each alarm
- an action can be set when the alarm triggers: switching GPIO pins on/off so external devices can be controlled
- recurring alarms: day of the week, weekdays, weekend days, custom setting for seconds, minutes, hours, days, months
- 5 time display modes
- AM/PM mode
- support for over the air updates
- BME280 support, display temperature, humidity and air pressure
- announcement mode: displays a (custom) message and sounds when the PIR detects motion
- blinking display
- bright display
- buzzer (number of beeps can be set)
- rotary encoder for switching off the alarm, setting the default alarm and changing menu settings
- sleep mode: display off after a delay
- suspend mode: don't trigger any alarms but update recurring ones
- custom melodies (Big Ben is at 11, Avicii at 12)
- light sensor support
- motion sensor support
The code consists of a ZIP file containing the main file and additional function files. The function files have to be in the same folder as the main file and should open as tabs in the Arduino IDE (note: I used version 1.8.7)
The code needs 4 additional libraries which have to be installed in the Arduino IDE, the links are in the code (as well as in the Code section). Check the Github page for setting up the ESPUI library, it needs additional libraries to work.
Note on the 2019 version: it supports ESPUI version 1.x which only works with ArduinoJSON version 5.X.
The 2020 version supports ESPUI version 2.x which needs ArduinoJSON 6.x.
To adjust the code for your setup: search for the @EB-setup comments. Search for the @EB-custom comments to change default settings to your preferences.
LicenseFeel free to use the code for your personal use, not for commercial purposes.
You can contact me at ericBcreator@gmail.com.


Comments
Please log in or sign up to comment.