Based on the UnoJoy library we wanted to make an RC flight simulator controller with any RC transmitter and receiver even though the receiver or transmitter does not have PPM or any other connection to PC just the PWM signal pins for servos. Basically for more outdated and old RC transmitters and receivers. For this project, we used only sticks from the RC transmitter. Maybe we will update the project with buttons for meanwhile this was not necessary for basic flying.
Step 1: Download filesFirst, we download the files from UnoJoy GitHub. We import the UnoJoy library into Arduino IDE. Then we upload the code below to Arduino Uno. Where we define digital pins and convert the RC receiver output signal.
Step 2: Convert Arduino Uno to USB game controllerTo connect Arduino to PC as a USB game controller we used the instructions, software, and drivers found at UnoJoy GitHub. First, we download the files from the UnoJoy GitHub and JRE FLIP tool. Install JRE FLIP tool. To convert Arduino Uno to USB controller we must first put it into "Arduino Uno DFU" mode. The official documentation can be found here. We connect Arduino to PC and short two of the pins by the USB connector as shown in the picture below with a wire. It should make disconnect and reconnect sounds and the lights on board should flicker. Meanwhile, remove the wire.
When we have done this we open the UnoJoy folder and run TurnIntoAJoystick.bat.
When the program has finished we unplug Arduino. If we get an error stating "AtLibUsbDfu.dll not found", we can solve it by updating the driver by selecting the folder where the AtLibUsbDfu.dll is located. We solved the issue by watching the following video.
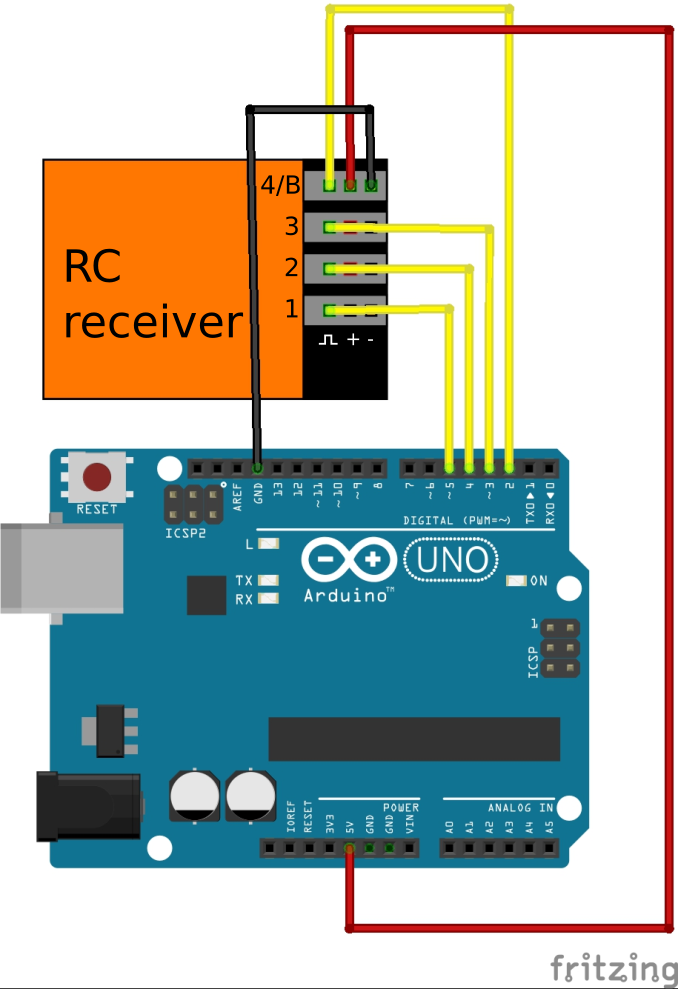
Step 3: Connect the RC receiver to Arduino UnoThen we have to connect the Arduino to the RC receiver (Jeti model rex 4 channel in our case). To supply the receiver with the power we connect it to the Arduino 5V pin and GND pin. We connect the 4 signal pins to the 2, 3, 4 and 5 digital pins. Connections for this 4 channel RC receiver are shown in the picture below. We used 4 channel receiver but it is possible to use a receiver with more channels. We plugin Arduino again and the PC should recognize it as a USB controller.
Step 4: Test the controllerAfter all the above is done we go to Control Panel\Hardware and Sound\Devices and Printers and we should see the game controller UnoJoy Joystick. If we right-click on it and click game controller settings and then properties we can test if everything is functioning properly as expected and calibrate if needed.
This solution is not the best but for older RC receivers it does the job. We tested it with the Multiplex MultiFlight Simulator and after a little calibration, we were ready to fly.


_ztBMuBhMHo.jpg?auto=compress%2Cformat&w=48&h=48&fit=fill&bg=ffffff)


Comments
Please log in or sign up to comment.