


You can read more about this tutorial, our EtherCAT shield, and other Esmacat tutorials on the official Esmacat website.
Detailed documentation of the codes and steps for this tutorial can be found here.
Overview:
In this tutorial you will learn how to build an IOT system using the Mbed ecosystem and an EtherCAT Arduino Uno form factor shield (EASE). You will learn how to make different IOT devices communicate using an existing Ethernet infrastructure over the EtherCAT protocol. You will also build a central application (an EtherCAT Master) which can control these IOT devices (EtherCAT slave devices).
EtherCAT Master: This will be an application running on a PC. The basic software for this is freely available on the software page of our website to download. You could write your own application to control the slave devices using this basic software.
EtherCAT Slave: For this we will be using Arduino compatible base boards which are available for Mbed platform + EtherCAT shield (EASE) which is also Arduino compatible (this will enable communication over EtherCAT) + Any other Arduino compatible shields based on what device we want to build. The Mbed software library for this EASE is available to download freely on Mbed platform.
For this demonstration, we are building a system which can measure Motor RPM. The code is available on Mbed platform for download.
EtherCAT Arduino Shield by Esmacat (EASE):EASE is an EtherCAT shield that is used to build an EtherCAT slave that connects to an EtherCAT master (PC/ Laptop/ Dedicated Master devices like the Esmacat Master S and Esmacat Master C.) This shield can be stacked on top of Arduino and other MCU boards with an Arduino Uno form factor. It allows high-speed communication with an industry-standard EtherCAT protocol for high-performance robotic applications. EASE is a simple way to incorporate the cutting edge technology that is EtherCAT for all users from students to professionals.
This shield has 8 registers that can be used to send/receive data between devices via Ethernet cables attached to the shield. The data packet between MCU Board and EASE is communicated via SPI protocol. We created simple libraries for the Arduino and Mbed platforms respectively to make interfacing with the board as easy as 2 functions.
More info: https://www.esmacat.com/ease
Suggested Reading: EASE Datasheet.
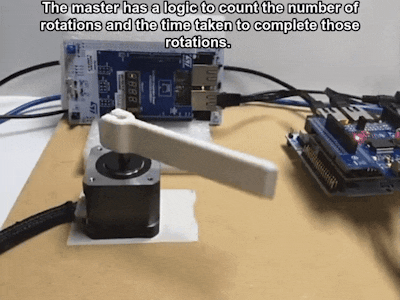
Measurement of Stepper Motor RPM:This project builds a simple system to measure the RPM of a stepper motor with Esmacat Master, two EtherCAT slaves (build using EASE +Base board + Sensor/Motor shield) one connected to proximity sensors and other to stepper motor. The stepper motor's shaft approaches a proximity sensor every rotation. The proximity sensor measures the distance between the shaft and sensor in millimeters and conveys it to the master. The master has logic which determines when the shaft has passed the proximity sensor and counts the number of rotations along with the time period to calculate the RPM.
Similar to this example, we can build different devices using Base Board (an Arduino, Mbed, or any other MCU board with SPI capabilities) + Sensor/actuator shields + EASE. The Base board will have the logic to capture the data from the sensor/actuator. EASE will facilitate communication of the data from these devices to a central application (EtherCAT Master application on the PC) which can be designed to control the entire system of devices connected to it. Multiple EASE boards can be connected with Ethernet cables with a daisy-chain topology and powered via Ethernet cables with Power-over-EtherCAT (POE) technology. Thus we can build an IOT system easily using the existing Ethernet infrastructure.
- The Esmacat Master S, Esmacat Master C or PC with Windows/Linux will be the EtherCAT Master of the system. Ensure that your Master is connected to a display, keyboard, and mouse for the implementation of this tutorial.
- The master communicates with the EASE slave via an Ethernet cable
- A POE (Power Over EtherCAT) injector is connected in series with the slave and master, to ensure that the slave receives logic power (24 VDC) over the same cable that carries the data for communication. The Ethernet cable from the Master is plugged into the input of the POE injector. The output of the POE injector is plugged into EASE’s IN port.
- EASE 1 is directly mounted on the Mbed Board 1.
- The Motor Shield is mounted on EASE 1.
- The stepper motor and DC power supply is connected to the CN1, Supply and motor phases connector of the motor shield. Please refer to the User Manual of Motor Shield for further details.
- The Ethernet cable from the OUT port of EASE 1 is plugged into the IN port of EASE 2.
- EASE 2 is directly mounted on the Mbed Board 2.
- The Proximity Sensor Shield is mounted on EASE 2.
The basic hardware connection of EASE is illustrated in Figure 1 and Figure 2
- Small work around for hardware on Motor shield is needed because the Motor shield and EASE have a conflict for a need on same pins.
- Motor shield needs Pin D9 and EASE also needs pin D9. To avoid this conflict D3 is set as PWM pin in Mbed Board 1 software. Because now the D3 pin is set as PWM some hardware changes are required to be done for the motor shield. When the motor shield is mounted on the EASE board the pin D9 must be left floating and not inserted in the headers. And the pin D3 on the motor shield header should be connected to pin D9 with an external wire. Please see the red boxes highlighting the changes in the picture below
- Software for EtherCAT Master : Download from our software page. After downloading this code you will have to copy the code files my_app.cpp and my_app.h attached to this project into esmacat_applications\my_project\. Note: You may have to tune the values of #define MOTOR_LOW_THRESHOLD and #define MOTOR_HIGH_THRESHOLD based on the physical placement of the Motor and the Proximity sensor.
- Software for Mbed Board 1: Import the code in your Mbed compiler here.
- Software for Mbed Board 2: Import the code in your Mbed compiler from here.
- Verify the code for Mbed Board 1 using the Compile button on Mbed. The code should compile successfully.
- Download the binary generated on the Mbed base board 1 by dragging dropping it to the USB mounted on the PC. For this step, the Mbed board should be connected to your PC with a USB cable.
- Repeat the steps 1 and 2 to Compile the code for Mbed base board 2 and download the binary generated on the Mbed base board 2.
- Once the binaries are successfully uploaded, press the reset button on the Mbed board, the program should automatically run.
- Once the program is uploaded on the board the, the board should be powered by VIN pin of the EASE. Unless you need the USB cable connected to the PC for Serial communication(in this case we may need the base board 1 to be connected to PC for viewing the printf on serial port), you may remove the cable from the Mbed board. Some Mbed boards have jumpers on the board for VIN power selection. Please make sure you read the user manual of the Mbed base board to correctly connect the jumpers.
- Now you need to run the Esmacat Master application. You can build and execute the code on a Linux or Windows environment. The code base has CMAKE support so you can use any environment which support cmake. We have used MS Visual studio in windows and QT creator in linux. For further help you can check Getting Started with Esmacat Master Software in Linux, Getting Started with Esmacat Master Software in Windows
- After the project is build you could run the executable available at location WINDOWS: MyRepositories\Esmacat\esmacat-master-software\out\build\x64-Debug\esmacat_applications\My_project.LINUX : Esmacat/esmacat-master-software-build\esmacat-slave-drivers\project_examples\My_project
- After running the executable you should be able to see result similar to shown in figure below
When prompted to select the adapter, select the number corresponding to the adapter on the list. If the adapter is entered correctly and recognized by the Master, it will list the Slaves on the EtherCAT communication chain, and then proceed to execute my_app.
You should be able to see a result similar as the screenshot and video below.
Thank you for following our tutorial! We are excited to see what users can create with EASE! Please let us know if you have any questions.
DetailedComplete PDF Tutorial can be found here.


Comments
Please log in or sign up to comment.