We believe that we can use biometric sensors to surface possible anxiety states.
Levels of anxiety are increasing worldwide. Between 2005 and 2015 the amount of people living with anxiety on daily basis has increased by 15%. Even more so, anxiety is particularly problematic in autistic patients. They can have severe anxiety attacks in many cases leading to self-harm.
Inspired by the desire of helping a close friend, as well as millions of people across the globe, we've decided to create a concept that can surface possible anxiety states in early stages of manifestation. We are using a blend of biometric measurements combined with the potential of machine learning to correlate and display relevant events.
We believe that a combination of skin resistance, pulse data, brainwave patterns and machine learning provides a more reliable indicator of anxiety states that any other commercially available product. By taking this concept on a product journey we would be able to provide direct benefits to the individuals and carers and system benefits for government and health organisations.
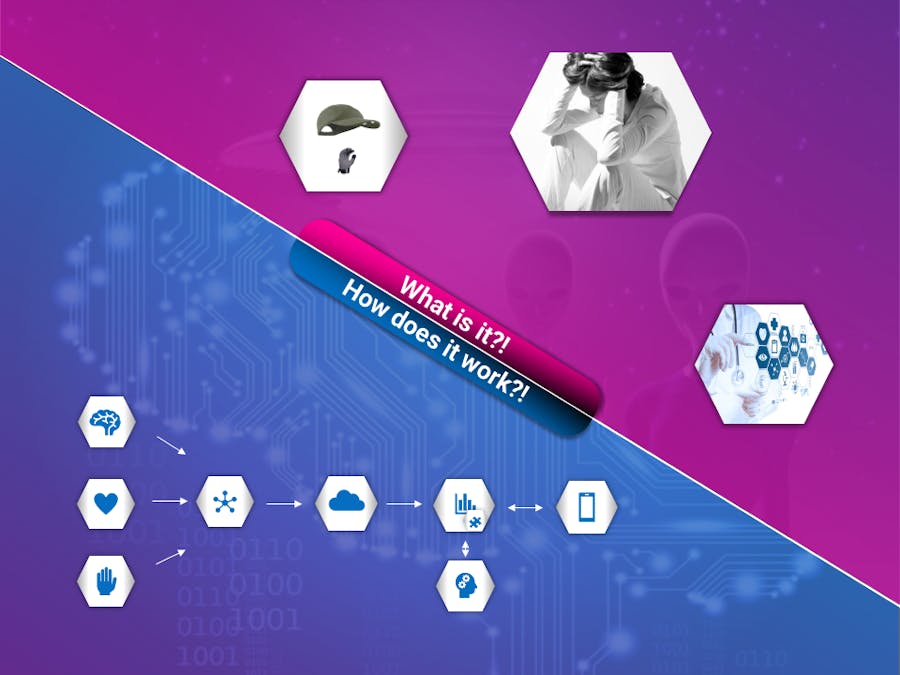
How does the Device work?The Device measures several parameters and sends the combinations securely via our Helium Channel to Google Cloud for analysis. We can then visualise the interpreted results and flag patterns that we believe match a state of Anxiety.
What are we Measuring?Galvanic skin response (GSR), is a method of measuring the electrical conductance (Actually resistance!) of the skin. Strong emotion may cause stimulus to your nervous system, resulting more sweat being secreted by the sweat glands. We measure this using a Grove GSR Sensor
Heart rate is a critical indicator of many physical and mental conditions. Anxiety is generally likely to result in faster, or irregular Heart rates. In some cases, Highly fit / Athletic Individuals, or individuals that have experienced extended bed rest can be experiencing an Anxiety state, but also seeing lower heart rates than generally acknowledged as "normal". Knowing your own Heart rate patterns is an important part of interpreting an Anxiety state. We measure heart rate using a Pulse sensor
Brain Emissions
The Human Brain is an amazing and complex organ that has been studied and marvelled for centuries. Significant Electroencephalography (EEG) research has repeatedly shown that the brain produces low frequency emissions that vary in frequency and amplitude according to activities and mental state. A very high level overview generally categorises these frequencies into five distinct bands.
0.5-4 Hz: Delta waves are associated with deep sleep and are known for triggering healing and growth hormones, hence the reason why sleep is so important!
4-8 Hz: Theta waves apparently occur mainly in children during early sleep stages, in emotionally stressed adults, or are somehow involved with learning and navigation
8-13 Hz: Alpha waves occur when a person is relaxed, but alert
14-30 Hz: Beta waves occur when a person is focused, alert and engaged
above 30 Hz: Gamma waves are associated with sensory perception or perception of consciousness. Considerable research is still being done on all of these.
We measure Brain emissions using the innovative Neurosky Mindwave Mobile 2 Headset, which uses a TGAT Application Specific Integrated Circuit (ASIC) to perform Network edge calculations prior to our Helium Channel Transport. We found Neurosky incredibly helpful to us, and they have an excellent set of Developer tools to enable Arduino connectivity.
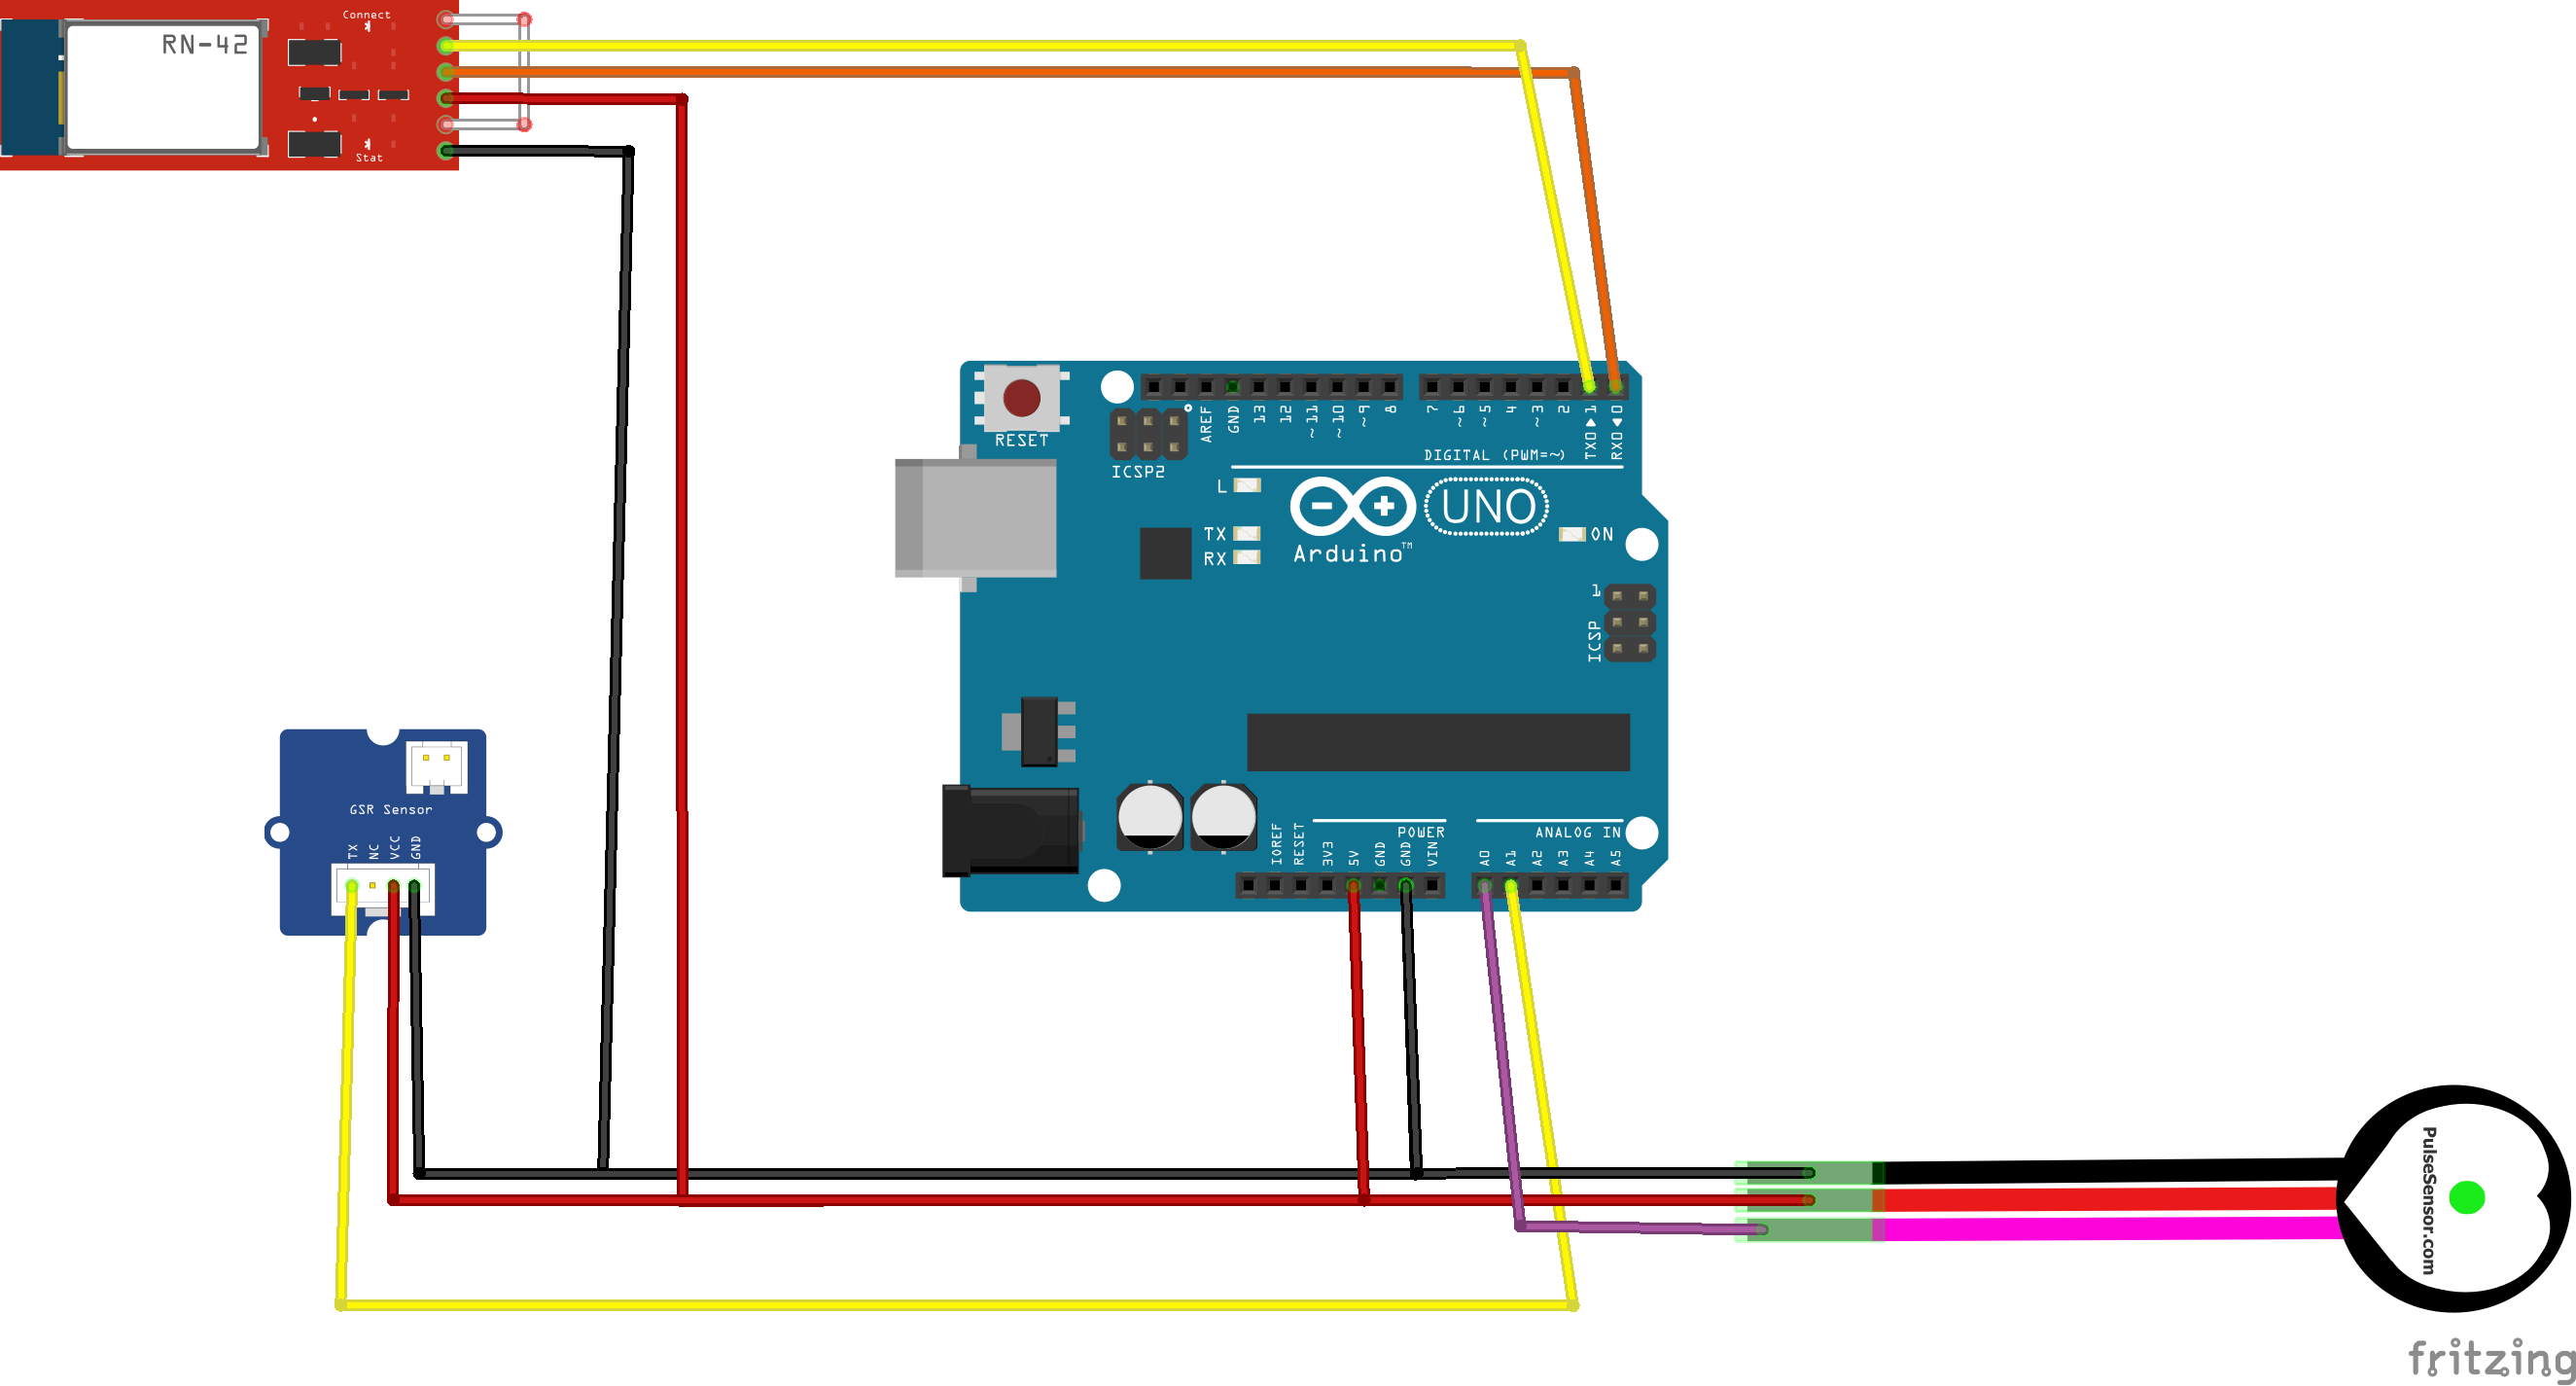
Headset connectivity is acheived via Bluetooth at 57600 baud. This is accomplished by pairing a BlueSmirf Module with the Headset, restarting, and then piping all RX / TX direct between the Mindwave Mobile 2 and the Arduino/Atom.
The Build consists of Hardware and Software components. Let's tackle the Hardware first. As in all great projects, Build up in small sections and test, test, Test!
Hardware - Helium Atom
The Helium Atom is a dual-band, long range, low-power, hardware-secured IEEE-standards compliant wireless module that can be purchased in a starter kit. We are very conscious that our device handles health specific data, and the Helium platform bakes in everything you need for highly secure cloud connectivity. In the Kit is an adaptor shield that fits directly over your Arduino, the kit also contains the Helium Element access point. The Atom connects to the nearest Element out of the box with little interference and requiring no device-level configuration.
You can plug the adaptor directly over your Arduino UNO, and there is extensive and excellent documentation on the Helium Developer site to get you started. However If you normally plug and play without reading the documentation, several items are worthy of note. Here is our Atom on the adaptor with points of interest circled in Red:
We are using an Arduino UNO, so the default interrupt settings of 8 and 9 worked fine. Depending on the specific Arduino board, you will have to configure the RX and TX jumpers on the Adapter to get the board to talk to the Helium Atom using the right pins. Take care to get the antenna orientation correct - follow the labels! FInally you will need the MAC address in order to activate the Atom and activate your Element in your Helium Dashboard. It is worthwhile now going through the activation sequence to ensure your Atom and Element are functioning correctly and sending sample data to the Helium Dashboard.
Hardware - Headset Connectivity
In this stage we initiate basic Headset connectivity. It's worthwhile to start with a fresh sketch and remove the Helium adaptor while getting the Headset connected and paired through our BlueSmirf pipe. The pairing process is documented in a comprehensive worked example here. Our Headset MAC address is "9807 2D80 140B", PIN is "0000", Mode is set to "AutoConnect".
Remember that the Uno has one Serial Port - Once the BlueSmirf is connected to D0 and D1, it's not possible to upload further sketches without errors. You will need to Power down, disconnect the BlueSmirf, Power up, upload new sketch, power down - reconnect the BlueSmirf and power back up! Make sure you also connect and test the Helium Atom adaptor shield at each stage to ensure no IO conflicts exist.
Once everything has been checked and tested, Power up the Headset.
Hardware - Pulse sensor
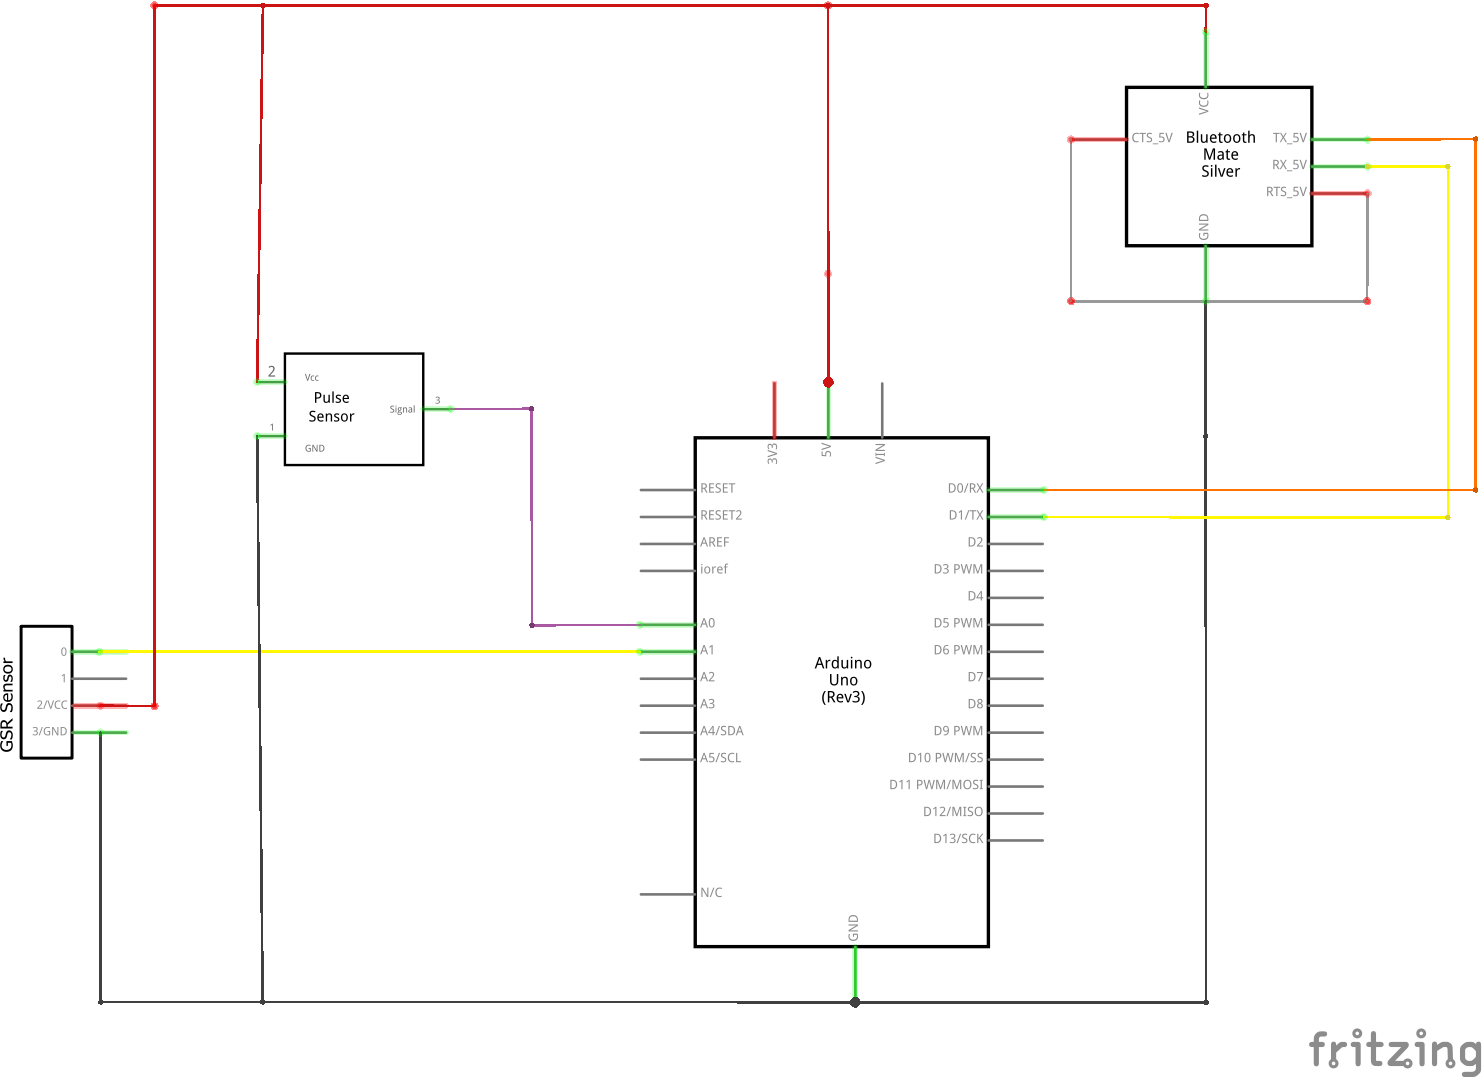
The Pulse sensor is straightforward after the Headset! We recommend that you disconnect everything and start with a new plain sketch. Read the documentation for the Pulse Sensor and install the Libraries. Connect up the red sensor wire to 5v (VCC) and the black sensor wire to 0v (GND). We connected the Purple Sensor wire to the A0 Analog input for our device. Run the sample sketches and You should be able to get an Arduino plot output easily using this method.
Hardware - GSR Sensor
The GSR sensor connection and testing is also straightforward. The finger electrodes plug directly into the Grove board, then the Grove connector has three wires we need to connect. Connect a red wire from Grove to 5v (VCC) and a black wire from Grove to 0v (GND). We connected the yellow Grove wire to the A1 Analog input for our device. Take care to follow manufacturer instructions to calibrate the Midpoint reference for the GSR - it should be adjusted to 512 (1/2 of the Arduino 1024 value ADC). A sample sketch to check basic operation is also available here.
Combine and Build....After we had confirmed the operation of each sensor and sketch individually, it was time to combine everything together and ensure the whole device worked as expected. Rather than a Breadboard, we find that using a screw connector shield helps to keep everything tightly connected..... but not necessarily neat! Here you can see our Helium Atom adaptor shield stacked under the Terminal shield.
The Hardware now needs to be minimised and integrated with all sensors into a single cap that can be worn with dignity in an everyday situation.
Software- Overview
After initializing the sensors and connecting to the Helium cloud, our code connects to each of the three sensors, collects the current data and formats it as a JSON string. This is then sent to Google cloud IOT core via a Helium MQTT channel. It repeats every 5 seconds.
Software - Google Cloud IOT coreTo kick off, We registered with Google Cloud and created a Firebase project. We then built a Firestore Database using the Google Documentation and began to add our JSON data. You can see the function to subscribe to the IoT Pub/Sub to store the data here on our Github.
Once the Firebase project, was created, We uploaded our website to Firebase Hosting (which has a inbuilt connection to Firestore) then subscribed to the Google cloud IOT publisher to listen for real time changes and store them in Firestore. Our website listens to new data points added and charts them on an interactive graph for us to visualize our health state. With the Firebase Server set up, you can see the output below
Here is a Demonstration of the system in action!
Software- Finalsteps
With the Data flowing into our site we can now begin to correlate individual data against several large sample data sets, then produce and send meaningful alerts to individuals and their Carers.
At a personal level this information may allow individuals to self recognise and choose to manage their emotions differently. It may also allow their Carers to respond more rapidly, armed with more detailed specific knowledge of an often dynamic and misunderstood emotional state.
At a de-personalised Macro or System level, this information may provide Government and Health care professionals signficant insights into endemic issues within our society at a local, specific event or discrete community level that may previously have been invisible. This may contribute to more responsive and inclusive policies and more effective community health management.
Our outputs can be seen in our Youtube Video or direct on the Firebase site, All of our code for this project is also available on our Github.


_ztBMuBhMHo.jpg?auto=compress%2Cformat&w=48&h=48&fit=fill&bg=ffffff)


_3u05Tpwasz.png?auto=compress%2Cformat&w=40&h=40&fit=fillmax&bg=fff&dpr=2)
Comments
Please log in or sign up to comment.