Hey everybody.
In this short tutorial I'm going to show you how to make an oled screen 64x128 works with a PSoC5 developing kit. I really went through a bad day in order to make this thing works since I couldn't find the right library. In order to avoid this awful adventure to someone else I will show how to do this step by step.
The first thing you will need to do is to open PSoC Creator and start a new project.
Select the kit you prefer and then move to the top design sheet. Since the oled we are using I2C protocol, we will need to use an I2C master component from the right sidebar (figure 1).
Figure 1. Top design for OLED I2C communication.
Note that I changed the component name from I2C_1 to I2COLED, if you pick a different name you will need to change that in the code later, keep that in mind.
If you build you project now (Build -> build(name of design)) the SDA and SCL pin will be selected automatically, check those out in the pin sheet (double click on pin tag on left sidebar) since you will need to connect those to your oled figure 2.
Figure 2. Pin layout.
We are now ready to move to the code itself. The first thing we want to do is to load the adafruit library code into our project. This can be done by right clicking on the header fold on the left and then loading the necessary header files. header files-> add -> existing and the same thing must be done for the source file (figure 3).
Figure 3. How to add a header file or a source file.
Lets now talk about the source files and the header files. The problem with the classical adafruit library written for Arduino is that the language used is cpp while PSoC only accept C. I had to google some time until I found the following repository on github:
https://github.com/NRDaza/Oled-Psoc5/tree/master/OLED.cydsn
which contain a nice example project for OLED on a PSC.
(All credits for this repository goes to NRDaza)
If you want to make the oled works on your PSoC device you will just need to download the following files from that repository and add those to your project folders as I showed you few lines ago.
Header files:- font.h
- ssd1306.h
- ssd1306.c
These are modified adafruit library code modified for working using C instead of cpp.
So far, so good. We added our libraries and what is left is to edit the main.c file in order to make our PSoC works.
Figure 4 shows the code necessary to activate the I2C communication and to print some line of text on our fresh new oled screen.
#include <project.h>
#include <stdlib.h>
#include "path\to\header\ssd1306.h"
#define DISPLAY_ADDRESS 0x3C // 011110+SA0+RW - 0x3C or 0x3D NOTE1
int main(){
  I2COLED_Start();             // NOTE2
   CyGlobalIntEnable;
   display_init(DISPLAY_ADDRESS); // NOTE3

for(;;){

       display_clear();
       display_update();
       gfx_setTextSize(1);
       gfx_setTextColor(WHITE);
       gfx_setCursor(2,2);
       gfx_println("Hey there!");
       display_update();    //NOTE4
  }
}
Figure 4. Main.c file for text printing.
This is a standard main.c file for a PSoC to work, you will just need to watch out for a couple of things.
NOTE 1: If you are using a 128x64 OLED screen, the address will be 0x3C or 0x3D, if one does not work try with the other one.
NOTE 2: This line will initialize the I2C communication. If you have changed your I2C module name in the top design view from I2COLED to something else, you will need to change that here too.
NOTE 3: This line will initialize your display using the address you specified before.
NOTE 4: Your should remember to update the display in order to see the results on the oled.
The last thing we need to do with Psoc Creator is to build our project (Build -> Build (project name)) and to upload the code to the PSoC (Debug -> Program).
And we are almost done, our PSoC is ready, the code is loaded, just one more step to make it work: wiring!
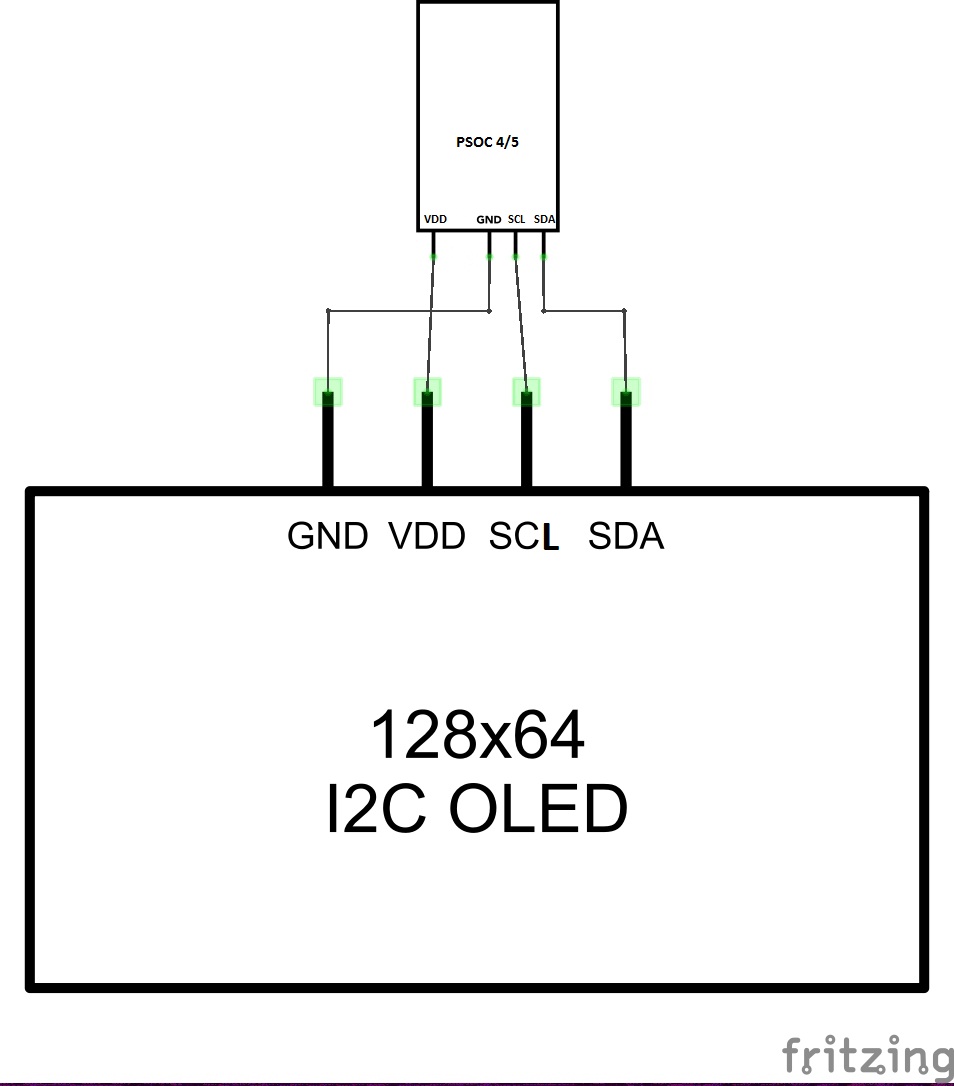
Figure 5 shows the wiring you will need to connect the oled display to the prototyping kit. As I said before, if you used different SDA/SCL pin just change the wiring accordingly.
Figure 5. Necessary wiring.
The working device can be seen in figure 6.
Figure 6. Working OLED on PSoC5.
I hope this short tutorial will be useful for your future projects!
Feel free to ask any question and see you in the next tutorial.


Comments
Please log in or sign up to comment.