
_v9wXXgyus7.gif?auto=format%2Ccompress&gifq=35&w=400&h=300&fit=min)

Hardware components | ||||||
 |
| × | 1 | |||
 |
| × | 1 | |||
| × | 1 | ||||
 |
| × | 1 | |||
Hand tools and fabrication machines | ||||||
 |
| |||||
I developed the Busylight to have a simple and uncomplicated way to tell my colleagues when I am busy. The whole thing, however, without complicated connection and software via the PC, but with manual operation.
I hope you like it.
Do you need help or have I forgotten something to write, send me a message. It's my first project.
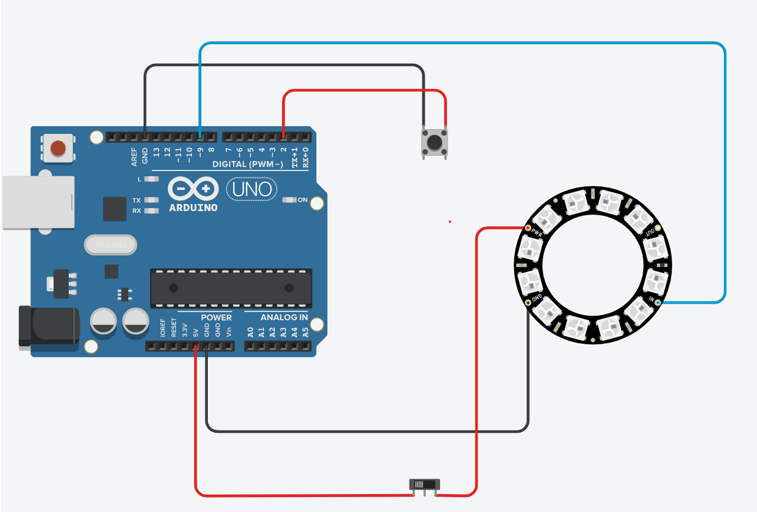
I used the Arduino Micro Pro for the project (in the figure I put an Arduino UNO by mistake). Alternatively, the toggle switch can be omitted if you want to switch off the ring by switching it through.
3DPrintYou can print the parts by yourself. I print everything with PLA and with an Ender 3 Pro
Since the dome and the base will of course always be in the field of vision, the two parts are printed in a layer height of 0.12mm.
The base can be printed without support and the dome with support. I printed the box and the bottom in a layer height of 0.2mm, but 0.28mm should also work, too. It is best to print the box on the head and necessarily with supports. If the parts are printed correctly, the box and board, as well as the dome and base, should fit together perfectly.
If you print the box without a toggle switch, or if you have other cables and the wireoutlets are too small, I will also include the.step in the download.
I designed small cable guides that you can use to hide the cable better, however, you should you use the same cable as I did.
AssemblyI used a ribbon cable to connect the NeoPixel to the Micro Pro. The cables are soldered as shown in the illustration (pull the cable through the wireoutlet of the base before soldering)
IN of the NeoPixel goes to the 9
VCC goes either via the toggle switch to the VCC of the Arduino or directly to the Arduino
GND goes to GND
The button runs over the 2 to GND
After soldering, the ends of the cables on the back must be cut off tightly
Be aware to not make the cables of the button and the cable from the button to the Arduino too short, so that you can plug the box together more comfortably. There is enough space in the box for all cables.
The NeoPixel should fit perfectly into the socket, as a precaution I attached the cable inside the socket with hotglue so that the soldered joints are not directly stressed when pulled.
CodeFor the code, I oriented myself on a different project and then adapted the code for my purpose


Comments
Please log in or sign up to comment.