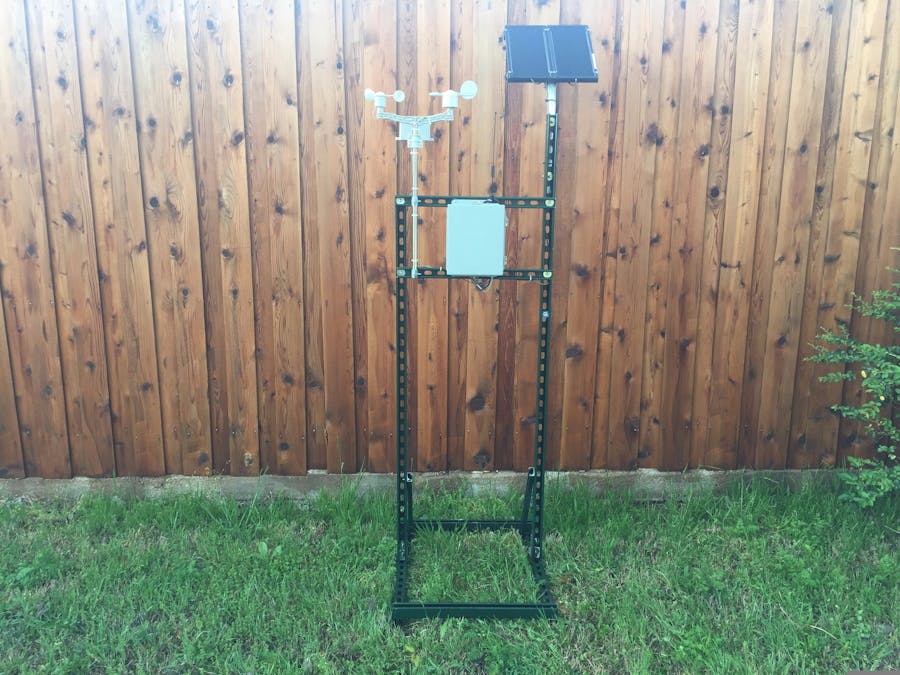
This station can be build for something like 200 bucks, you could even build a fleet of them and deploy them at a moments notice to monitor for hazardous conditions, pollution, or industrial leaks. The unit uses the AT&T IoT starter kit which is a FRDM-K64F ARM microcontroller paired with an AVNET LTE shield. The unit is battery powered and solar charged so it is truly wireless. On top of that the setup can sip on your data plan so responsibly, so much so that you could probably feed a fleet of 30 of them for a month or two with only 1GB of data!
I split this project up into a lot of different videos that made sense to me, I communicate better in video versus typing anyway so...
Here is a list of the videos:
- Overview
- Hardware/ building the rack
- AT&T IoT Starter kit
- MBED, Flow, and M2X
- PubNub
- PowerBI
- Freeboard
- WeatherRack
- MQ-135 Gas Detector
Here is a mostly complete bill of materials.
Electronics:
- Solar panel 12V around 15-30 watts
- Solar Regulator (SunSaver)
- Battery 12V 5-10AH
- Cellular antenna two of these
- MQ-135 gas detector
- Arduino Prototyping shield
- male to Male pin headers
- 12v-5v adapter (can use a usb car charger)
- 18 AWG wire for solar and general hookup
Hardware:
- Rain tight or water tight electrical enclosure (nema 4 box)
- Deep Slotted Strut 20'
- Shallow Slotted Strut 10'
- 4 1/2' strut straps (for weather sensors)
- 2 1" strut straps, for mounting the solar
- 1/4" spring nuts - 15
- Strut 90deg angle bracket
- 1/4'- 1-1/4 fender washers
- 1/4" bolts
- 1/4" Nuts
- 1/4" Locknuts
- Assorted "CGBs" for wire entry into the enclosure keeping it water tight
Getting Started with the AT&T IoT Starter KitQuick Start
There are some great guides, get ready to do some reading!
Guides, here are four of them:
- Online getting started guide https://starterkit.att.com/tutorials/starter-kit-guide
- Lots of example projects and tutorials on Hackster https://www.hackster.io/ATT
Create Accounts:
- Avnet account to register your device and get guides and instructions www.cloudconnectkits.org
- Set up and activate your device, create a developer account https://starterkit.att.com/
Update Firmware:
- You will need to upgrade your cellular shield firmware https://starterkit.att.com/tutorials/cellular-shield-firmware-upgrade.
- Then upgrade the microcontroller firmware https://developer.mbed.org/handbook/ Firmware-FRDM-K64F
Install programs:
- Get a terminal client program like Cool Term http://freeware.the-meiers.org/ or Putty http://www.putty.org/
- Install the NXP K64F Windows Drivers https://developer.mbed.org/handbook/Windows-serial-configuration
- MBED account for programming the ARM microcontroller https://developer.mbed.org/
- If you are doing the tutorial you will also want these accounts
- AT&T M2X IoT cloud offerings https://m2x.att.com/
- AT&T cloud Node-Red logic and application engine https://flow.att.com/
- PubNub is an option for streaming data https://www.pubnub.com/
Program up your Microcontroller to push data all the way into Flow and M2X.
Note:In this example I push data from the Starter kit into Flow, then PubNub, this is how most people have done it for the Realtime AT&T IoT StarterKit challenge.
There is another way that pushes directly from the Starter Kit into PubNub bypassing Flow however there is a bug with the particular versions of mbed and mbed-rtos that makes the program compile but not run if you add analogIn. After a lot of troubleshooting I finally opened a ticket with PubNub who escalated to AT&T who escalated to AVNET. If I get a resolution I will publish an example using this particular library and bypass Flow.
AT&T Flow to PubNubSet up AT&T flow to push data over to PubNub.
PubNub to PowerBIStream real-time data in from PubNub to PowerBI and create a real time dashboard.
PubNub to Freeboard.ioStream real-time data in from PubNub to Freeboard.io and create a real time dashboard.
Learn More about the WeatherRack Weather sensorsLearn more about the MQ-135 Gas Detector SensorThe CodeYou can fork my MBED program and try it out for yourself. https://developer.mbed.org/users/fileark/code/ATT_PubNub_IoT_Hackster/
I have only modified from the ATT example a little bit. I only modified main.cpp to change the publish string, config_me.h for default config, and sensors.h to add my weather and air related items.
Please reach out if you have any questions and enjoy!


Comments
Please log in or sign up to comment.