Have you ever had to get up and turn off the lamp while your are about to fell asleep? Have you ever had to come into bedroom to turn off the lamp right before you are about to leave your apartment? I had such a problem simply because I am a forgetful person, and even though this happened to me many times, still can't I avoid happening again.
Recently I bought an Elegoo smart robot car kit. After playing with it for a while, I decided to use the components to do some practical projects instead of just toys. The kit has Bluetooth module, a cloned version Arduino UNO R3, and a shield to hook up Bluetooth chip and Arduino UNO. Why not build a remotely controllable lamp using these components? This is how the project starts.
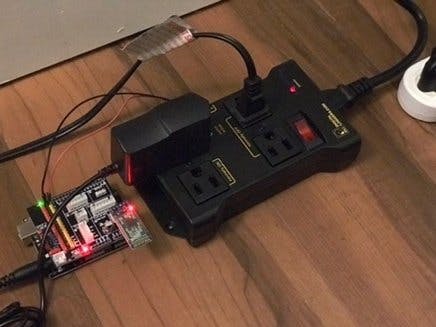
InstructionAt first I considered using some Relay shields on Arduino, but I don't dare to operate on the high power electric lines directly because of safety issue. After all I am a just a hobbyist, not an arsonist. Then I searched online and found a product that matches my needs, IoT High Power Realy. It is an extension cord with 4 power outlets, among which three of them can be programmed. One of the limits of the relay is that all three programmable ports are controlled by a single bit. But for a simple lamp control, it is enough.
The hookup is very easy. First assemble the shield to the Arduino UNO. Then connect Pin 13 and GND to the digital Input of the relay. The reason to use Pin 13 is because Pin 13 also connect the built-in LED. The LED can serve as a indicator light. Use a power adapter to provide 9V to Arduino.
After uploading the code, connect the Bluetooth chip to the shield. NOTE: while uploading the code to Arduino, please unplug the Bluetooth chip, because the Bluetooth chip uses the UART Serial interface to communicate with Arduino. Arduino UNO cannot talked to both Bluetooth chip and your computer using the same Serial port at the same time.
The last thing is to define the buttons in the ELEGOO BLE TOOL app. After installing the app, and enable the Bluetooth function in my iPhone. I click "connect" on the left top corner to let the software scan Bluetooth device. Connect the device HC-08. Then in the keyboard panel, keep pressing the blank button to define the function and message of the button. You can define whatever message you want to use, but it should be a single character. I use "k" as the message to turn on the switch, and "g" as the message to turn off the switch.
Now you can use the app to control your lamp.


_ztBMuBhMHo.jpg?auto=compress%2Cformat&w=48&h=48&fit=fill&bg=ffffff)


Comments
Please log in or sign up to comment.