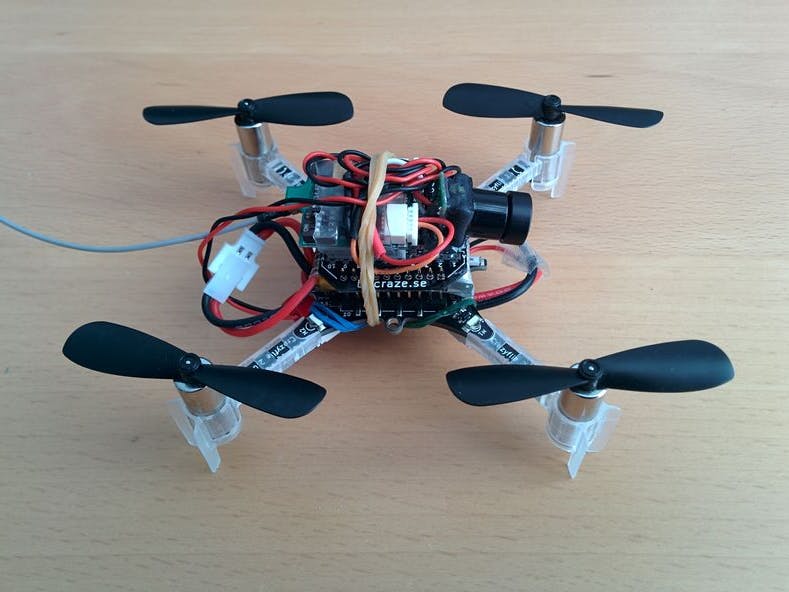
This project was inspired by the following YouTube video from LaDroneShop:
UPDATE 01/2017:
Unfortunately the original parts that were used are not longer available from LaDroneShop, but you should be able to find similar parts at shops like HobbyKing.
For example:
- Quanum ELITE QB58 TX CAMERA COMBO Micro Cam VTX 25mW 40CH 5.8GHz (NTSC) (Camera + video transmitter)
Shopping list (outdated):
If you do not own FPV goggles like a Fatshark Dominator, a FPV monitor is a cheaper alternative. Goggles will give a better immersion and make it easier in the long run though.
Prices:
- Camera: 42 Euros
- Video transmitter: 50 Euros
- Battery: 5 Euros
- FPV monitor: 150 Euros
There are similar products available from other stores, that will probably work equally well.
AssemblyUnfortunately the CF1 battery can not be hooked up to the transmitter directly because they have different connectors (CF1 battery: "Micro JST" or JST-ZH, Transmitter: "Nano JST" or JST-SH). So I had to do some soldering and used different cables.
I also had to solder some plugs to the cable that connects the camera to the transmitter. Some weight can be saved by cutting the cables to the right length.
Before proceeding you should check that the video transmission works!
To mount the camera on the Crazyflie 2.0 the prototyping expansion board can be used:
Use a hot glue gun to mount the camera to the front edge of the expansion board. ATTENTION: Before gluing it tight, please double-check that the camera is orientated the right way up (otherwise your camera can end up looking sideways)!
The video transmitter can be mounted to the expansion board with double-sided sticky tape/pads.
The battery can be mounted to the top or the bottom of the Crazyflie 2.0. The bottom is probably better due to a lower center of gravity. I used rubber bands to affix the battery.
ConsiderationsWith the mentioned components the weight of the Crazyflie 2.0 is increased significantly (it weighs about 46g in total). This also affects the flight time (roughly 4:30 min instead of 7 min).
A separate battery has the advantage that there are no interferences from the motors. It also powers the camera and the transmitter for a long time (about 35 min).
The disadvantage is the increased weight which affects the flight behavior and the flight time.
Instead of using a separate battery, the camera and the transmitter could also be powered by the Crazyflie 2.0's own battery. Depending on the input voltage of the components, a step up voltage regulator must be used.
The whole setup might also be attached to the bottom of the Crazyflie 2.0, to get rid of the rotors in the picture. This would require some kind of landing skid that adds the necessary ground clearance.
LinksDiscussions on the Crazyflie forum about FPV mods:


Comments
Please log in or sign up to comment.