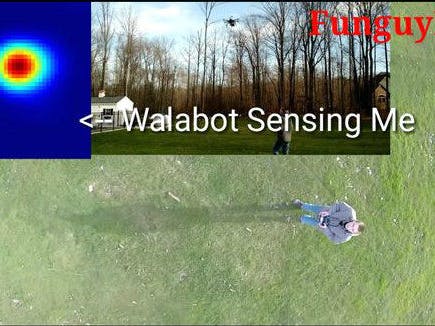
This drone can show where people/things are located within a building (or anywhere) by displaying an image with different colors based on density. It uses a Walabot, Raspberry Pi, and multiple other micro-controllers that send information to a ground-station. This is a very complex and time consuming project but I'm sure if you have some type of experience with building drones and python, then you should be able to complete it. If you have a questions, just leave them in the comments and I will try to answer them. Let's begin!
Questions:- Why would it be good to see through buildings with a drone? My reason was for firefighting and/or SAR, the drone (under legal privileges) will be able to fly above a burning building and show where people or pets are trapped.
- How does it work? It works by using a Walabot, a 16-segment radar array that can "see" through solid objects. The code I'm using displays objects by their density. An animal shows up more red on the screen because of the higher water content in their body making them more dense.
- Are you intruding in my privacy? I know with the way people look at drones nowadays, they believe that they are just for spying on people. I understand that there are people that are inappropriate and should be punished, but most people flying drones are doing everything legal and appropriately. This drone will be only used for good purposes so you don't have to send me messages about how you think I'm breaking the law.
- Frame Rate: The Raspberry Pi Zero isn't powerful enough for the Walabot image processing, so the frame rate is really slow. Suggestion: If you have the room, which I didn't, you should use a larger Raspberry Pi (like the Pi 3).
- Incorrect Display: If there is something like a refrigerator, it will display it just like a person, this could be a problem in some cases. Luckily, if there is a person, they still will show up so it's not too bad to work with.
- Interference: The Walabot sometimes does pick up interference from the motors, luckily it's very rare.
- Battery Life: The drone is really heavy, so the battery life is really bad. Unfortunately, this cannot be changed.
You are going to need to get a lot of parts for this build; I have listed them below. (Be advised that if you choose different parts, like a different frame, you might need alternative parts.)
I ordered most of my parts from GearBest. They all worked and came in a reasonable time.
- Main Frame - I bought mine from eBay with an built in PDB
- APM with compass, GPS, and Power Supply
- Walabot Pro
- Li-Po Battery (3-4Cell 5000mAh)
- Wire
- 6xESC's (30A)
- 3xCounter Clockwise Motors
- 3xClockwise Motors
- CCW and CW Props (You may want spares)
- 5.8GHZ FPV TX/RX
- Raspberry Pi Zero
- Screws for motors or anything else you might need them for
- APM Telemetry
- 2.4GHZ 7-channel min TX/RX
- Heat Shrink
Tools:
- Soldering Iron
- Solder
- Screw Drivers
- Allen Wrenches
- Pliers
- You probably will need other tools but it all depends how you build it
Build your frame first. If your frame has an on-board power supply, you probably don't want to put the top cover on yet. Your frame should come with build instructions, however you probably won't need them.
PHOTO CREDITS: "HKG Store" - Where I bought the frame from.
Step 3: Mount and Solder the Motors and ESCsMount each motor to each arm (MOTOR ORDER MATTERS: FOLLOW THE PICTURE PROVIDED). Solder the ESC to the PDB and solder the motor to the ESC. Before putting heat-shrink on the wires, make sure the motor is rotating in the right direction by connecting the ESC to a receiver and testing the direction. Most motors also have threads for CW or CCW movements, make sure it all matches up.
Step 4: Optional, Install the LEDsI used an Arduino Nano and NeoPixels for the LEDs. Connect everything to a UBEC or BEC (DO NOT CONNECT TO THE FC, IT DRAWS TOO MUCH AND WILL FRY IT). You can find a project for building the LED setup on my website here. I used electrical tape to hold the LEDs on the arms.
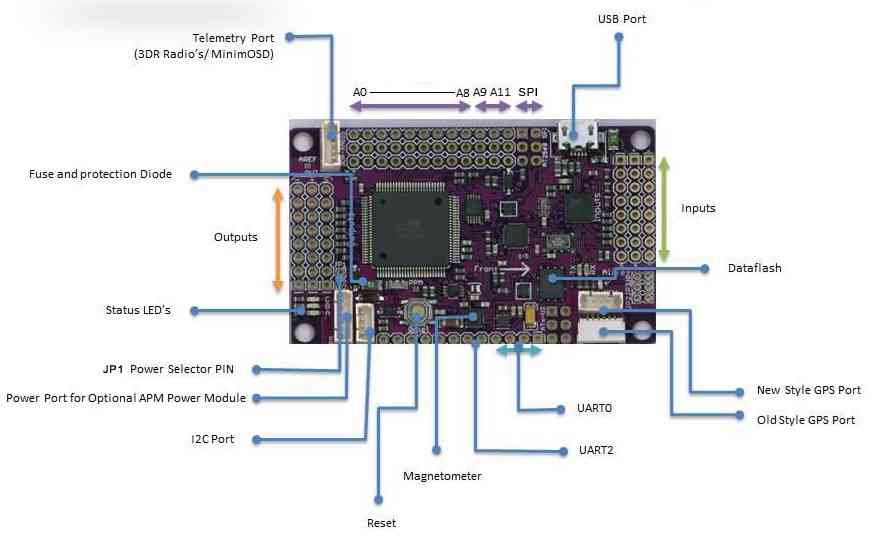
Step 5: Install the FC and Its Add-OnsI used a vibration absorbing mount to hold the APM on the frame. Everything else can be mounted however you would like, vibration won't affect it. The compass (which is attached to the GPS) should be above the motors to prevent motor interference, I did this by using a GPS mount attached to my 3D printed dome cover. Use the wiring diagrams I provided for understanding the correct connections.
I RECOMMEND YOU FOLLOW THE ARDUPILOT SETUP GUIDE IF YOU NEED MORE INFO ON SETUP INSTRUCTIONS.
*NOTE: It is a good idea to keep the antenna away from any area with higher power running through it for best operation.
Step 6: Test Out the Drone and Configure ItYou can now attach the props and battery and test the drone. It is normal for it to not fly good at first; this is because you must configure the PIDs. If you are using telemetry, this is easy: land your drone and change the PIDs (pictured), then takeoff and test it again until it flies how you like.
This can be a time consuming process; you can use auto-tune but I have never used it.
***You should have already completed the settings in the initial setup tab***
Step 7: Setup the Walabot and Raspberry PiYou will need at least an 8Gb flash drive and Raspbian installed on it. Plug it into the HDMI (if you have another Raspberry Pi you can configure the stuff on it first, then switch the SD card to the Pi Zero) and wait for the GUI to start. Open the web browser and download the Walabot SDK for Raspberry Pi. Once it is installed, you will need to add the following lines to the boot/config.txt file to support the Walabot.
safe_mode_gpio=4
max_usb_current=1
Reboot the device now.
Once it reboots, we will test out the "walabotdrone.py" script [DOWNLOAD THE FILE] in the GUI (it doesn't matter where the file is located).
**HINT: You will want to make it so it starts the script automatically. Unfortunately, I cannot show how to do this because there are so many different OS versions for Raspberry Pi and they are all different.
Step 8: Attach the Walabot and Raspberry Pi to the DroneI drilled 4 holes in the Walabot case and attached standoffs. Then on top of the standoffs, I attached the Raspberry Pi Zero. I used a transformer case as the mount for the drone. It stuck well to the Walabot magnet. I used hot glue and super glue to ensure the mount wouldn't come undone. Make sure you have the 5V, GND, and TV pins in place before you put everything together, it will make things easier for you.
WARNING: Be careful with the Walabot, you probably would be better to use gloves when handling it.
Step 9: Test Out the WalabotWithout flying the drone test out the Walabot and video transmitter. When it calibrates, point it towards the sky so there is nothing there, this will make it so the Walabot will detect everything when scanning. Make sure it works how you like and change the settings (yes, you still can use a keyboard and mouse) until it works how you like.
My results: The first image is just "static". The bottom where the colors are is my roof that I used for testing. The second picture is when I walked into the room where the Walabot was facing, you can see me as the red blob in the middle (it was facing downward).
Watch the video for a better visualization.
Step 10: Dome/CoverI 3D-printed a dome for the hexacopter. I got the original design from thingiverse, but had to make some changes. The original was too small and I couldn't mount my GPS so that is why I edited the design. You can find the new design on my website.
WARNING: MAKE SURE THE DOME DOESN'T TOUCH THE FC (APM) - it could case vibrations resulting in a crash.
Step 11: Test Flight!Do your first test flight. The PIDs may need to be re-tuned for the extra weight. Test it out first by walking under it; there should be a red blob. Now, IF IT IS SAFE, fly over a building and have somebody inside; see if you can see them. If you cannot, change some of your settings or re-calibrate it until they show up as a red blob. *Note: there will be a lot of rubbish because of other things in the building, you will need to go by your best judgement to configure it.
Watch the video!


_copy_P5AWOdT4dX.png?auto=compress%2Cformat&w=48&h=48&fit=fill&bg=ffffff)


Comments
Please log in or sign up to comment.