


Hardware components | ||||||
 |
| × | 1 | |||
 |
| × | 1 | |||
 |
| × | 1 | |||
Software apps and online services | ||||||
| ||||||
 |
| |||||
| ||||||
| ||||||
In today's interconnected world, the fusion of artificial intelligence and hardware opens new avenues for human-machine interaction.
This project demonstrates how to integrate a generative conversational AI agent to control physical hardware, specifically by activating a buzzer through voice commands.
Problem StatementWhile voice assistants have become increasingly prevalent, many operate within closed ecosystems, limiting customization and direct control over specific hardware components. This poses challenges for developers and enthusiasts aiming to create personalized home automation solutions or adaptive devices controlled via voice.
Project Description – From Voice to HardwareThis project showcases how a generative conversational AI voice agent—powered by ElevenLabs—can be used to control physical hardware through natural conversation, without requiring fixed commands or traditional voice control logic.
Built using the Seeed Studio XIAO ESP32S3 and Firebase Realtime Database, the system listens to natural language prompts and executes actions in real-time, such as activating a buzzer or other connected components. The agent doesn’t just recognize voice commands—it understands intent, making the interaction feel truly human.
This is a low-code solution, designed to be replicated and adapted by developers, educators, or makers with minimal programming effort. You don’t need to build an NLP engine from scratch—just talk to the agent, and it handles the logic and control for you.
Whether you’re prototyping smart devices, accessibility tools, or voice-controlled environments, this project shows how easy and powerful it is to bridge conversational AI and hardware.
Step 1: Firebase Realtime Database – Setup & ConfigurationWhat You Need:
- A Firebase account
- A Firebase project (can be new or existing)
- Realtime Database enabled
- (Optional) Firebase Authentication if you want to secure access
Step-by-Step Instructions:
1. Create a Firebase Project
- Go to Firebase Console
- Click "Add Project"
- Name your project (e.g.,
voice-buzzer) - Enable Google Analytics (optional)
- Click "Create Project"
2. Enable Realtime Database
- From the project dashboard, go to the left sidebar
- Click on Build → Realtime Database
- Select your database location and click "Create Database"
- Choose Start in test mode (we’ll secure it later)
- Click Enable
3. Define Initial Data Structure
Click the "Data" tab, then paste this structure:
{
  "buzzer": {
    "id": {
      "state": 0
    }
  }
}
This sets the buzzer status to OFF by default.
4. Copy Your Database URL
You’ll need this for Make. Copy the URL from the top of the database screen: https://your-project-id.firebaseio.com/
Save this; we’ll use it to update the buzzer value.
5. Generate a Database Secret / Auth Token
If you want to secure the database:
- Go to Project Settings > Service Accounts > Database secrets
- Generate a secret key
- Use this as a bearer token in Make(For quick prototyping, test mode without auth is okay)
What You Need:
- A Make.com account
- The Firebase Realtime Database URL (from Step 1)
- Your database path:
/buzzer/id/state - A Firebase Auth token
Goal:When the ElevenLabs agent detects a command like "turn on the buzzer, " it sends 1 (on) or 0 (off) to a Make webhook, which then updates the state field in Firebase.
Step-by-Step Guide:
1. Create a New Scenario
- Log into Make.com
- Click Create a new scenario
- Click + to add your first module
- Search for "Webhooks" and select it
- Choose Custom webhook → Add
- Name it something like
buzzer-control - Click Save – it will generate a custom URL
Copy this webhook URL – we'll use it in ElevenLabs later.
2. Add a Firebase HTTP ModuleSince Make doesn’t have a built-in Firebase module, we use HTTP:
- Click the "+" to add a second module
- Search for "HTTP" → select "Make a request"
Configure HTTP Module:
- Method: PATCH
- URL:
https://<your-database>.firebaseio.com/buzzer/id.json
Replace <your-database> with your Firebase DB URL.
Headers: Authorization: Bearer YOUR_FIREBASE_SECRET
Body Type: Raw → application/json
Request Content (Map this dynamically):
{
  "state": {{5.state}}
}
This lets you send 0 or 1 from the webhook payload directly to Firebase.
Step 3: ElevenLabs Conversational AI – Agent Setup + Webhook ToolWhat You Need:
- A free ElevenLabs account
- The custom webhook URL from Step 2 (Make.com)
- A basic idea of your hardware command logic (1 = on, 0 = off)
Goal:Create a conversational agent in ElevenLabs that understands voice commands and sends a webhook payload (1 or 0) to trigger hardware actions via Firebase.
Step-by-Step Guide:
1. Create a New Agent
- Go to the Conversational AI section in ElevenLabs
- Click Create new agent from scratch
- Give it a name, e.g.
NeoorHardware Assistant - Set the Agent Language to:
Default language: EnglishAdditional languages: Optional
2. Set Agent Behavior and Prompts
First message:Hi, I'm NEO, how can I help you today?System prompt: Analyze the user's message and determine their intent:
If they want to turn on the device, the value is 1
If they want to turn off the device, the value is 0
If the intent is unclear, kindly ask the user to clarify their request.
Keep the conversation natural:
If the user asks something about the device (its status, how it works, etc.), answer first before executing any action.
If the user just greets or starts a general conversation, respond in a friendly way and wait for specific instructions.
Execute the action:
Once the intent (1 or 0) is identified, trigger the tool named "Hardware" and pass that value as its property.3. Add and Configure a Webhook Tool
- Scroll to the Tools section
- Click Add Tool → Custom Tool → Webhook
- Then click Edit Tool and fill out the configuration:
Basic Info:
- Tool name:
Hardware - Tool description:
Identify the user's intent and assign a value of 1 or 0 depending on whether they want to turn a device on or off. Only send that value as a property.
Webhook Settings:
Method: POSTURL: YOUR WEBHOOK URL FROM MAKE.COM
Body Parameters:
- Click Add property and configure:
- Identifier:
state - Data type:
string - Value type:
LLM PromptDescription:1 or 0 - Required: ✅ (checked)
- Save changes to your agent and the tool.
Your ElevenLabs agent is now ready to interpret spoken commands and forward the correct state (1 or 0) to your Make webhook!
Step 4: Configure XIAO ESP32S3 with Firebase – Board Setup + Arduino CodeWhat You’ll Do:
- Install ESP32 board definitions
- Install Firebase client library
- Upload code to control a buzzer remotely via Firebase RTDB
1. Install the ESP32 Board for Arduino IDE
- Open Arduino IDE
- Go to
File > Preferences - In the Additional Board Manager URLs, paste this: https://raw.githubusercontent.com/espressif/arduino-esp32/gh-pages/package_esp32_index.json
- Press
OK - Go to
Tools > Board > Boards Manager - Search for esp32 and install the latest version by Espressif Systems
Once installed, go toTools > Boardand select:XIAO_ESP32S3
2. Install Required Libraries
Open Library Manager via Sketch > Include Library > Manage Libraries and install the following:
- Firebase ESP Client by Mobizt
WiFi(built-in for ESP32)
3. Upload the Code
Paste this full code into the Arduino IDE and replace the placeholder values:
#include <WiFi.h>
#include <Firebase_ESP_Client.h>

/* 1. WiFi credentials */
#define WIFI_SSID "YOUR_WIFI_SSID"
#define WIFI_PASSWORD "YOUR_WIFI_PASSWORD"

/* 2. Firebase Web API Key */
#define API_KEY "YOUR_API_KEY"

/* 3. Firebase Realtime Database URL */
#define DATABASE_URL "https://your-project-id.firebaseio.com/"

/* 4. Authenticated Firebase user (must exist in Firebase project) */
#define USER_EMAIL "your_email@example.com"
#define USER_PASSWORD "your_password"

// Firebase objects
FirebaseData fbdo;
FirebaseAuth auth;
FirebaseConfig config;

unsigned long sendDataPrevMillis = 0;

// GPIO pin for buzzer or relay
const int BuzzerPin = 1;

void setup()
{
  pinMode(BuzzerPin, OUTPUT);
  digitalWrite(BuzzerPin, LOW);  // Off by default

  Serial.begin(115200);
  WiFi.begin(WIFI_SSID, WIFI_PASSWORD);
  Serial.print("Connecting to WiFi");

  while (WiFi.status() != WL_CONNECTED)
  {
    Serial.print(".");
    delay(300);
  }

  Serial.println();
  Serial.print("Connected! IP address: ");
  Serial.println(WiFi.localIP());

  // Firebase configuration
  config.api_key = API_KEY;
  auth.user.email = USER_EMAIL;
  auth.user.password = USER_PASSWORD;
  config.database_url = DATABASE_URL;

  // Auto-reconnect on WiFi failure
  Firebase.reconnectNetwork(true);

  // Configure buffer sizes for secure communication
  fbdo.setBSSLBufferSize(4096, 1024);

  // Limit response size
  fbdo.setResponseSize(2048);

  // Start Firebase
  Firebase.begin(&config, &auth);
  Firebase.setDoubleDigits(5);
  config.timeout.serverResponse = 10000;
}

void loop()
{
  // Check Firebase every second
  if (Firebase.ready() && (millis() - sendDataPrevMillis > 1000 || sendDataPrevMillis == 0))
  {
    sendDataPrevMillis = millis();

    int buzzerIdState;
    if (Firebase.RTDB.getInt(&fbdo, "/buzzer/id/state", &buzzerIdState))
    {
      digitalWrite(BuzzerPin, buzzerIdState);
      Serial.print("Buzzer State: ");
      Serial.println(buzzerIdState);
    }
    else
    {
      Serial.print("Firebase Error: ");
      Serial.println(fbdo.errorReason().c_str());
    }
  }
}
Important Notes: The path/buzzer/id/stateshould exist in your Firebase RTDB and hold a value of1(ON) or0(OFF).
The user defined inUSER_EMAILandUSER_PASSWORDmust be registered in your Firebase Authentication with Email/Password enabled.
The pinStep 5: Connect Actuators with Grove Shield for XIAO – Control a Buzzer via Firebase1is used here; you can changeBuzzerPindepending on your wiring (on XIAO ESP32S3, usable GPIOs include 1, 2, 3, etc.).
What You’ll Do:
- Mount the Grove Shield on your XIAO ESP32S3
- Connect a Grove Buzzer to digital port D1
- Test the full setup remotely using Firebase RTDB
Assembly Instructions
- Snap the XIAO ESP32S3 into the Grove Shield
- Use a Grove Cable to connect the Grove Buzzer to the port labeled D1 on the Grove Shield
- Plug the USB-C cable into your computer or power source
That’s it! The Grove Buzzer is now physically connected to GPIO 1 (D1), as expected by your code:
const int BuzzerPin = 1;In this section, we’ll walk through how to test the full system: from voice commands to activating a buzzer through Firebase using your ESP32S3.
How It Works – End-to-End Flow
1. The user (or a system) sends a request to change /buzzer/id/state in Firebase to 1 or 0
2. The ESP32S3 reads this value from Firebase every second
3. If the value is 1, the buzzer is turned ON (GPIO goes HIGH); if 0, it turns OFF (GPIO goes LOW)
4. The buzzer beeps or stays silent depending on the current state in Firebase
Test It Live
To test your system:
- Make sure your ESP32S3 is flashed with the correct code and powered on
- Ensure the Grove Buzzer is connected to port D1 via the Grove Shield
- Confirm that your scenario in Make.com is turned ON
- Open your ElevenLabs conversational agent link (a voice chatbot you can speak to in natural language)
Example Voice Commands You Can Try
You can say things like:
“Turn on the buzzer.”“Stop the buzzer.”“Trigger the alarm.”“Silence everything.”
Your AI voice assistant will understand the intent, and behind the scenes:
- It sends a signal to your Make.com scenario
- Make updates the Firebase value at
/buzzer/id/state - Your XIAO ESP32S3 reads the change and reacts by activating or deactivating the buzzer
You've just built a full-stack, low-code, voice-controlled IoT project—connecting cloud AI, Firebase, and hardware with minimal coding. This is what we love at Gabotrix: fast prototyping, accessible tools, and empowering creators at any level.
What You Just Built
- Voice-activated automation using natural language
- Real-time control through Firebase RTDB
- Low-code firmware for the XIAO ESP32S3
- Plug-and-play setup with Grove Shield and sensors
- A foundation for more advanced AI + IoT interactions
Built by Gabotrix – Prototyping for Everyone
This project is part of our mission at Gabotrix: making hardware and AI more accessible and collaborative for makers, educators, researchers, and innovators across LATAM and beyond.
We’re not just building projects—we’re building a movement around low-code prototyping and open innovation.
Open for Collaborations
We’re always open to hardware collabs, content creation, and exploring new ideas with communities, universities, or tech companies.
Want to co-create content, run workshops, or launch cool stuff together?📬 Reach out: support@gabotrix.com
Next Tutorial – Coming Soon!
In our next tutorial, we’ll take it further:💬 Ask our conversational agent about sensor readings in natural language📊 Convert those readings into low-code reports you can use or share📦 All using Firebase, Make.com, and the ESP32S3 — no advanced coding needed
If you’d like us to publish it soon, give this project a like or share it!It helps us know you're interested and keeps the free content coming!
Let’s keep building cool stuff together. This is just the beginning.
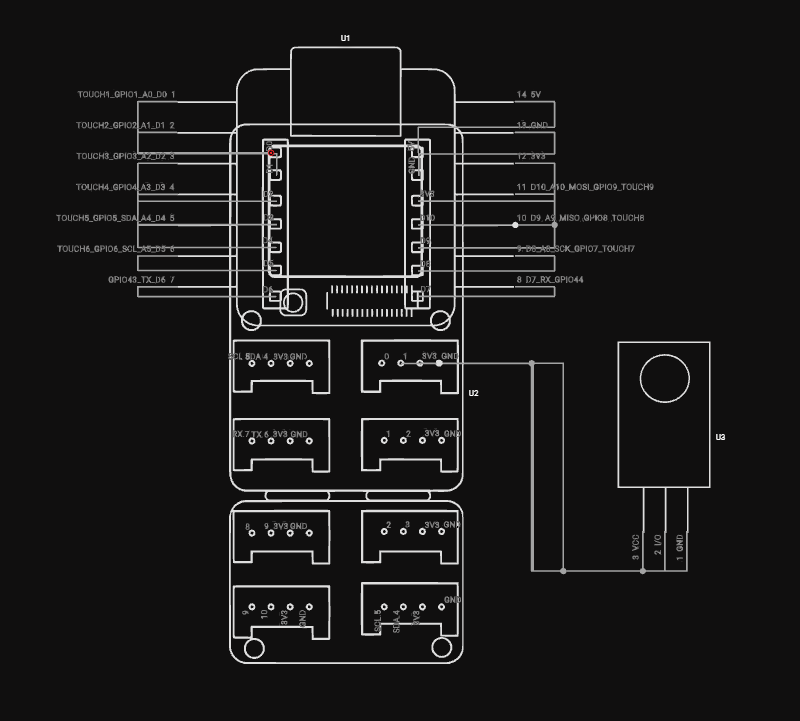
Wiring Diagram – XIAO ESP32S3 with Grove Shield and Buzzer Module


Comments