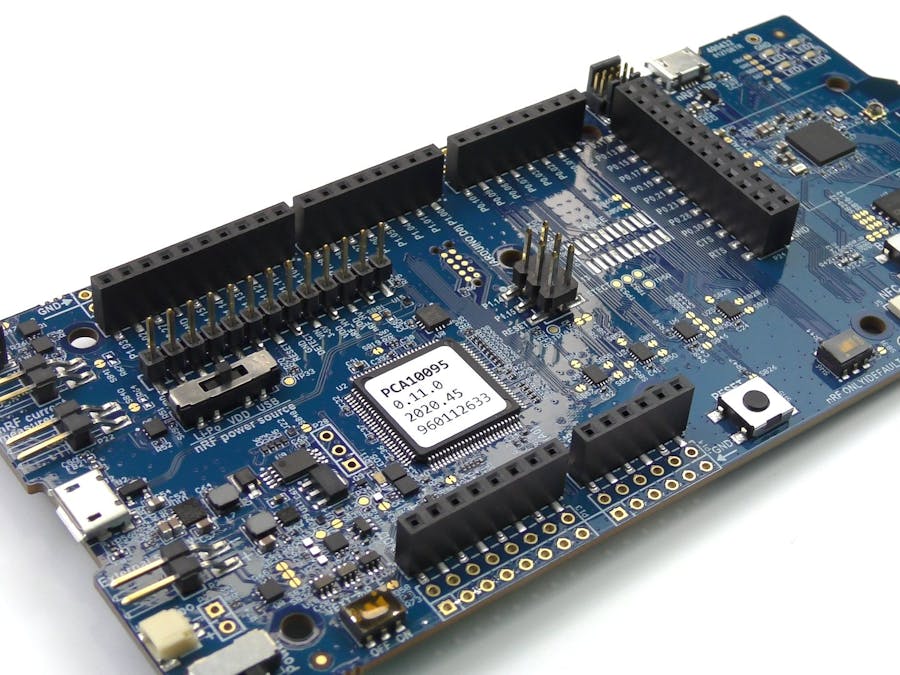
Bluetooth is used for countless peripherals and IoT products, and due to its low power and versatility, it is a prime candidate for use in embedded systems to communicate with other devices. The nRF5340 Development Kit from Nordic Semiconductor is a great platform to get started with Bluetooth development and learn how to network wireless devices with useful protocols. The board comes with the following specs:
The main focus of the board is the nRF5340 SoC, which has
- 128 MHz ARM Cortex-M33 CPU + 1MB flash + 512KB RAM (For applications)
- 64MHz ARM Cortex-M33 CPU + 256KB flash + 64KB RAM (For networking)
Bluetooth 5.2 support, including
- Bluetooth Low Energy (BLE)
- Direction Finding
- Mesh
- Thread + Zigbee protocols
It also has onboard NFC, advanced security features, USB, Quad-SPI, HS-SPI, and supports voltages from 1.7V to 5.5V. This makes the nRF5340 Development Kit great for projects that require low power consumption, but also plenty of peripherals and connectivity. The use of two CPU cores also means one can be powered down to save battery life while the other handles periodic networking tasks.
Testing Blinky and Heart Rate Monitor (HRM) ExamplePlease follow the URL provided on the nRF5340 DK box and complete the getting started steps there first. Once you have finished testing the Heart Rate Monitor (HRM) example, feel free to continue below.
Installing the ToolchainIn almost any workflow, you'll need a way to get your code into a format that can be loaded onto your target chip. This normally involves some kind of IDE, compiler, linker, and programmer/debugger. To create and load programs for the 5340, you'll need to start by downloading and installing the nRF Connect for Desktop tool. Then run the Toolchain manager, which will install the SEGGER Embedded Studio (the IDE) and the nRF Connect SDK (code that is needed for the Nordic boards and SoCs).
After following all of the on-screen instructions, you should be all set to start developing for the nRF5340!
Kit CommunicationThe nRF5340 has an onboard debugger, which lets the host computer load programs, view the status of registers, and step through the program line-by-line. This also lets your board show up under a serial port (such as COMxx for Windows or /dev/ttyxx for Linux) and lets it connect to a terminal emulator. To use this for viewing various output or for collecting data, you can download a program like TeraTerm, PuTTY, or the Arduino IDE's Serial Monitor. Use the following settings:
- 115200 baud rate (default for most program samples from the SDK)
- 8 data bits
- 1 stop bit
- No parity
- HW flow control: RTS/CTS
Then just use the processor's UART peripheral to read and write data between the kit and the host computer. The kit will provide 3 ports in total, and they behave in the following order by default:
- Network core data on the first
- Silent on the second
- Application core on the third
After clicking Open IDE for the toolchain you just installed, go up to File->Open nRF SDK Project, which makes another window appear. From there, choose the beacon project and the nrf5340dk_nrf5340_cpuappns board. Then click OK.
You should now see the project within the IDE, so go to the Project Explorer on the left side and find main.c, which is under Solution 'build'->Project 'app/libapp.a'->C_COMPILER_app. This file is where the application code is written, and this example just causes the kit to advertise a URL via BLE, and it is not connectable. Build the project by either pressing F7 or by going to the Build menu.
Once the kit has been connected to your computer via USB, go to Target->Connect J-Link. You might have to 'unlock' it in order to load programs via the J-link debugger. Then go to Target->Download zephyr/merged.hex to load the file onto your board. Because there are two cores, projects that are meant to use the network core need to be merged into a single HEX file. Binaries for one core are in the form of ELF files. For this example, the merged HEX file is already present.
You are also able to debug the program by going to Build->Build and Debug, which gives access to the registers, memory, and more.
In order to view the output of this sample application you'll need the nRF Connect for Mobile app that lets your phone connect and read/write data to the development kit. After scanning for a bit, the development kit should show up Test Beacon. Upon further inspection, you should see a service UUID of 0xFEAA, a URL, and Tx Power.
Notice that the URL is defined in main.c at line 31.
And that's it! Now you can begin to create your own programs and projects by using nRF Connect, or view other SDK samples.


Comments
Please log in or sign up to comment.