


Hardware components | ||||||
| × | 1 | ||||
| × | 1 | ||||
| × | 1 | ||||
| × | 1 | ||||
| × | 1 | ||||
 |
| × | 1 | |||
 |
| × | 1 | |||
 |
| × | 1 | |||
 |
| × | 1 | |||
 |
| × | 1 | |||
| × | 1 | ||||
| × | 1 | ||||
| × | 1 | ||||
| × | 1 | ||||
| × | 1 | ||||
| × | 1 | ||||
| × | 7 | ||||
 |
| × | 7 | |||
| × | 1 | ||||
| × | 1 | ||||
| × | 1 | ||||
Software apps and online services | ||||||
| ||||||
 |
| |||||
Hand tools and fabrication machines | ||||||
| ||||||
Climate change challenges homeowners to face the reality of increasingly frequent and intense bushfires. To avoid major loss of life, the advice from the fire service, police and planners is to evacuate. Take what you can, leave your house, and hope fire fighters can cope. And often, they can't cope.
The project aims to protect the house from bushfire when you are told to leave. Spraying systems can be activated, by the homeowner, or automatically. Loss of mains electricity and internet is common in major fires and is addressed.
Temperature and smoke sensors, as well as press button and Blynk, can start spraying.
The author lives in a rural area of Tasmania, Australia. He was a volunteer fire fighter for 15 years and worked extensively on fire safety for the home through a community fireguard program.
In Australia and many other countries, rural residents rely on tank water. Many have limited water to fight fires and probably don't have ‘off the grid’ solar power available. Your situation might be different of course, you might even have the luxury of a piped, good pressure, water supply.
ConceptInitially, and because of the ‘off the grid’ requirement, a deep cycle battery and 12 volt pump was used to spray water around the house. Now the system is evolving towards an auto-start generator. Since a small pump has limited capacity, a micro-controller sequentially controls a number of spray or sprinkler lines. A number of ‘triggers’ are built into the controller. The triggers utilise temperature and smoke sensors programmed to automatically start the pump at critical thresholds:
• high temperature
• sudden rise in temperature
• heavy smoke
• elevated temperature plus smoke
As well, the system can be started by
• a start switch (‘start and run’ switch)
• a smart phone app switch linked to the system via the home WiFi and thus the internet.
If the WiFi is unavailable the sensors will still work automatically. The phone app also shows the temperature and smoke, allowing monitoring from many kilometres away – provided the WiFi is working and the internet is available. Phone towers have been disabled in past major bushfires. While the system is designed for the real possibility of the 240v power supply going down, you may want to consider an arrangement that can start on 240v mains and switch to generator power if needed.
Another useful addition would be an ESP32-CAM sending photos to Blynk.
Development of the concept is welcomed.
What will it cost?
Each situation will be different. For those with off-grid power and a large dam, there is less infrastructure. Much of the work involves siting sprinklers, leading hoses to them, and fitting solenoid valves and wires. The micro-controller costs are surprisingly low but learning to code Arduino boards and the Blynk phone app is a steep learning curve for those not immersed in IT. The code is freely available as an example. Prices of key components are given in Part 3 below.
Is it worth doing?
While an automated spray/sprinkler system cannot guarantee your home will survive a bushfire, it should certainly improve your chances. With climate change and more forceful evacuation messages it should provide better peace of mind, if not save your situation. Do you have to evacuate? Legally, in most Australian jurisdictions, the answer is no. However it is usually the safest option if done early. Consider not only your safety, but the safety of fire fighters.
The system, provided you have built it robustly, will mean you home is better prepared than it was. That is useful in itself. Here is a fire service advisory message issued just after a nearby bushfire was contained and the fire weather eased. (Tas Fire Service website, Snug Tiers fire, Feb 2025):
There is no immediate threat.
Tasmania Fire Service and Tasmania Parks and Wildlife Service are attending. Conditions are expected to be changeable.
What to do:
If you have a bushfire plan, check it now.
Well prepared homes are expected to be defendable in these conditions.Monitor conditions, and if they get more dangerous, and you are not well prepared, plan to go to a safer place.
How good is the science?
The short answer is, it’s early days. Smoke sensors have been around for years and are utilised in building fire systems and smoke alarms. Temperature sensors are likewise proven items, as anyone with a home weather station can attest. Micro-controllers drive anything from washing machines to coffee makers. Phone apps are ubiquitous. What isn’t known is what level to set the ‘triggers’. How long to spray for? Will it be enough water in high wind? What can go wrong in your situation? One battery will pump continuously for maybe an hour, longer with intermittent pumping. The solar panel will help but output will be reduced in heavy smoke and when daylight recedes. How much is enough? Will the electronics be robust enough? All these can be considered however, and adapted to your situation. Plus, we need many installations and many tests before final guidelines can be provided.
Off-grid power 1 - batteries
Batteries are expensive. At the moment deep cycle lead-acid batteries seem my best option. I'm aiming for 3-4 hours pumping while 'off grid'. Those with solar power and a battery have a solution on hand. While large home storage battery prices are falling, and smaller options such as e-motorcycle batteries are coming on to the market, they are relatively more expensive that lead-acid.
Off-grid power 2 - generator
Auto-start, or two-wire start generators are now available and are reasonably affordable. If such a generator is configured to start up when the grid power fails, it's a compelling option. No lead-acid batteries are needed. Mains powered pumps are relatively cheaper and offer more water volume so maybe there might be fewer solenoids to wire up. Four hours or more pumping time can be easily achieved. See Part 4.
Where should I start?
Oddly enough, the gutters are a key issue. Years ago, if a bushfire was close, the advice was to plug your down-pipes and fill the gutters with water. Burning leaves could not settle in the gutter and then send sparks and heat into the roof area. These days, gutter guard mesh probably is a better option.
You might not need a pump. If you have good water pressure - from mains water or elevated tanks or a dam - the water delivery is much simplified. Depending on the pressure, you might only need a few lines.
I built my water delivery system in stages. The sprinklers came first, with special attention to wetting down the vegetation and the house on the fire weather side. Next season I added the mist sprayers, to better protect the many windows and, because I have a timber house, keep the walls cool.
Water
Properties without a reliable water supply will need a water tank. A 4600 litre tank, minimum, is suggested for a small to medium sized house. More water is needed to protect sheds and outbuildings. The tank(s) are best dedicated to fire safety in the summer.
Pipe and Hose
How many of each? I will have two systems, one for the house and office, the other for the sheds. That’s two pumps, solar panels and chargers. The house has four impact sprinklers and solenoids for them, plus three spray/mist lines and solenoids for each hose line. Wire depends on distance from the pump and battery and how many ‘arms’ the system has. The sheds will have a similar arrangement.
It’s worth testing to see what hose works. Garden hose is 12mm, but 18mm is preferable for getting a volume of water over a long run. See https://www.bunnings.com.au/holman-18mm-x-30m-yardmate-garden-hose_p0047705. 30m costs $80. Maybe you have a short run and 12mm hose works. That’s fine, and cost is $20 to $30 for 30m. Map it out.
Poly pipe is often the best solution although joins aren't quite as easy as garden style hose. Garden hose is good for initial siting and testing. If you have 1 inch input and output on your pump, use 1 inch poly pipe for delivery. Bury the hose line.
If you put the solenoids near the pump and not at the end of the hose line, and have one line for every sprinkler or sprayer you will save on wire, but may need more hose. The mist spray lines use 13mm black poly pipe with a spray every metre or so. If you have a lot of spray outlets on the line, it requires a lot of water.
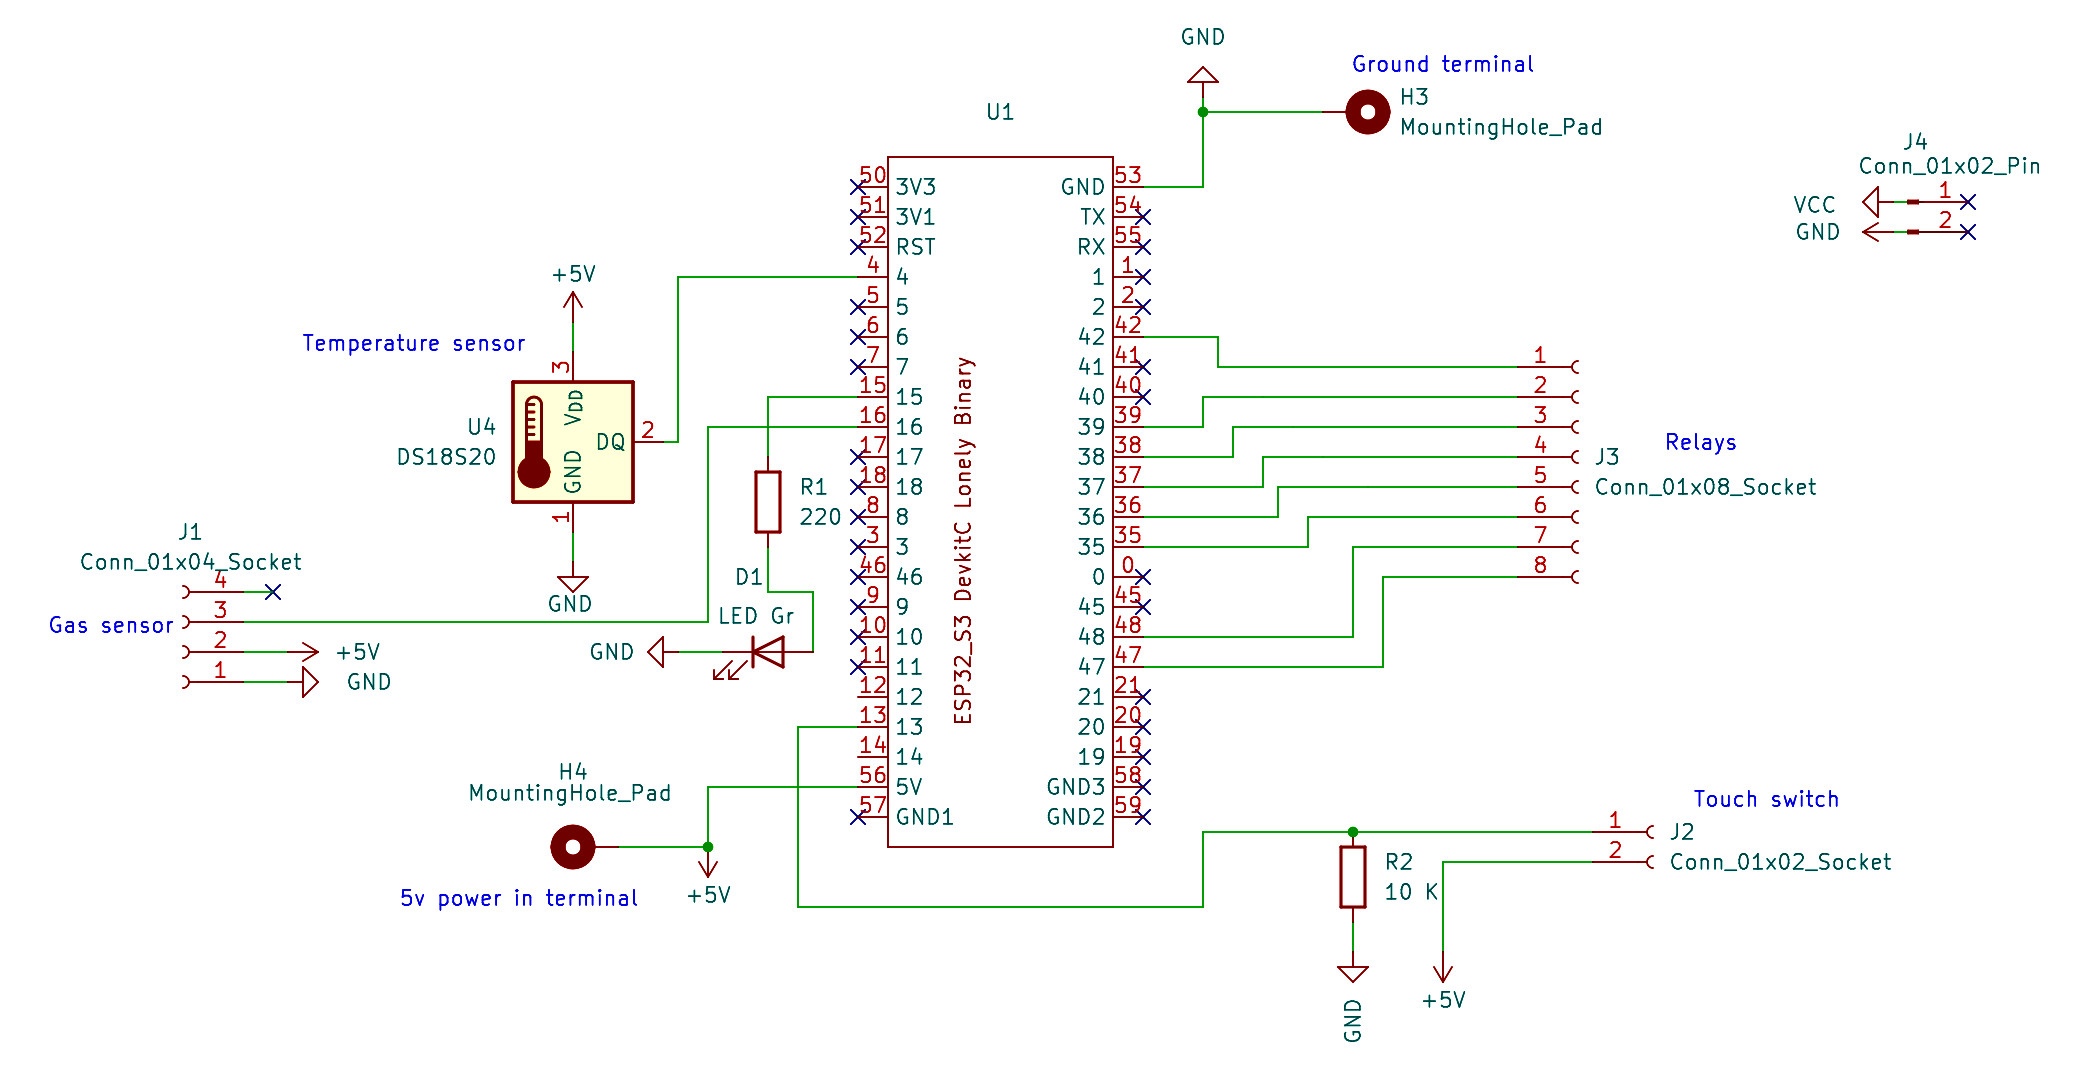
The External CircuitryI followed the circuit suggested by LarryD in the flyback diode post mentioned above, https://forum.arduino.cc/t/flyback-diode-required-for-relay-board-and-12v-solenoid/422993
The major difference is that I used an 8 channel relay. Jaycar provides a datasheet for this XC4418 relay, https://media.jaycar.com.au/product/resources/XC4418_datasheetMain_67843.pdf?_gl=1*1ssimnp*_gcl_au*MTAxNDQ3ODA2My4xNzI1NTA1MzA1 However that doesn’t cover how to connect the external components. Note that the centre terminal on each channel connects to the +ve, and the leftmost terminal will carry that positive to the solenoid once the relay is activated.
In my design the ESP32, buck converter (or voltage regulator) and relays are all housed in one box, but the wiring is almost the same. Important difference: an eight channel relay takes 12v, so the black and red wires to the relay will come from the battery end of the buck converter. Jaycar one to four channel relays use 5v as shown here.
For eight channels the wiring to each solenoid is repeated in parallel. The detailed illustration below shows the eight channel hookup, the horizontal red +ve wires are connecting each centre pin. The lower red wires, when switched, will take the +ve to the solenoids or the pump. The dark plugs at the bottom are waterproof connectors. Note this is not automotive style +ve and -ve wiring in the connectors. [Update Oct 2024. The connectors have proven to be a little unreliable, probably due to my not using a perfect wire size. I am now looking for something like a stainless steel terminal strip. - GM.]
Bushfire attack essentially takes five forms:
Wind: Strong winds resulting from severe bushfires will drive embers into vulnerable areas of a building, preheat and dry fuel ahead of a fire, lift roofing and extend flames along a more horizontal plane closer to building elements.
Smoke: While smoke will cause minimal damage to property, it can severely affect the health of residents. Smoke is a significant factor in at risk developments, particularly where residents are susceptible to respiratory disorders. Smoke can also reduce visibility during evacuation or shelter situations.
Embers: Ember attack is responsible for most bushfire related building fires. Embers can also cause spotting in advance of the bushfire and ignite building elements.
Radiant heat: Radiant heat can severely impair the health of residents and the integrity of building elements. Radiant heat can prevent emergency services personnel assisting occupants of at risk developments.
Flame: Flame attack will severely restrict fire fighting operations, resulting in the ignition of building elements and a threat to the health of residents and their capacity to evacuate the area.– NSW Rural Fire Service, https://www.rfs.nsw.gov.au/plan-and-prepare/building-in-a-bush-fire-area/what-you-need-to-know/decision-tree-pages/goal-13
Your systemPlanning your system requires you to carefully evaluate how to respond to each of those elements of bushfire behaviour.
Wind: you should be aware of your most likely wind direction for bush fire. Gale-force hot winds, which way do they come? What’s affecting the direction? Valleys, trees, vegetation? That side of your house may need more water. If you get the chance, set up a sprinkler next high fire danger day and see what it does. Think about wind carrying your water spray away from where it will be effective. How long will it take to dry that side of your house if you do spray it? How long does it take to wet it down?
Smoke: isn’t going to burn your house down, but is a warning and thus a trigger for your system. You can have intense smoke from kilometres away, think about how that might work. Really intense pungent smoke is usually an indication that a fire is on top of you. If you have limited water, that should be your trigger. I used a beekeeper’s smoker to calibrate my system.
Embers: the peril of eucalyptus forests. Consider your house from top to bottom. I have a Colourbond roof and vertical board walls. I have a fine mesh gutter guard in all the buildings’ gutters – for keeping leaves and embers out of my gutters and also to keep leaves out of my water tanks. To cool the boards and windows I have a fine mist line high up the walls and running all the way around the house. This also serves to add to the accumulated water at the foot of the walls, because that is where smouldering or even burning leaves will gather. Further out, I have the heavy duty sprinklers spraying in an arc to saturate the closer trees, shrubs, lawns and walkways.
Radiant heat: what fuel is near the house? Remove flammable trees or have enough water and spray power to wet them down. Imagine your favourite gums on fire, up their bark and in their crowns. Don’t have an avenue of such trees around your house, particularly on the fire weather side, separated trees are better. Look at the trees for wind protection (needed) and trees as fuel (a problem). It’s a tricky balance that has to be addressed. Also look at adjacent sheds or buildings. Can they catch alight? Look to your windows, how might they be affected?
Flame: is what we are trying to avoid. Wet, cool surfaces don’t burn. However the extremes of bushfires make it hard to plan for a fire sequence. It might be ember attack, then fire front, then ember attack for hours following. It might be fire front first! Your system has to cope with the possibilities.
Mine is set up to spray a sequence of a minute each, heavy sprinkler, then mist line, then next heavy sprinkler, then next mist line, working around the house. I checked it out on a high fire danger day with high winds and everything around the house looked flooded. A sequence lasts about seven minutes, then will start again if smoke and temperature trigger it, or I set it going through my phone app.
Doing Community Fireguard work for Tasmanian Fire Service some years ago, I took the opportunity to ask people about their experiences in the 1967 fires – still considered one of the worst ever – and later fires. Three observations stuck with me: “The winds were 100 miles an hour, the temperature 100 degrees [F], and the dams were all empty!” (Ted Domeney. talking about 1967.) “I watched the embers flying across the Channel and saw the fires start up on Bruny Island. There were fireballs, burning balls of gas, blowing over the water.” (Colin Glanville, talking about 1967.) “The big gum outside the house had burnt and the heat had cracked the upstairs window. Sparks blew in and a chair was smouldering. Luckily we got back just in time.” (Ridgeway resident, talking about 1998). Ideally, your house, and windows, should be cool and wet enough to survive. Bushfires can be extreme, and quirky.
Now look again. Heat travels upwards. On the leeward side of the house I have a hill that falls away. Unfortunately it has many gums and wattles. After a fire front has passed that area may take a while to be set off by embers, but when it gets going it will be very hot, burning hard, uphill, right towards the house. Are you exposed?
Arduino on the triggerThe automated part of the system involves the micro-controller (an Arduino ESP32 model in my case), programmed to start the pumping sequence when:
- the temperature is over 45º C. Rationale: a 35 to 40º C day is not uncommon for fire weather, plus the sensor is in a box. The box is ventilated to allow air (and smoke) to move through it but an elevated temperature is expected. Then a fire will add to that.
- the smoke is more than 4000 ppm. Rationale: calibrated by passing smoke over the sensor. Also checked using the gas from a cigarette lighter eld close to the sensor.
- the smoke is more than 2500 ppm AND the temperature is over 45º C. Rationale: a fire could be approaching in lower temperature and the wind is not blowing intense smoke over the unit yet. Smoke and heat together should be a useful trigger.
- the temperature increases 4º C in a sudden ramp. Rationale, an approaching fire might raise heat more or less steadily above the ambient hot day temperature, even on a 25º C day. Any weather hotter than 20º with winds more that 20 knots plus low humidity can be bad fire weather. (The 20/20 rule.) The system takes an average of a ten second period (call this a decade) and compares it against the decade just before, and just before that, looking back over the past nine decades.
These figures have not been tested in a bush fire! We need many units and some real world experience to add to the science. I will use my system to monitor the sensors and add to my knowledge and fine-tune my estimates.
Finger on the triggerIt may be that your local radio, fire brigade or community fireguard alert you to an approaching fire. Fires start somewhere, you might be unlucky and it starts near you. Throw your valuables into the car, turn on the system and press the button. The spray should be working as you drive away to your evacuation centre. After one full spraying sequence it will stop. But the sensors are there waiting; as it’s triggered it will start another sequence.
Blynk on the triggerMicro-controllers are readily connected to WiFi. Some units can be connected to the mobile phone network in 4G or 5G. My system is based on the house WiFi and the unit can send and receive information over the internet. Blynk (https://blynk.io/) provides a fairly easily programmed system to allow Arduino style programs to interact with a phone app or via a computer. My app includes a button to start the system at a distance, and a monitor to see if it has already started due to one of the other triggers.
If the power to my house is lost so is my WiFi – unless I have time to change my modem to battery, where it will continue to connect to the internet via 4G. (No fibre optic NBN here, but at least I have moved up from ADSL+.) Since the system is on a 12 v battery, the Arduino should keep communicating.
The app, and the start button, are useful for testing the system – especially to check if program changes work correctly.
About the codeThere are three files:
- OTATelnet_Blynk_PCB_UA_4-31.ino, the main file.
- OTA_Telnet_2.h, for the communications components
- creds.h, the credentials file.
Main file
The settings for the triggers are gathered early on.
//// this section for the triggers >>>>>>>>>>>>>>>>>>>>>>>>>.
const floatramp = 4.0;// a sudden rise in temp will start the pump. Degrees C.
floatminTemp = 45.0;// for getting the minimum of an array of temp values. Set it high to start. ramp will compare with this.
const floatmaxTemp = 50.0;// startup temp
const intgasTrigr = 4000;// this value will set off the system
const intgasTrigrLowr = 2500;// this value will set off the system in combination with elevated temp.
These constants allow you to vary the number of hose-lines you will be pumping, and the duration of water delivery for each hose-line.
constbyte numLines = 7;// the number of water delivery pumping lines connected to the relays
constbyte lineTime = 60;// how long each water line will pump for in seconds
>>>
The lineTime constant will work between 10 seconds and 255 seconds. For testing, I suggest 10 seconds. For practical use, 60 seems right for my house. If your local fire weather warning is for 20 plus C but high winds with very dry vegetation, plus existing fires in the area, you might lower minTemp and maxTemp. I set them high initially to avoid false starts and wasting scarce water.
If your situation requires only, say, four water lines, change the constant numLines appropriately.
const intc = 35;// y=mx+c equation for temp sensor calibration
const floatm = 14.6;// y=mx+c equation for temp sensor calibration
I have tried various temperature sensors and, in spite of the claims for some, they need calibration. The TMP36 sensor response is linear, although I have seen some log equations used. I set up a spreadsheet to plug in the voltage readings (float TMP36_mV in the code) and the temperature readings from a Thermopro TP350 temperature and humidity unit which should be accurate to 0.5 degrees C. A couple of coordinates are enough to calculate the equation. While this isn’t laboratory accurate it’s much closer than the specs settings. I have used 500 mV offset, from the specifications sheet. Next time I will connect the TMP36 to the 3.3v pin of the ESP-32, rather than the 5v I have now. My readings should then come in line with the specifications.
The function for temperature reading and averaging is
void checkSensorsAve() {
for (intj = 1; j <= numTempReads && analogRead(tempPin)> 0; j++) {
thisTempRead = (analogRead(tempPin));
tempReadBucket = tempReadBucket + thisTempRead;
}
numTempReads is set to 10. I have found that the sensor is capable of giving 500 or more readings each second, which one would think should give a better average. However the more reads, the more dropped reads, particularly if the unit is busy trying to connect to its communication sub-systems. Ten reads only each second gives a very stable result and leaves the remainder of the second for other processing activities. analogRead(tempPin)> 0 requires that a read can’t be empty – which would upset the average.
- checking the pumping duration and sequence
- checking the Blynk information was working and the start button functioned
- checking temperature calibration
I found the processor seems to be most stressed when the internet is patchy – quite likely in fire conditions. A number of programmers have suggested restarting the processor to give the best chance of reconnection. For this reason I built a counter to measure wifi downtime, and after 20 minutes (1200 seconds), the system restarts.
void restart() {
if ((downDecades > 120)&& (started == 0)) ESP.restart();
}
The disadvantage of a restart is the loss of pumping cycle information. It’s very useful to know how many times the unit has been triggered.
The pumping function, void pumping(), works through activating the relays for the pump and the water lines. The water line opens two seconds before the pump starts, so as not to stress the lines. The pump stops two seconds before the line closes. Then the next line sequence begins.
The float lineNowPumping is for checking where the pumping sequence is up to.
The floatnumPumpCycles shows the completed cycles.
Since I was limited with the number of variables I could use in Blynk, I combined these into what looks like a decimal number but isn’t. On the phone app, Cycles/line of, say, 2.7, indicates there has been two completed cycles and the unit is pumping on line 7. When that last line is complete the number clicks over to 3.
creds.hThe credentials file isn’t included because it’s confidential. That’s the idea.
Yours should look like this (keep the quotation marks):
const char* MYssid = "YourWiFiName";
const char* MYpassword = "YourWiFiPassword";
// Blynk
#define BLYNK_TEMPLATE_ID "YourBlynkTemplateXXXXXYYYYZZZ"
#define BLYNK_TEMPLATE_NAME "Fire spray system"
#define BLYNK_AUTH_TOKEN "YourBlynkToken"
Part 2 – Software and CommunicationArduino to PCB – a steep learning curveA number of people I have talked to expressed interest in the system, but were daunted by having to learn electronics and programming. This section explains a little of what is involved - those already conversant with Arduino programming, OTA, circuit design and board making etc may skip this section.
If you don’t like the idea of soldering and programming, you might find someone in your family or community who is willing to take this on. The plumbing of the hose lines is something most people can do.
The internet has great resources for training videos and discussion. The Arduino and Blynk websites have very useful introductions. Jaycar and other product supplier websites have not only Arduino compatible products, but also specification sheets explaining how to wire up the item and use it with a micro-controller. The Arduino IDE makes programming very straight-forward.
ArduinoAs of February 2020, the Arduino community included about 30 million active users based on the IDE downloads. – https://en.wikipedia.org/wiki/Arduino
Arduino micro-controllers have been available for nearly 20 years and their programming and utility is very well developed. They have a reputation for reliability. The ‘integrated development environment’ handles the programming aspect, with a programming language check, upload to the Arduino board facility and a comprehensive library of ready to run software called ‘sketches’ – and much more.
For those interested in the challenge of learning to build projects and program the Arduino, or compatible devices of other brands, there are excellent learning resources online, including beginners courses. Paul McWhorter’s Arduino Lessons (https://toptechboy.com/arduino-lessons/) are comprehensive and entertaining. Although I must admit I’m still a novice programmer.
I was given an Arduino Uno to ‘start playing with’; thanks Gene. I blew it up after a few weeks by powering it from an external source, then, wanting to upload a changed sketch, I plugged the board into my computer in the usual way. Lights out. Not good. That encouraged me to work through the tutorials more carefully.
I soon realised it would be easier if I could upload the sketches wirelessly. This led to OTA or Over the Air programming – a great improvement. OTA however means you can’t use the serial port in the IDE to track and debug your sketch, so you need an external window, like Telnet. Fortunately someone had already written the code, it was a matter of using the right Google search to find it.
Then on to Blynk and the phone app. Once again there were many examples to look at, and simple sketches to begin with. Blynk also led to the choice of the ESP32 S3 board with an external antenna. I had found, for my situation, the low powered boards need this extra hardware.
My program incorporates not only the triggers and pump start-stop relays, but also WiFi and OTA, Telnet and Blynk. And I had to make sure that the basic triggers would keep working if the WiFi was unavailable – quite possible in a real bush fire.
Pete Knight, a moderator on the Blynk forum, recommends ESP32 boards, and also, ‘keep your main loop clean’. The forum proved invaluable. The programming was more of a challenge than soldering up the parts.
Breadboards to PCBsI started with a basic ‘push in the leads’ breadboard to test the idea. Wires everywhere! And hardly robust – after a week some of the connections were loose. On to a solderable breadboard with components on the front and fairly linear wiring on the reverse. Still rather messy and a dry joint was very hard to track down. The soldering was tricky too, I needed magnifiers to see what I was doing and a new soldering iron with a tiny point. I finally landed on a battery powered 6W soldering iron from Jaycar https://www.jaycar.com.au/battery-powered-6w-soldering-iron/p/TS1535?srsltid=AfmBOooegESU0W7gDC9mIWZrKJpWLnCHWekQW4WTpALk9IwkM9n9iz5e
Only 6 watts? You couldn’t burn your finger on that could you? It’s very adequate for PCBs and has the added benefit of longer protection of the tip. You only heat it up when you need it (10 seconds). No cord! I bought some heavy duty re-chargeable batteries and I’m still on the first charge.
KiCad was suggested for PCB design. Thanks Gene.
SEAFLO 55 Series Water Pressure Pump $224, Amazon
Century Deep Cycle Battery N70T 102 Amp-hour, SuperCheapAuto, $252 with solar panel and charger, SuperCheapAuto, $149 OR
Westinghouse iGen4500AS Auto Start Inverter Generator, A$2999, Harvey Norman.
12V DC 1/2" Water Solenoid Valves - Normally Closed. Amazon, $8.47 each
IN4007 ‘flyback’ diodes. Jaycar, $1.60 for 4. Available from Little Bird Electronics or Jaycar.
Multi-Core Irrigation Cable, SunShower Online.
9 Core Irrigation Cable 0.5mm costs $2.85 per metre. 3 core costs $1 per metre.
Sprinkler capable of covering approximately 450 to 500m².
Holman 15mm Metal Impact Sprinkler Head, Bunnings, $24.55
Garden hose 18mm, Bunnings. 30m costs $80.
Garden hose 12mm, Bunnings, $20 to $30 for 30m.
Poly pipe K-Rain 13mm x 50m Black, Bunnings. $24.12
Poly pipe K-Rain 19mm x 100m Black, Bunnings. $59.
Lonely Binary ESP32-S3, Amazon, $30.
8 Channel relay to handle 12v, $21.95, Jaycar.
Automotive Fused Relay SPST 30A, 12.95 Jaycar
Power supply regulator, 12v to 5v. Arduino Compatible DC Voltage Regulator Module CAT.NO: XC4514 Jaycar $10.25.
Temperature sensor TMP36 - Analog Temperature sensor, Little Bird Electronics $5.80
MQ-2 smoke sensor module, Little Bird Electronics $9.66.
Jumper wire F/F to neatly connect the circuit to the sensors and relays. Little Bird Electronics, 40 pin, $6.36.
Solderable breadboard, Core Electronics, $9.80.
Part 4 – Off-grid power using a generatorMy initial thought was to invest in a self-starting generator such as the Westinghouse iGen4500AS Auto Start Inverter Generator, https://generatorstore.com.au/westinghouse-igen4500as-auto-start-inverter-generator/. This unit has continuous output: 3700 watts; maximum output: 4500 watts.
- Outlets: 2 x 15Amps
- Run Time: Up to 19 hours
- 240v to 12v transformer
Also, I thought to utilise an affordable 240v pump which would provide more capacity. This proved to be a difficulty however. Electric pumps have a high starting load. How high is hard to ascertain as most don’t show it in the specs.
Useful advice can be found here: https://forums.whirlpool.net.au/archive/2564605 "Pumps are notoriously hard on generators at start-up (particularly if the gen is equipped with electronic AVR) and can call for up to nine times the motor rating."
I emailed the Ozito company about their 350 watt model (which I have). They replied that you need a 3.5 kw generator to safely use it! Which is similar to the Whirlpool comment. Since I plan for two pumps to be running at the same time, the generator would not handle it. Maybe there are suitable pumps out there, let me know if you find one.
The 12v Seaflow pump detailed above plainly says “Max amps 15.0” on the label. With only 180 watts max, the generator should handle two pumps with ease.
The first test was to change the battery/solar panel setup to mains power. I kept the 12v pump and added a 240v to 12v transformer with 30 A capacity:
( https://www.amazon.com.au/dp/B07JW614VR?ref=ppx_yo2ov_dt_b_fed_asin_title)
This worked fine on mains and with my Honda generator – which is not self-starting however.
The second test was to set up a fire system for the sheds. I came across a pump on Amazon, 12V Caravan Water Pump High Pressure Self-priming rv Camping Boat 70PSI 20.8L/M, Brand: Youngly, A$99.99. Max amperage is 15 or 180 watts. Normal operating power (not startup) is 7.5A or 90 w. https://www.amazon.com.au/Caravan-Water-Pressure-Self-priming-Camping/dp/B0D8BLB81BThis, according to the specs, has 20.8 litre/minute delivery compared to 18.9 for the Seaflow. I used the transformer mentioned above to supply 12v.
Performance seemed lower than the house system however, the range of the sprinklers was not as good. This may be attributable to a number of factors – piping, pump not as good as the specs suggest, and importantly, running on 12v. The house system runs off battery with a solar panel attached, the voltage is probably 13v. Remember the Seaflo pump was designed to boats, and would run happily on the maximum the battery would be supplying.
Rather than running a 240 v extension cord from the shed to the transformer and pump, I experimented with running a long 12 v lead through a twin wire power cable. I had 20 m to go. Voltage drop was probably 1%. Performance was the same as before but now I can bury the cable and leave it there.
Next question: how to increase the sprinkler output? The easiest answer seems to be to simply add another pump in parallel to the first. Reading suggests this won’t double the flow but it should improve it by 50%. The added power needs a bigger transformer. There is a 500 watt version available: https://www.amazon.com.au/gp/product/B098752XR9/ref=ppx_yo_dt_b_asin_title_o00_s00?ie=UTF8&th=1
The second pump was duly added, plus the 500 watt supply. I also pumped more water into the feed tanks, which raised the input pressure. The earlier, smaller sprinklers with a 4mm orifice proved to throw water further than the wider models, so I kept those for the most exposed side of the sheds. The downside of the smaller sprinkler is less water volume however, so I raised the line pumping time to 80 seconds rather than 60. Together, these adjustments gave a much better result.


_3u05Tpwasz.png?auto=compress%2Cformat&w=40&h=40&fit=fillmax&bg=fff&dpr=2)
Comments
Please log in or sign up to comment.