The Internet of Things (IoT) has recently become a core technology for building smart homes, smart offices, smart cities, and many more applications of the Industry 4.0 Era.
At the same time, security and privacy are considered key issues in any IoT deployment.
The vulnerabilities in IoT-based systems can cause serious security threats that affect not only the deployed smart environment but any system it connected to, for example, the massive amount of exploited IoT devices can form a huge distributed network of botnets for DDoS attacks.
Network Intrusion Detection System (NIDS) is a good solution to mitigate and react to these cyber threats.
On the other hand, due to the limited computing, power, and storage capabilities of IoT devices, conventional NIDS maybe not a good option. Conventional NIDS is also rule-based, mostly using CPU, and doesn’t have the ability to prevent unknown threats.
The proposed solutionIn this project, I demonstrate a very simple concept of a NIDS for IoT network using a powerful and flexible Ultra96-V2 device.
Specifically, I would deploy the latest AI-based Unsupervised Anomaly Detection Algorithm named Kitsune[1] with the ability to prevent unknown cyber-attacks even before they can cause severe damage to the system.
Ultra96-V2 with powerful yet flexible Programmable Logic combined with Xilinx Vitis AI SDK made it a good candidate for an AI-based High Performance Network Intrusion Detection Device.
Project layout- Discuss the system design to demonstrate the performance of Ultra96-V2 NIDS.
- Explain the architecture of AI-based NIDS inherited from Kitsune framework and how it works
- Each step of building a Smart NIDS including:
- setup development environment
- collect training dataset
- train Anomaly Detection model
- deploy the trained model on Ultra06-V2 Programmable Logic
- setup an attack-defense scenario.
The IoT network system to demonstrate the effectiveness of Ultra96-V2 NIDS is including:
- A LAN network of IoT devices and sensors with a network switch, router, and an Ultra96-V2 device as a passive packet sniffer to monitor the outbound network traffic
- The IoT devices are connected to remote IoT server over the Internet
- An attacker would use tools to penetrate the IoT LAN network and do damages to the systems such as Password Brute force, Denial of Services (DoS), and Botnet.
- The Ultra96-V2 device is installed as a simple AI-based NIDS to sniff the packets of the IoT network and need to detect any anomaly activities and alert the system administrator for investigations.
The above design is for a complete IoT network, but in this project, I would try to create a simpler scenario to easily prove the concept of Smart NIDS.
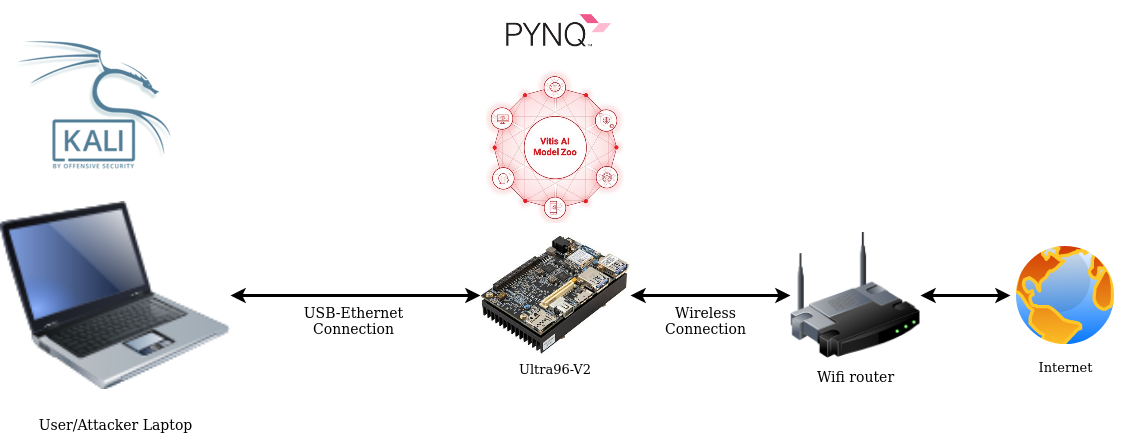
In this scenario, Ultra96-V2 (let’s called it DEVICE MACHINE) is connected to the User/Attacker laptop through USB-Ethernet Connection. Using the WiFi module on board, Ultra96-V2 connection to WiFi router to access the internet.
The User/Attacker laptop (let’s called it HOST MACHINE) is installed in Kali Linux with many off-the-shelf penetration testing tools OR Ubuntu 18.04.4.
This host machine is going to be used to install much software, both for build NIDS and test network penetration, so prepare it with at least 200GB of storage and recommended at least 8GB of RAM.
I would demonstrate a simple DoS (Denial of Service) attack call TCP SYNC Flood using hping3 to a web service on port 80 from Ultra96-V2.
Here is how the setup look like
The kitsune framework including 5 basic components:
- Packet Capturer to sniff the network interface and extract the raw packet.
- Packet Parser to extract metadata from the raw binary packet.
- Feature Extractor to extract Damped Incremental Statistics Features for network flows. These features are input vector components for the core algorithm.
- Feature Mapper to mapping features vector into corresponding Ensemble autoencoder models.
- Anomaly Detector is a Deep Learning model built from an ensemble of autoencoder models and combined with the last output Autoencoder model.
The core Deep Learning architecture of Kitsune is the autoencoder - a Deep Learning model that usually used to extract meaningful features from input vectors through the process of reconstructing them exactly but also avoid learning the identical mapping function.
Autoencoder is a very popular unsupervised machine learning architecture, so we don’t need any handcrafted labels. This advantage makes autoencoder a good choice when handcrafted labels are too hard to collect or too much label intensive. This situation is right for network attack datasets.
In network anomaly detection, the autoencoder is trained to learn the common pattern of benign packet flows. Then the reconstruction loss is used to differentiate the anomalies from benign ones. It means that when the Autoencoder sees anomalous packet flows, it should struggle to reconstruct it cause the reconstruction loss is higher than usual.
The main contribution of this project is deploying the architecture of Kitsune on the Ultra96-V2, especially the Anomaly Detector is going to be compiled to run on the Programmable Logic to improve the overall performance of the framework, make it process packet faster while detecting attacks accurately.
Kitsune Anomaly Detection Model ModificationWhen I tried to compile the origin Kitsune Anomaly Detection model to Vitis AI DPU, I faced the limitation of Vitis AI version 1.1, that it doesn’t support some layers need in Kitsune: SQRT, MEAN, MIN, and MAX layers.
And the quantization and compilation process required the input of the model is in format NWHC, while the origin Kitsune Anomaly Detection model is created with 2 dimension inputs and outputs.
So my solution for these issues is:
- reshape the input from 2 dimension (N, C) into 4 dimension (N, 1, 1, C)
- using Convolution kernel 1x1 layer that has the same mathematical formulation as a fully connected layer.
- Using the direct output of ensemble layers as input for the output layers instead of calculating RMSE (Root Mean Square Error)
Here is the origin Kitsune architecture that doesn’t compile (at least for now with Vitis AI 1.1)
Follow this guide to get started with PYNQ operating system and install PYNQ version 2.5.
https://ultra96-pynq.readthedocs.io/en/latest/getting_started.html
Install Vitis AI on the device machine and build DPU-PYNQ on the device machineThis project is a very helpful guide to get started with Deep Learning on Ultra96-V2 with PYNQ.
Following installation steps help you setup Vitis-AI development environment on host machine and built DPU-PYNQ for Ultra96-V2.
https://www.hackster.io/zst123/smart-office-hot-desking-with-pynq-vitis-ai-8ac98d
NOTE: After following this guide, you should have a DPU-PYNQ folder in your host machine with a subfolder host contain 2 important files: docker_run.sh and compile.sh. The docker_run.sh
is used to launch the vitis-ai-cpu:latest image into new container, with quantization tool vai_q_tensorflow a compilation tool vai_c_tensorflow in the conda environment vitis-ai-tensorflow.
Later, we are going to copy the tensorflow trained frozen model into this host folder so when we access the container, we can see this file and continue the quantization-compilation process.
Ultra96-V2 additional software for NIDSOn the device machine, install tshark to capture network packets into.pcap files used for your own training dataset.
sudo apt install tsharkGet the source code from github repository and install requirements
git clone
cd hacksterio-smart-nids
pip install -r device-requirements.txtOn your host machine, Get the source code from github repository and install requirements into new conda environment:
git clone
cd hacksterio-smart-nids
conda env create -f environment.ymlOn your host machine, install hping3 for TPC SYNC FLOOD DoS attack
sudo apt install hping3On device machine, Install NGINX web server:
sudo apt install nginxBecause PYNQ image is created with port 80 already used for Jupyter Notebook, we need to change NGINX default site to other port (for example 81) to make it work.
Open the file /etc/nginx/sites-available/default with your favorite editor, change 2 first line:
server {
listen 80 default_server;
listen [::]:80 default_server;
...
into
server {
listen 81 default_server;
listen [::]:81 default_server;
...
Now restart nginx
sudo service nginx restartCheck if nginx work by going to http://192.168.3.1:81/. You should see this
On the device machine, start capturing network packets from interface usb0 using following commands:
sudo -s
touch benign-capture.pcap
tshark -i usb0 -w benign-capture.pcap
While capturing, you can access the Jupyter Notebook server of device machine, use it to generate benign traffic for the dataset. When you are feel it captured enough packets, CTRL+C to stop tshark.
Copy packet caputre file from the device machine into the host machine’s repository hacksterio-smart-nids to train anomaly detection model.
Step 3 - Train anomaly detection model on the created datasetOn the host machine, run following commands to train new Anomaly Detection model for your NIDS:
cd hacksterio-smart-nids
python train_feature_mapper.py -d benign-capture.pcap
python train_anomaly_detector.py -d benign-capture.pcap.h5
python model_merging.py
sh scripts.sh
The output of the training process is a file models/total/total.h5 inside the repository folder hacksterio-smart-nids.
Here is the visualization of the model.
On the host machine, copy the TensorFlow trained frozen model into a subfolder inside the DPU-PYNQ/host I mentioned before in Step 1, for example, DPU-PYNQ/host/model.
Copy the input_fn.py and quantize.sh from the repository folder device_scripts into DPU-PYNQ/host/model.
Copy the compile_tf_model.sh from the repository folder device_scripts into DPU-PYNQ/host.
Now we start quantizing and compiling the trained model to Vitis AI DPU for Ultra96-V2:
cd DPU-PYNQ/host
# Create new vitis-ai-cpu container and remote into it
./docker_run.sh xilinx/vitis-ai-cpu:latest
# Now we areiInside the container, activate vitis-ai-tensorflow conda environment
conda activate vitis-ai-tensorflow
# run model quantization with benign dastaset
cd model
sh ./quantize.sh
# run model compilation
cd ..
sh compile_tf_model.sh
The output of the quantization and compilation process is a model.elf file. Copy this file to the device machine to do the inference and start NIDS.
Step 5 - Setup a demo scenarioStart NIDS on device machineOn the device machine, inside the repository folder hacksterio-smart-nids, run the following command to start the NIDS:
python nids.pyOn the host machine connected to the device machine over USB-Ethernet connection, we would run a TCP SYNC FLOOD attack using the following command:
sudo hping3 -c 100 -d 120 -S -w 64 -p 81 --flood --rand-source 192.168.3.1If the Anomaly detection model is trained properly, when the attack happens, the terminal that running NIDS on the device machine should print alerts of anomaly network activities.
Conclusion and future developmentsThis is a project to demonstrate the usage of Ultra96-V2 as a Network Intrusion Detection Device for IoT networks.
There are still many ways to improve and develop in the future, here are some:
- Setup a more realistic scenario with a VPN-secured IoT network and more powerful attacks
- Rewrite the NIDS in high-performance languages like C/C++, Rust instead of Python
- Integrate with traditional NIDS such as Zeek or Snort3 for more features.
- Using Alveo U25 as a NIDS-integrated SmartNIC for high performance and security in a Data Center environment
[1] Yisroel Mirsky, Tomer Doitshman, Yuval Elovici, and Asaf Shabtai, "Kitsune: An Ensemble of Autoencoders for Online Network Intrusion Detection", Network and Distributed System Security Symposium 2018 (NDSS'18)


.png?auto=compress%2Cformat&w=48&h=48&fit=fill&bg=ffffff)


Comments
Please log in or sign up to comment.