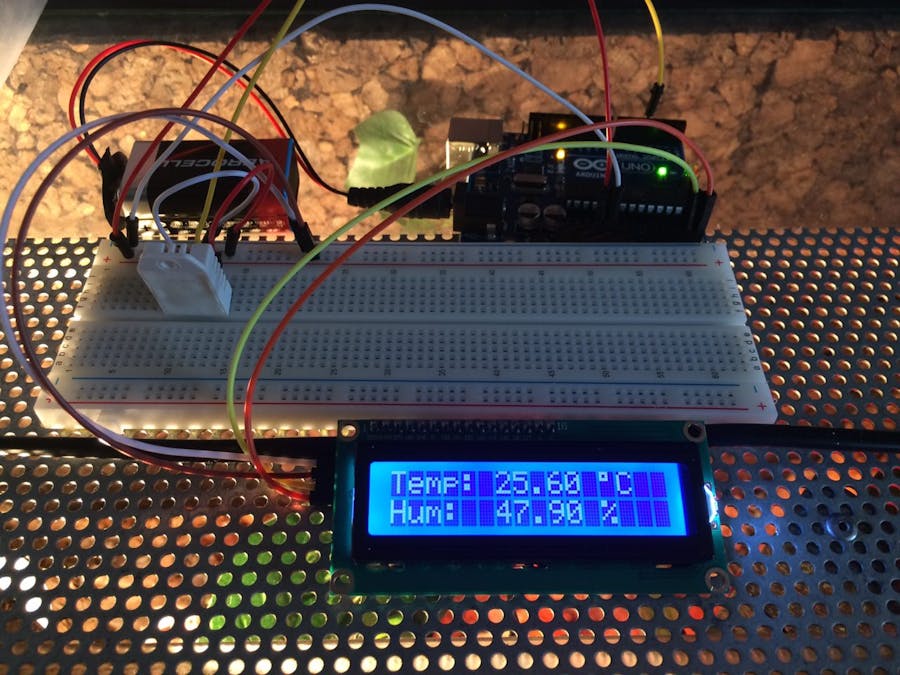
For two years my son (7) had the desire to have a pet snake. Finally he bought a couple of snakes with a terrarium. To keep the snakes at a comfortable environment for them we need to monitor the temperature and the humidity.
So we bought an analogue humidity/temperature sensor and discovered that it wasn't all that easy to keep both at a good level. As I was dying to start a project with my newly bought Arduino Uno it seemed a good idea to use a humidity / temperature sensor and let the Arduino do the automation of temperature and humidity in the terrarium. Therefor I bought a DTH22 humidity / temperature sensor and a LCD I2C 16x2 display and had a go.
This tutorial is the basis of this project. There is no automation whatsoever in this tutorial. Just the use of the DTH22 and a LCD I2C display.
I have seen an other tutorial for this purpose, but this was using an LCD without the I2C. If you don't have the I2C connected to your LCD please have a look at this tutorial by ThothLoki
Hardware Required- Any 5V Arduino (in this case Arduino Uno R3)
- DTH22 Humidity / temperature sensor
- LCD 16x2 display with I2C mounted to it
- Breadboard
- 6 male/male jumper wires
- 4 male/female jumper wires
I like the LCD 16x2 with an I2C mounted because it saves you the trouble of all the pins that might or might not need to be connected to the Arduino. You only need 4 jumper wires and thats it.
The display has an I2C address to accept commands or send messages. The downside is that you need to figure out which address it uses before you can continue. I won't me going into the details here, but at the Arduino forum you can read everything about it.
In my case our device uses the 0x3F address, if your device also uses this address you're lucky, you can just copy our code.
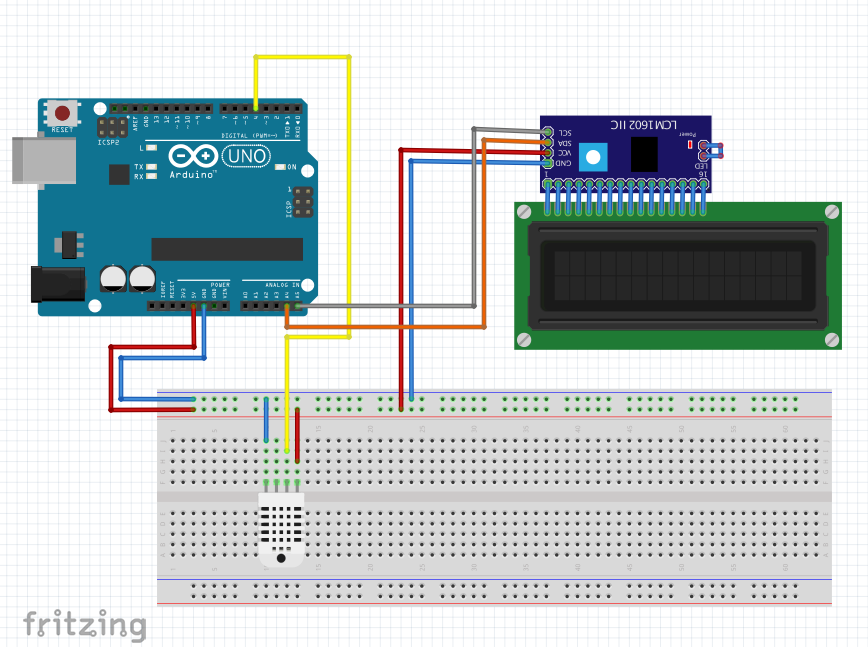
Hook-up the breadboard to the ArduinoThe DHT22 sensor as well as the LCD 1602 I2C use a 5V power supply. Therefore I connected the 5V pin on my Arduino to the red + row on the breadboard and the ground of my Arduino to the blue - on the breadboard. As I want to keep colors in sync, on my schema I will use red cables for 5V and blue cables for ground. In real life I didn't use blue for ground, but white... have been playing too much with car electronics I guess.
I will use a yellow cable for Data, an orange cable for SDA and a gray cable for SCL. The letter two will be on the I2C.
Adding the DHT22 sensorLets have a look at the pinout. The DHT22 sensor (like the DHT11) has four pins. I place the DHT22 sensor on the breadboard with the front facing outwards. This way the first pin (5V power) is on the right (see the schematics).
I use a small red jumper cable to connect the 5V VCC to the 5V (+) row on the breadboard. And a small blue jumper cable to connect the ground to the ground (-) row on the breadboard. I took a long yellow cable to connect the second pin, the data pin, to the Arduino. As it is digital data, I connected this to data port 4 on the Arduino. In other examples you will probably see people using port 7, both will work. I used port 4 because I anticpated that I will use more data ports and wanted to save port 7 just in case. You will also see this in the schema's.
The LCD 16x2 I2C also has 4 pins. Looking at the picture below, from left to right:
- Ground
- VCC (5V)
- SDA
- SCL
Connect the first (left) pin to the ground (-) row on the breadboard. Connect the second pin to red the 5V (+) row of the breadboard. I use an Arduino Uno so which has the I2C connections on A4 (SDA) and A5 (SCL). So I connected the third pin to the A4 and the fourth pin to A5 connector on the Arduino.
Remember for the screen you can have different address' to connect to. My I2C uses address 0x3F (see part 'Before we start') so beware that my code is setup for this address.
Remember the libraries needed (Adafruit_Sensor, DHT, NewliquidCrystal). Download these libraries, unzip them and place these in the libraries directroy of your project.
Then upload the code to your Arduino and check the humidity and temperature of your terrarium (or server cabinet, or refrigerator or just your living room).


_ztBMuBhMHo.jpg?auto=compress%2Cformat&w=48&h=48&fit=fill&bg=ffffff)


Comments
Please log in or sign up to comment.