


From breadboard dreams, April 2012
Today, I visited Holo Land. This is a wondrous place, a friend’s home stuffed to the brim with 3D imagery and light experimentation. A few of these have overflowed into my hands — a lovely surprise!
I also gave my new Litiholo kit a whirl; it initially arrived without a laser diode, so I had to wait another week, twitching, until this moment came. This morning, I fit in two exposures, between passing trains and our neighbors waking up to the day. I am happy to call myself a holographer again.
First Shot: Transmission Hologram
To get a good image, you need something that is a) shiny and b) stable. Your object must reflect a lot of light onto the glass plate, or no image will appear. And since you’re working with 3-10 minutes of exposure time, you run a massive risk of blurred or invisible objects if there is any vibration in the system. That includes sound waves. Don’t worry if you can’t follow this perfectly. (You can also read my old walkthrough, which is pictureless and therefore a bit sad...)
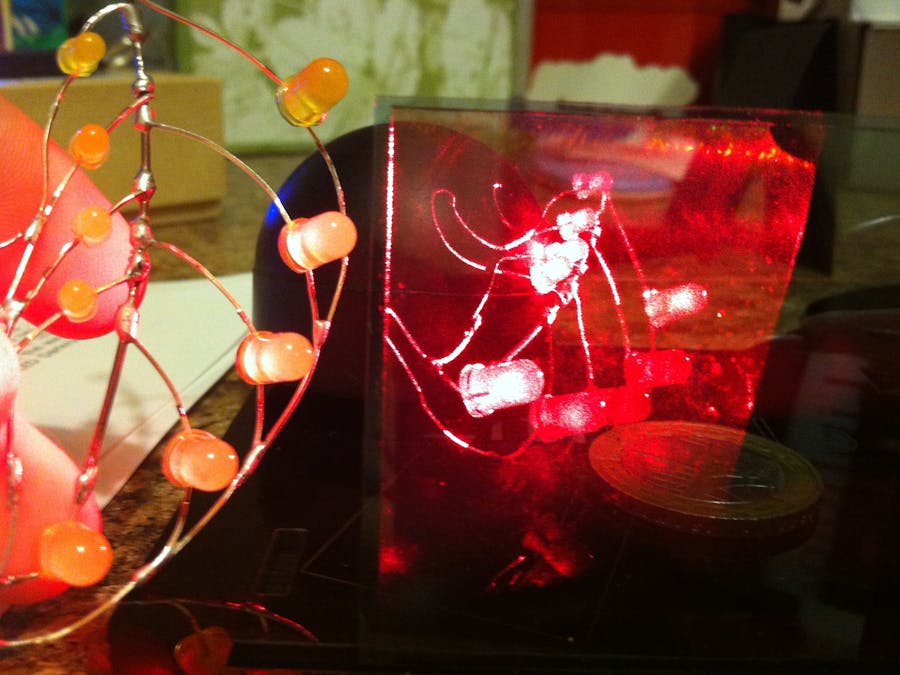
Casting about for shiny things to image, I settled on my LED leaf and a £2 coin with Isambard Kingdom Brunel on it. Later, I will get some putty / blue tack for stability; for now, I just used a matte black object (a.k.a. coffee scoop) as a prop. The glass plate pictured is not reactive; it’s merely a setup aid.
Here’s the setup again, illuminated by the laser beam – a preview of what the hologram will look like through the holographic plate. Litiholo’s plates are identical to this small pane of glass, with a sheet of “instant” plastic film stuck to one side. It’s a big step forward from what I’m used to – this kit doesn’t require any hazmat, and as such, I’m not really sure it qualifies as a challenge at all. ;)
After a 4-minute exposure, here is my result. I didn’t turn on any lights until the 5-minute mark had passed, to make sure that the plate was done exposing and wouldn’t be marred. You can see that I’ve already removed the LED leaf (now off to the left). You can tell that the Litiholo folks put some thought into their work. This is a pretty damn good result for a DIY kit, on a kitchen counter, without good light seals! Really, I’m surprised and impressed at the quality – depth, brightness, and resolution are all quite decent.
However, I’m not so impressed with my critical-thinking skills. The holo plate leans on a plastic support, which I put on the wrong side of the stage. It blocked light from about half the plate, leaving a big blank space. At least I had 29 more plates!
I often use the analogy of a window when explaining holograms. As you can see, the unexposed plate doesn’t hold any image information, so it acts like the opaque wall next to a window. When you move in front of the window, you can see the whole LED leaf – but from here, to the side, half of it is invisible, "blocked" by the unexposed area. (In reality, that part of the plate simply doesn't have any information for how the light was coming off of your object, so it isn't reproducing anything.)
Transmission holograms must be viewed using a laser that produces the same frequency as the one used to create the hologram. (Got that?) However, if it comes out well enough, you can almost discern the image, which shows up all rainbowy under normal (non-coherent white) light.
Second Shot: Reflection (Denisyuk) Hologram
Reflection holograms, by contrast, can be viewed under regular light, though they still work best with a single point-source of light. (The sun is the best point source for any hologram.)
Since I’m used to this method, I sprang for the reflection kit upgrade (about $34 on top of $99 for the basic set). This includes a slightly rickety tower, built of the same laser-cut black acrylic as the rest of the kit, which in general works pretty well.
Here’s the reflection setup: object directly behind the plate, close but not quite touching. I assume they’ve placed the laser up on a tower, facing downward at a steep angle, so that it will be easier to illuminate the plate in regular light without contorting yourself to see the final image. I’m not sure it works very well, though, and I may end up printing my own accessories to substitute in.
This one didn’t come out nearly as well. There are several likely causes, and I don’t blame the kit. As I’ve mentioned, I was working between trains (with NextMuni as an invaluable aid), and I was in such a rush that I a) didn’t let the room settle and b) shortened the exposure time, from 10+ minutes to about 8. Of course, the train I’d feared was late… it rumbled by after I’d had a few minutes to kick myself for my haste. 28 more plates.
Since this one didn’t come out hugely well, I experimented with peeling off the plastic. It comes off readily, and readheres with ease, though you get air bubbles. This encourages me; I hope to make jewelry with these, and a thin sheet of plastic is much easier to custom-cut and set than glass.
Additionally, according to Litiholo, the plastic film is inert after developing – not susceptible to humidity like the tacky chemical emulsion I’m familiar with. Presumably, it will also stand up to sunlight better. Marvelous!
Parting Shots & Next Steps
Here’s what the holograms looked like immediately after exposing. You can easily identify the half-exposed transmission plate, and the dim bottom area of the Denisyuk. Upon exposure to white light, the blue areas faded to clear, and the two plates are now difficult to tell apart.
Next, I plan to incorporate some optical glass I’ve dug out of cameras and projectors at Noisebridge. I’d love to use lenses, as in this awesome image that pictures a *working* microscope. Since a hologram is an exact replica of how coherent light acts within a scene, a lens within a hologram will still distort whatever is behind it. (Because of this, holographic optical elements — HOEs — are an emerging solution for lightweight image manipulation.)
I have a few other ideas up my sleeve as well, but until they come to fruition, my lips are sealed!


Comments
Please log in or sign up to comment.