


_EO6Do2TcT0.png?auto=compress%2Cformat&w=900&h=675&fit=min)
Hardware components | ||||||
 |
| × | 1 | |||
| × | 1 | ||||
 |
| × | 1 | |||
 |
| × | 1 | |||
Software apps and online services | ||||||
 |
| |||||
Short link to this page: bit.ly/sms-button
This tutorial is produced in conjunction with the Twilio team, for Pi Day 2019! We're running a workshop for the PyLadies SF event: Pi Day + RasPi + Python + actual, edible pie... what's not to love?
The project title is pretty self-explanatory, so let's jump in!
Set up your Twilio accountIf you haven't done so already, head over to Twilio and create a new account. You'll get some free credit toward a connected phone number – and you can even search for the one you want!
This is a good time to grab your Account SID and Auth Token from the Account Dashboard (Home icon). Keep them safe!
If you don't have a spare monitor, keyboard, and mouse laying around, you can connect to your Pi via SSH over a USB-serial cable, which is what we'll be doing in the workshop. This may require you to have UART enabled in the Raspberry Pi's preferences, which we've already set up.
You may also need to download and install a driver on your local machine. (If you have trouble, try downloading both the Prolific and SiLabs drivers... shakes fists at software gods)
Give the Pi power via its "PWR IN" micro USB port (the one closer to the edge). If you already have your Pi set up to run headless over SSH, you can do that instead.
Otherwise, assuming you already have the OS installed on your Pi, grab your serial cable and follow these directions to connect your Pi to your computer and SSH into it (you can ignore the previous instructions on the page).
Brief summary of the process, via the command line:
- List your USB devices to find which port the Pi is on: ls /dev/tty*
- Find the one that looks like /dev/tty.usbserial – possibly with some numbers after it
- Insert that in this command, and run: screen /dev/tty.usbserial 115200
- Once you get prompted to log in, use the default login pi and password raspberry (you will probably want to change these later). You are now logged into your Pi!
Use the ssh connection to set up wifi on your Pi, using the built-in Raspberry Pi configuration tool:
$ sudo raspi-config
Once finished, you can test the connection by pinging Google:
$ ping google.com
You should see the connections happen periodically; hit Ctrl+c to stop.
Set up Python with Twilio on RasPi & TestFollow these official directions to create your first Python program on your Pi and send an SMS from it. You'll need to install the helper library from this link. (If you're attending our PyLadies workshop, it should already be installed on your MicroSD card.) Installing the Twilio library can take a while on a Pi Zero W, so this is a good time to scroll down to the build section and put everything together.
You can also test the API code from your main computer. I found this super friendly! Be sure to put your *account* SID in the appropriate field, not the phone number's SID.
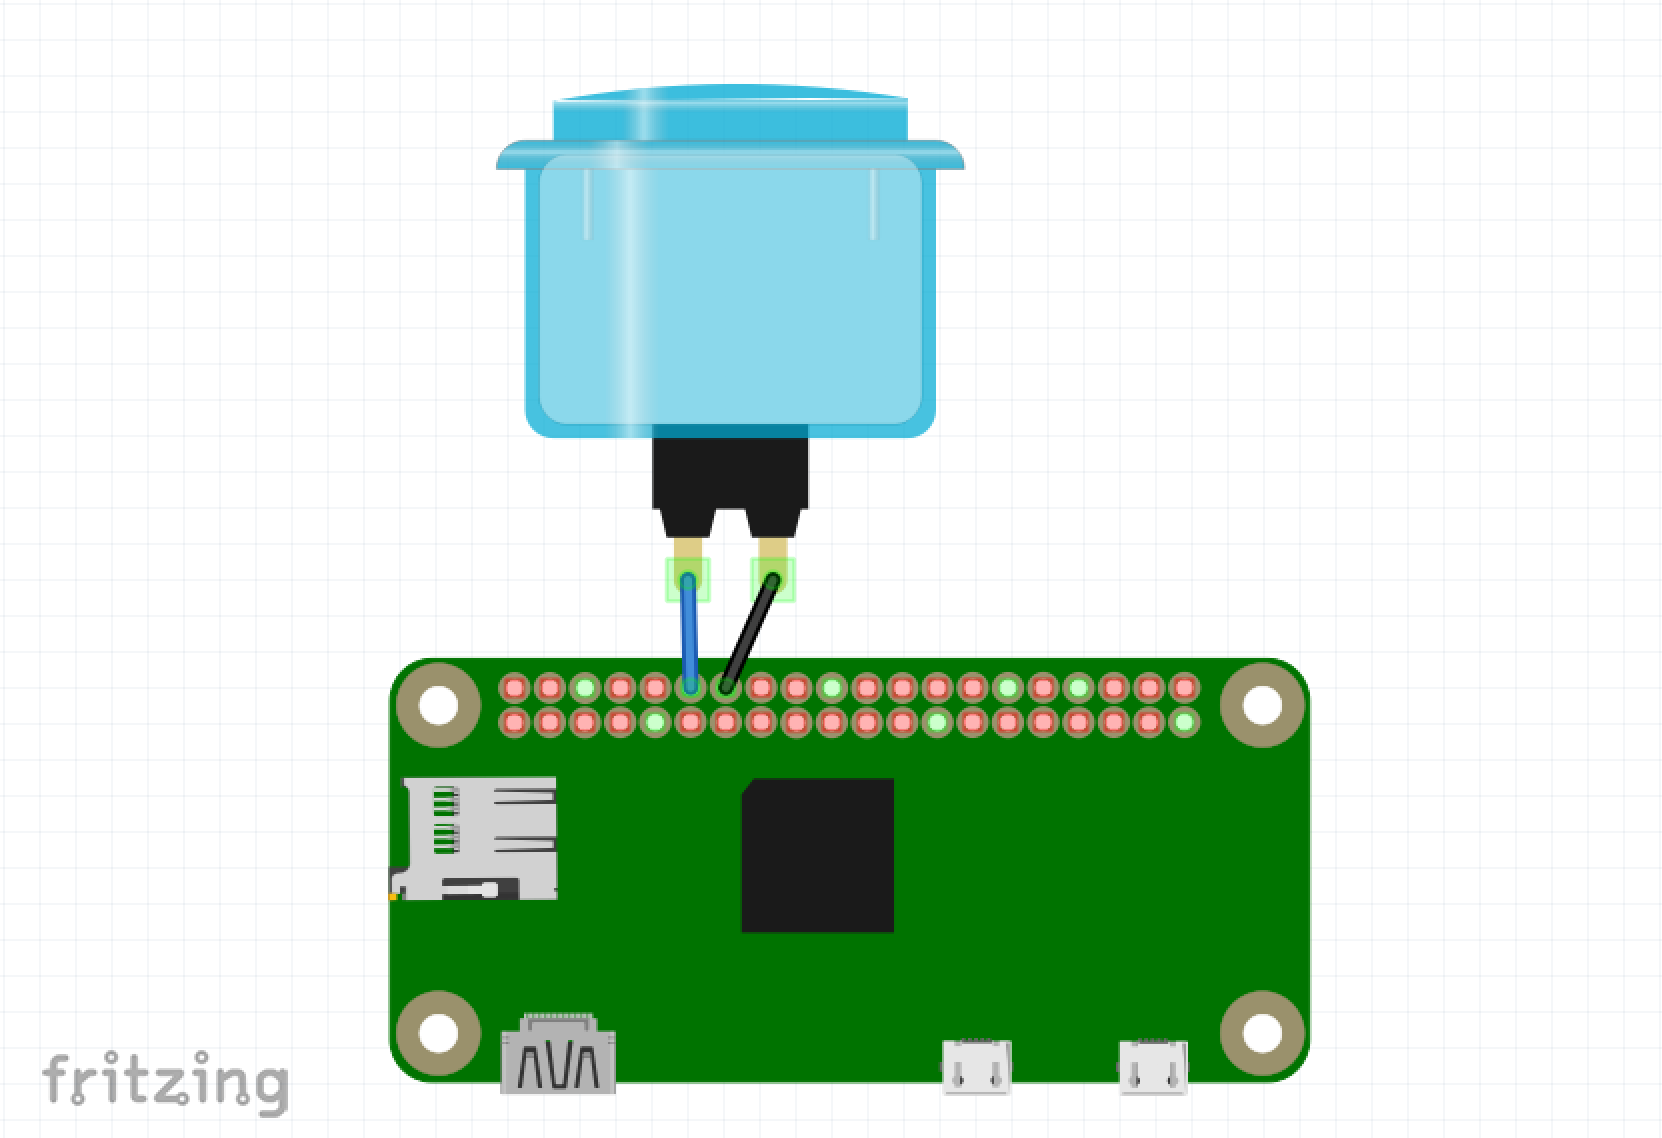
The great thing about buttons is that it doesn't matter which wire is which! The button just connects two wires when it's pushed, so it can work either way it's plugged in.
Cut your female-female jumper wire in half, strip the cut ends, and tin them with solder. Solder one wire end to each terminal of your button – if you're using one with more than two legs, check with a multimeter to find a pair that will connect when the button is pushed. (Of course, you can use a breadboard instead, as shown below.)
Attach the female headers to the Pi, on pins 18 and GND. Here's a great pin reference. You can also scroll down to see a Fritzing diagram of the setup.
...And you're done!
Now, use the code at the bottom of this project as a reference for how to trigger an SMS by pushing the button. This code is a mashup of Twilio's SMS code and a button demo by Inderpreet Singh.
To adapt this script, run this on the Pi:
$ nano sms-button.py
...which opens up the Nano editor on a new document with that filename. Then, paste in the code. Finally, replace all the personalized fields: your account SID, auth token, Twilio number, and personal phone number. Hit Ctrl+o, then enter, then Ctrl+x, to save and quit. (It may be easier to make these edits in a plaintext file on your personal computer first, then paste that over SSH.)
Run the scriptSave the code as sms-button.py and run:
$ python sms-button.py
Push the button and check your phone!
Hit Ctrl+c to terminate the script.
TroubleshootingI ran into this error while running the script – "RuntimeError: Failed to add edge detection". This post suggested downgrading to a previous version of RPi.GPIO, and their instructions worked for me as well.
If you run into an OpenSSL error, try running this on the Pi:
pip uninstall pyOpenSSL
...and then trying again.
Latency: It seems to take a minute for the Pi Zero to spin up this script, so it's not unusual if the first button-press takes a while to respond. It should speed up after a bit.
ReferencesHere are the docs I'm referencing:
- https://www.twilio.com/docs/wireless/quickstart/raspberry-pi-headless-usb-modem#activate-the-serial-port-on-the-pi-header-and-increase-usb-current
- https://www.twilio.com/docs/sms/tutorials/how-to-send-sms-messages-python
- https://www.twilio.com/docs/sms/quickstart/python
- https://www.hackster.io/glowascii/raspberry-pi-shutdown-restart-button-d5fd07
- https://www.element14.com/community/docs/DOC-78055/l/adding-a-shutdown-button-to-the-raspberry-pi-b


_3u05Tpwasz.png?auto=compress%2Cformat&w=40&h=40&fit=fillmax&bg=fff&dpr=2)

Comments
Please log in or sign up to comment.