Connect your Wifi Notecard with Notecarrier.
Incase you are facing any difficulty refer:
https://dev.blues.io/quickstart/notecard-quickstart/notecard-and-notecarrier-a/
After that open in browser terminal of blues wireless on clicking above link and connect your notecarrier via data cable with our laptop/desktop then browser will popup and ask you for selecting port to connect with notecarrier.
Then enter following command to log the card information
{"req":"card.version"}Now create a new project on notehub https://www.notehub.io/projects
Take note of your ProductUID. This identifier is used by Notehub to associate your Notecard to your project.
Now connect your notecard with wifi in order to do so run following command in browser terminal.
{"req":"card.wifi","ssid":"<ssid name>","password":"<password>"}Incase the using above command you face difficulty in connecting to wifi then try another method mentioned on https://dev.blues.io/guides-and-tutorials/notecard-guides/connecting-to-a-wi-fi-access-point/
Once, your notecard is connected with wifi, Now its time to configure your Notecard so that it knows where to send data. You do this by assigning the ProductUID created in the last step to your Notecard.notecard with your notehub project.
{"req":"hub.set", "product":"com.your-company.your-name:your_product"}Now initiate a synchronization between the Notecard and Notehub.
{"req":"hub.sync"}you can check on the state of the sync with
{"req":"hub.sync.status"}Now that being said you can send a demo note using following command
{"req":"note.add","body":{"temp":35.5,"humid":56.23}}The connection of all sensors are as follows:
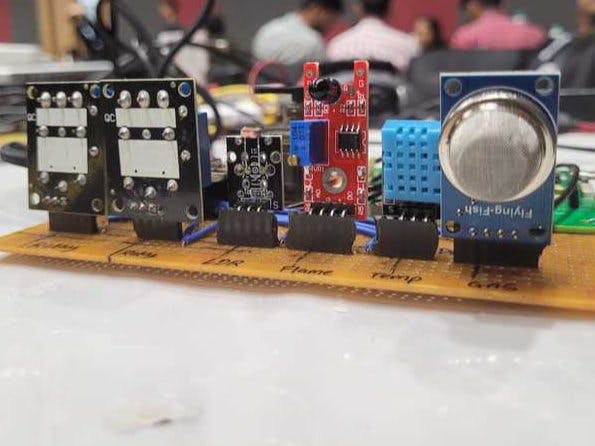
D1 ==> LDR
D2 ==> Flame Sensor
D3 ==> DTH 11
D4 ==> MQ2 gas sensor
D6 ==> Servo
D7 ==> Relay
D8 ==> Relay
Node MCU TX ==> Note carrier RX
Node MCU RX ==> Note carrier TX
Node MCU GND ==> Note carrier GND
Make your all connection as mentioned above. After doing that your connections should look like this
Now that your sensors are all connected, let's move on to the programming part. To do so, open the Arduino IDE and compile the code below. It will collect all the sensor data and output it to the serial monitor as well as send it to notehub.
#include <Arduino.h>
#include <ESP8266WiFi.h>
#include <ESP8266HTTPClient.h>
#include <WiFiClientSecureBearSSL.h>
#include <Notecard.h>
#include <DHT.h>
#include <Servo.h>
#define txRxPinsSerial Serial
#define productUID "<product_uid>"
#define LDRPIN D1
#define FLAMEPIN D2
#define DHTPIN D3
#define GASPIN D4
#define RELAY1 D7
#define RELAY2 D8
#define SERVOPIN D6
#define DHTTYPE DHT11
const char *ssid = "<ssid_name>";
const char *password = "<password>";
Notecard notecard;
DHT dht(DHTPIN, DHTTYPE);
Servo servo;
void setup()
{
notecard.begin(txRxPinsSerial, 9600);
J *req = notecard.newRequest("hub.set");
JAddStringToObject(req, "product", productUID);
JAddStringToObject(req, "mode", "continuous");
bool stat = notecard.sendRequest(req);
Serial.println(stat);
pinMode(LDRPIN, INPUT);
pinMode(GASPIN, INPUT);
pinMode(FLAMEPIN, INPUT);
pinMode(RELAY1, OUTPUT);
pinMode(RELAY2, OUTPUT);
servo.attach(SERVOPIN);
delay(500);
dht.begin();
delay(2000);
WiFi.mode(WIFI_STA);
WiFi.begin(ssid, password);
Serial.print("Connecting to WiFi ..");
while (WiFi.status() != WL_CONNECTED)
{
Serial.print('.');
delay(1000);
}
}
void loop()
{
if ((WiFi.status() == WL_CONNECTED))
{
std::unique_ptr<BearSSL::WiFiClientSecure> client(new BearSSL::WiFiClientSecure);
client->setInsecure();
HTTPClient https;
if (https.begin(*client, "<base_url>/control/get/1"))
{
int httpCode = https.GET();
if (httpCode > 0)
{
if (httpCode == HTTP_CODE_OK || httpCode == HTTP_CODE_MOVED_PERMANENTLY)
{
String payload = https.getString();
if (payload == "true")
digitalWrite(RELAY1, HIGH);
else
digitalWrite(RELAY1, LOW);
Serial.println(payload);
}
}
else
{
Serial.printf("[HTTPS] GET... failed, error: %s\n", https.errorToString(httpCode).c_str());
}
https.end();
}
else
{
Serial.printf("[HTTPS] Unable to connect\n");
}
if (https.begin(*client, "<base_url>/control/get/2"))
{
int httpCode = https.GET();
if (httpCode > 0)
{
if (httpCode == HTTP_CODE_OK || httpCode == HTTP_CODE_MOVED_PERMANENTLY)
{
String payload = https.getString();
if (payload == "true")
digitalWrite(RELAY2, HIGH);
else
digitalWrite(RELAY2, LOW);
Serial.println(payload);
}
}
else
{
Serial.printf("[HTTPS] GET... failed, error: %s\n", https.errorToString(httpCode).c_str());
}
https.end();
}
else
{
Serial.printf("[HTTPS] Unable to connect\n");
}
if (https.begin(*client, "<base_url>/control/get/3"))
{
int httpCode = https.GET();
if (httpCode > 0)
{
if (httpCode == HTTP_CODE_OK || httpCode == HTTP_CODE_MOVED_PERMANENTLY)
{
String payload = https.getString();
if (payload == "true")
servo.write(180);
else
servo.write(0);
Serial.println(payload);
}
}
else
{
Serial.printf("[HTTPS] GET... failed, error: %s\n", https.errorToString(httpCode).c_str());
}
https.end();
}
else
{
Serial.printf("[HTTPS] Unable to connect\n");
}
}
float h = dht.readHumidity();
Serial.print("Humidity Level     : ");
Serial.print(h);
Serial.println(" %");
float t = dht.readTemperature();
Serial.print("Temperature Level  : ");
Serial.print(t);
Serial.println(" C");
int l = digitalRead(LDRPIN);
Serial.print("Light  : ");
Serial.println(l);
int g = digitalRead(GASPIN);
Serial.print("GAS  : ");
Serial.println(g);
int f = digitalRead(FLAMEPIN);
Serial.print("FLAME  : ");
Serial.println(f);
J *req = notecard.newRequest("note.add");
if (req != NULL)
{
JAddStringToObject(req, "file", "mlh_htf.qo");
JAddBoolToObject(req, "sync", true);
J *body = JCreateObject();
if (body != NULL)
{
JAddNumberToObject(body, "temperature", t);
JAddNumberToObject(body, "humidity", h);
JAddNumberToObject(body, "light", l);
JAddNumberToObject(body, "gas", g);
JAddNumberToObject(body, "flame", f);
JAddItemToObject(req, "body", body);
}
bool stat = notecard.sendRequest(req);
Serial.println(stat);
}
Serial.println("------------------------------------------------");
delay(30000);
}
Make sure to change <ssid_name>, <password>, <product_uid>, <base_url> field in above code.
To get <base_url> you first have to deploy the backend made in Node Js. For backend code go to https://github.com/deepakgohil9/iot_assistive_backend
After deploying your backend now its time to set up route from notehub proxy to your backend server for that create a route for your notehub project you will find routes option on left pane of note hub website.
In that create a new route give any appropriate name to that route.
In URL field enter <base_url>/note/add
In Notefiles field select mlh_htf.qo
In bottom Transform Data field select Body Only option
Keep rest of the option default as it is.
Refer following screenshots
To get <base_url> you first have to deploy the backend made in Node Js. For backend code go to https://github.com/deepakgohil9/iot_assistive_backend
At the end now deploy the frontend. For Frontend code got to https://github.com/VedVaghela/HackThisFallFrontend.
You will also find documentation of backend apis at https://documenter.getpostman.com/view/19278775/2s935oL4Np
At the end you will get an dashboard like follow which show your sensor data and from their only you can remote control your appliances connected with relay.
In this tutorial, I have shown you how to build your own IoT-based assistive device with Blues hardware modules, and explained how to share that data with the external world.


Comments
Please log in or sign up to comment.