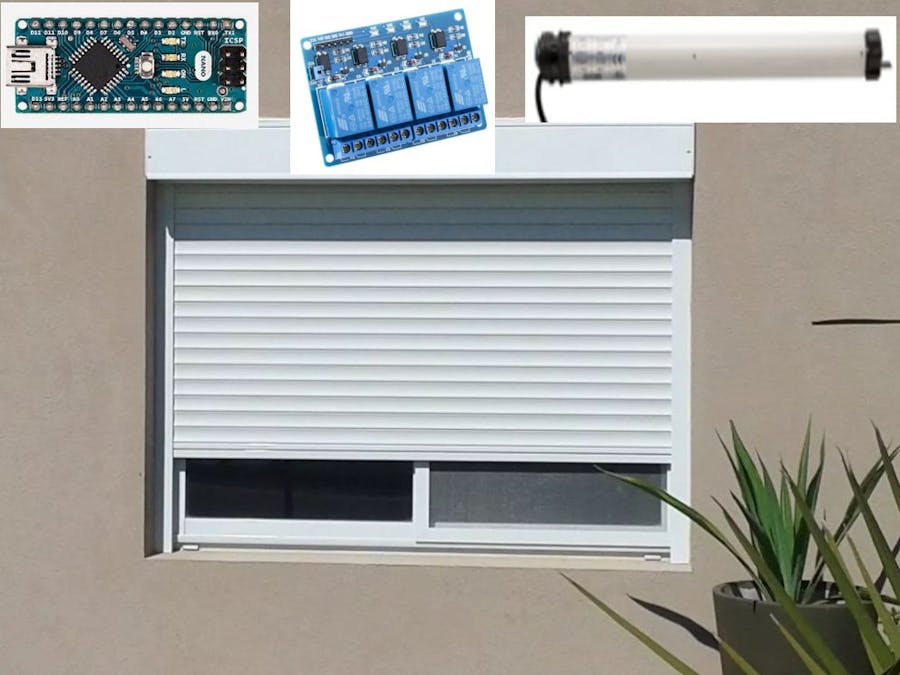
Just bought a new house and wanted to automate everything, starting with the blinds. What seemed to be an easy project turned out to be a bit of a nightmare: the relative high power motors (150W) were destroying my relays and triacs, what wireless communication and controller to use and how to make it work was not obvious, noise in the lines were causing random activation of the blinds (pretty scary in the middle of the night)... Finally I managed to solve all those issues with very cheap components and hopefully I can help someone else to spare these headaches and a lot of time.
Don't like to program, but love to solder? Read anyways the tutorial and at the end you find a discrete circuit, which does the same, but with no intelligence.
ExplanationWhen controlling motors, an important issue is their inductance, which causes that when trying to open the circuit, the current insists on keeping flowing through your breaking device, causing a very high voltage. If you try to break the circuit with no precautions with a small relay, their contacts will stick together, and if you use a triac (solid state relay) the over-voltage (in my case I measured peaks of more than 1600V) will destroy the semiconductor.
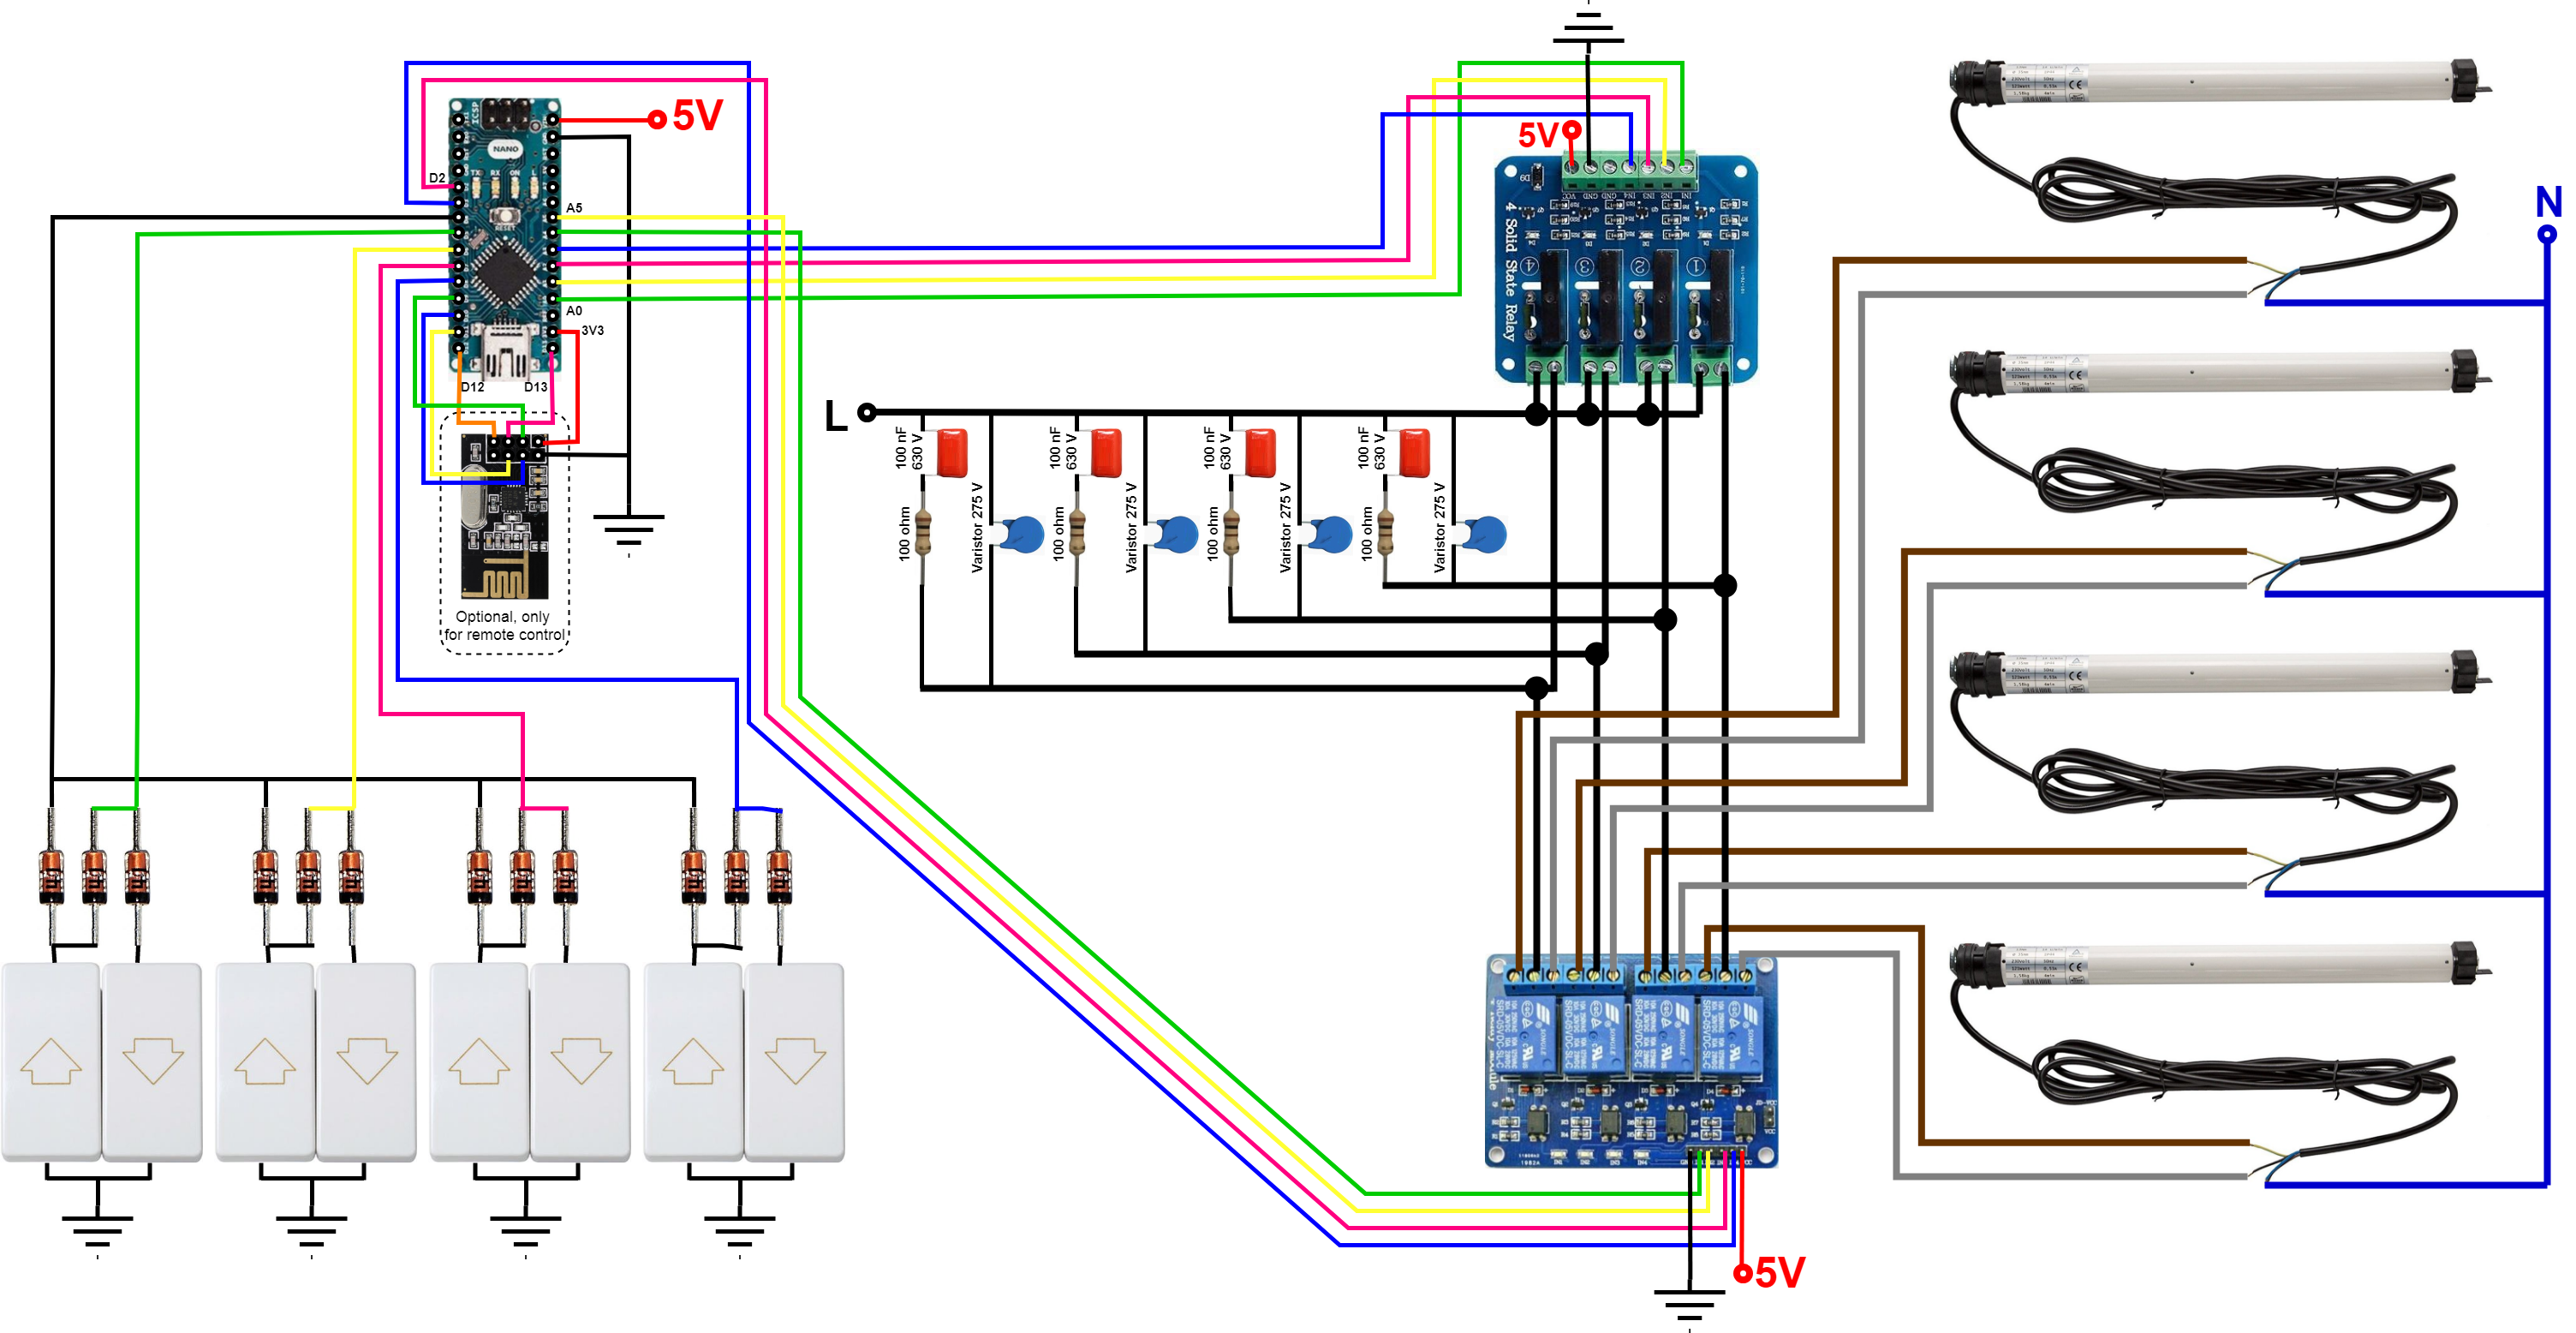
I realized by googling, that other people had issues with this, but they took the easy, expensive and voluminous way, they just get bigger relays, still needing the cheap relays just to activate the bigger ones, while the contacts will still suffer and may fail eventually. As an engineer I could not allow myself not to get the most efficient solution. :) In the schematic attached below you have the solution to spare this big relays just by adding one resistor, one capacitor and one varistor.
The varistor protects the triac from an over-voltage. The resistor plus capacitor forms a RC Snubber circuit that absorbs the energy during the breaking commutation.
[PS: since I wrote the tutorial directly out of my head long time after making the project, the other day having a closer look at my board I realized, that in the real circuit I placed the resistor and capacitor between the brown and grey lines (according to the schematic colors) of each motor instead of in the triac contacts. Both solutions work in this case, but the advantage of this second option is that the Snubber is not permanently attached to the mains. ]
[PS2: SebDominguez also made a nice schema with the actual configuration:
]
Instead of using one pin for the up command and another for down for each blind, the switches share a common line that indicates whether the blind has to go up or down. So we use 5 inputs instead of 8. No filter is needed, inputs are software debounced.
First the Arduino activates the relays module to select the motor direction, after a small delay, so the relay contact is already in place, it activates the triac, feeding the motor with the 230 VAC through the cheap relays and triacs modules with no issue. To break the circuit the process is the opposite, first triacs and then relays, so relays never suffer a live commutation.
You may use from one to four motors, with no need to modify the code, it won't harm to have the logic for the other motors if you don't use them, unless you need the pins for something else, obviously.
At home we have two stories and hence, two circuits. Since remote commands must be unique, I have made the code to be valid for any of those by commenting one line at uploading time. If you are mounting only one circuit, you don't need to change anything, but if you will build two, there you have already the solution for free. In fact I just lied to you, we have three circuits, but in total 8 blinds, in one circuit we occupy all four motors, but the other four blinds are split in two by using the first three inputs in one Arduino and only input number four in the second. The duplicated circuits react to the remote commands exactly the same, but where there is nothing connected, there is nothing to activate. :) If you are using the MySensors version of the code, then you can connect up to 256 nodes with 4 blinds each one not changing a single line in the code, fair enough if you live in a palace.
The system altogether looks kind of like this:
Sorry, that it is not very fancy and clear, but it is the real installation, made time ago, not just a prepared circuit for this tutorial and I can not show it to you assorted on a table. As you can see, it fits in a 22 x 15 x 5,2 cm wall box, but quite tight though. The way I made it was to put everything into an open wooden box using hot glue gun: practical, quick and easy.
If you use the web IDE for the Arduino sketch it should find automatically all needed libraries.
Remote Control (Optional)The aim of this tutorial was to solve the inductance problem, but as an extra, there is also the remote control capability.
The provided code includes two ways of remote control via the radio module nrf24l01+: using MySensors (recommended), or by sending an integer with the number of blind and command 0 or 1 for up or down.
In both cases I use a RPi as master with a nRF24L01+ module directly attached to it, and a controller (Domoticz) installed.
For the first option, using MySensors, it is needed to install the MySensors MQTT gateway. (https://www.mysensors.org/build/raspberry). In my implementation configuring it as Ethernet in the localhost. Follow the steps in the link and here you have my configuration parameters that may help you (check if you need the same):
sudo ./configure --my-gateway=mqtt --my-controller-ip-address=127.0.0.1 --my-mqtt-publish-topic-prefix=domoticz/in/MyMQTT --my-mqtt-subscribe-topic-prefix=domoticz/out/MyMQTT --my-mqtt-client-id=mygateway1 --my-transport=rf24 --my-port=1883 --my-rf24-irq-pin=15
Once done its integration in Domoticz is very straight forward: add the HW MySensors MQTT gateway, power the node and in the setup of your new hardware you will find it directly.
For the second option, using directly a custom application, not MySensors, a virtual switch executes the console command:
./remote -m XY
(X: blind #, Y: action).
In the header of the Arduino script you can find more details.
The code for this remote command is described in http://hack.lenotta.com/arduino-raspberry-pi-switching-light-with-nrf24l01/ Forget about the Node.js section and the Arduino sketch, we don't need them and that sketch actually has a bug. What we need from here is "The Lamp Switch Application" section only. The hardware section can also be useful for the radio connections. By the way, always put the 10 uF capacitor at the radio module power pins. Also consider to get the radio module with external antenna if you have the space. Indoors, the range of the PCB antenna can be very limited (less than 10 m), specially if modules are enclosed into the walls like for this project.
Keep in mind that this code has to be modified a little, matching the radio parameters to the Arduino ones and also, making the code send the command only once instead of retrying up to 5 times if no response is received, otherwise in case of missing the Arduino feedback you will see your blinds acting-stopping-acting-stopping-acting.
The final code for the Raspberry would look like this:
#include <unistd.h>
#include <string>
#include <getopt.h>
#include <cstdlib>
#include <sstream>
#include <iostream>
#include <RF24/RF24.h>
using namespace std;
//RF24 radio("/dev/spidev0.0",8000000 , 25);
//RF24 radio(RPI_V2_GPIO_P1_15, RPI_V2_GPIO_P1_24, BCM2835_SPI_SPEED_8MHZ);
RF24 radio(RPI_V2_GPIO_P1_22, RPI_V2_GPIO_P1_24, BCM2835_SPI_SPEED_8MHZ);
//const int role_pin = 7;
const uint64_t pipes[2] = { 0xF0F0F0F0E1LL, 0xF0F0F0F0D2LL };
//const uint8_t pipes[][6] = {"1Node","2Node"};
// hack to avoid SEG FAULT, issue #46 on RF24 github https://github.com/TMRh20/RF24.git
unsigned long  got_message;
void setup(void){
	//Prepare the radio module
	printf("\nPreparing interface\n");
	radio.begin();
	radio.setRetries( 15, 15);
	radio.setChannel(0x70);
	radio.setDataRate(RF24_250KBPS);
	radio.setPALevel(RF24_PA_MAX);
	radio.printDetails();
	radio.openWritingPipe(pipes[0]);
	radio.openReadingPipe(1,pipes[1]);
	//	radio.startListening();
}
bool sendMessage(int action){
	//This function send a message, the 'action', to the arduino and wait for answer
	//Returns true if ACK package is received
	//Stop listening
	radio.stopListening();
	unsigned long message = action;
	printf("Now sending  %lu...", message);
	//Send the message
	bool ok = radio.write( &message, sizeof(unsigned long) );
	if (!ok){
		printf("failed...\n\r");
	}else{
		printf("ok!\n\r");
	}
	//Listen for ACK
	radio.startListening();
	//Let's take the time while we listen
	unsigned long started_waiting_at = millis();
	bool timeout = false;
	while ( ! radio.available() && ! timeout ) {
		//printf("%d", !radio.available());
		if (millis() - started_waiting_at > 1000 ){
			timeout = true;
		}
	}
	if( timeout ){
		//If we waited too long the transmission failed
		printf("Puta mierda, no me responde nadie...\n\r");
		return false;
	}else{
		//If we received the message in time, let's read it and print it
		radio.read( &got_message, sizeof(unsigned long) );
		printf("Yeah, me han respondido > %lu.\n\r",got_message);
		return true;
	}
}
int main( int argc, char ** argv){
	char choice;
	setup();
	bool switched = false;
	int counter = 0;
	//Define the options
	while(( choice = getopt( argc, argv, "m:")) != -1){
		if (choice == 'm'){
			printf("\n Talking with my NRF24l01+ friends out there....\n");
			while(switched == false && counter < 1){   //Number of attemps to send the message
				switched = sendMessage(atoi(optarg));
				counter ++;
				sleep(1);
			}
		}else{
			// A little help:
			printf("\n\rIt's time to make some choices...\n");
			printf("\n\rTIP: Use -m idAction for the message to send. ");
			printf("\n\rExample (id number 12, action number 1): ");
			printf("\nsudo ./remote -m 121\n");
		}
		//return 0 if everything went good, 2 otherwise
		if (counter < 5)
			return 0;
		else
			return 2;
	}
}
Since it is required to compile and so on, I made it easy for you and put everything you need (only for the Raspberry side, the Arduino sketch is below) in a zip file with the modified source code, libraries and the compiled code for the Raspberry Pi 3:
If you extract this into your RPi, you should be able to just run the remote command.
The ResultHere you can see how I have implemented everything.
The three pairs of switches in the wall control three blinds. The tablet on the wall shows the Domoticz interface with virtual switches. Behind the tablet there is the Raspberry, where the controller is installed, among other things. The Arduino is not here, it's close to the blinds in the picture shown before; RPi and Arduino are linked wirelessly via the radio module.
Here you can also see the Google Home, which by using IFTTT with Webhooks service and Domoticz helps me to make any voice command possible, like "Hey Google, blinds down." If you have reached this point, for sure you will have no problem to make the voice commands work.
Here you have a very quick made video showing the result.
Let me know if this tutorial has help you!
Best regards,
gomecin
P.S. As an extra for curiosity, or because you really hate computers, programming or whatever, first I tried to make the solution discretely with no intelligence at all. This is the result:
I even built it, and the circuit does the job, but I did it before being familiar with the Arduino platform, which is more flexible and completely reliable, hence I'm not gonna explain it. If it is of any use for you, then great, but it is not the scope of this tutorial, and I would discourage to use it.


Comments
Please log in or sign up to comment.