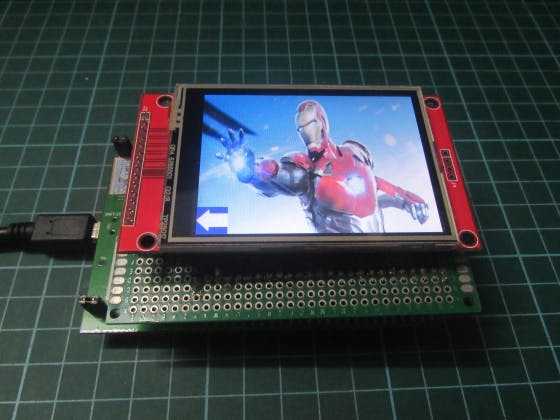
The LCD I am using is a 2.8″ TFT LCD with SPI communication. I also have another 16-bit Parallel TFT LCD but it will be another story for another time. For this post, let’s focus on how to display what you want on the 2.8″ LCD. You can find all details about this LCD from this page: http://www.lcdwiki.com/2.8inch_SPI_Module_ILI9341_SKU:MSP2807
Because there aren’t a lot of instructions for using this LCD with STM32 board, I am going to write a complete guide for this LCD.
First thing first, this LCD use SPI as the main communication protocol with your MCU. For STM32 users, HAL Library has already implemented this protocol which makes this project easier for us. But, a little knowledge about this protocol does not hurt anyone. SPI is short for Serial Peripheral Interface which, aside from two data lines, also has a clock line and select lines to choose between devices you want to communicate with.
This LCD uses ILI9341 as a single-chip SOC driver for a display with a resolution of 240×320. More details can be found in the official document of ILI9341. But the most important thing is that we have to establish a start sequence in order for this LCD to work. The “start sequence” includes many other sequences which are also defined in the datasheet. Each sequence starts when you send a command to ILI9341 and then some parameters to follow up. This sequence is applied for all communication between MCU and ILI9341.
The connection between LCD and STM32F4E-Discovery is as below. ( This is the default pins of SPI1. )
SDO(MISO) —————-> PA6
LED —————————> 3V
SCK —————————> PA5
SDI(MOSI) —————–> PA7
DC —————————–> PA1
RESET ———————–> PA0
CS —————————–> PA2
GND ————————–> GND
VCC —————————> 3V
For TOUCH Pins:
T_IRQ ———————–> PB1
T_DO ————————> PB2
T_DIN ————————> PC4
T_CS ————————> PC5
T_CLK ————-———> PB0
For beginners:
For this project, I recommend using the System Workbench for STM32 for coding and building the code. After installing and open the program, go to the source code you have just downloaded and double click the .cproject file. It will automatically be open in your IDE. Then build the program by right click on the folder you just open (TFTLCD) and choose Build Project. Wait for it to finish and upload it to the board by right clicking the folder, choose Run As and then click Ac6 STM32C/C++ Application. And that’s it for running the example.
For further understandings, let’s dive into the source code.
The most important library for this project is obviously the ILI9341_Driver. This driver is built from the provided source code in the lcdwiki.com page. I only choose the part that we need to use the most in many applications like writing string, displaying image and drawing symbols. Another library from the wiki page is the TOUCH library. Most of the libraries I got from the Internet were not working properly due to some adjustments to the original one.
To draw symbols or even display images, we need a “byte array” of that image or symbol. As an illustration, to display an image from a game called Transistor, I have a “byte array” of that image stored in a file named transistor.h. You can find this file in the link below. Then, I draw each pixel from the image to the LCD by adding the code in the Display_Picture() function in the Display folder.
void Display_Picture()The above example is just only for displaying black and white image. In order to show a color image, we need to a little bit different. First, go to this website to generate the array of the colour image. Remember to change your size to 320×240 and choose the 65K color option. Because it now takes up two bytes for one pixel, we need to send two bytes at once. You can check the Display_Color_Picture() function in the Display folder.
void Display_Color_Picture()As for the TOUCH feature, the way it works is that the screen will return the ADC value of the x or y coordinate of where you touch on the screen. The code I provided is a short version of the source code from the manufacturer and you can consider it as an extremely simple version of a touch screen feature. Because of that, the response time is very great. But for a simple application that doesn’t require drawing with your stylus, I think this works just fine. You just need to press on the screen long enough until it changes to a different layout.
Below is the video that demonstrates all the features in this post.
If you have any question, feel free to contact me. Here is the link to the source code: https://github.com/dtnghia2206/TFTLCD
Thank you for reading this. 😀
For more posts about technology, you can check my blog at: https://aweirdolife.wordpress.com/2019/02/10/tutorialstm32-tft-lcd-display/
Update: I have a new series about STM32 Peripherals that you can check it out:
https://aweirdolife.wordpress.com/2019/12/29/stm32-peripherals/


Comments
Please log in or sign up to comment.