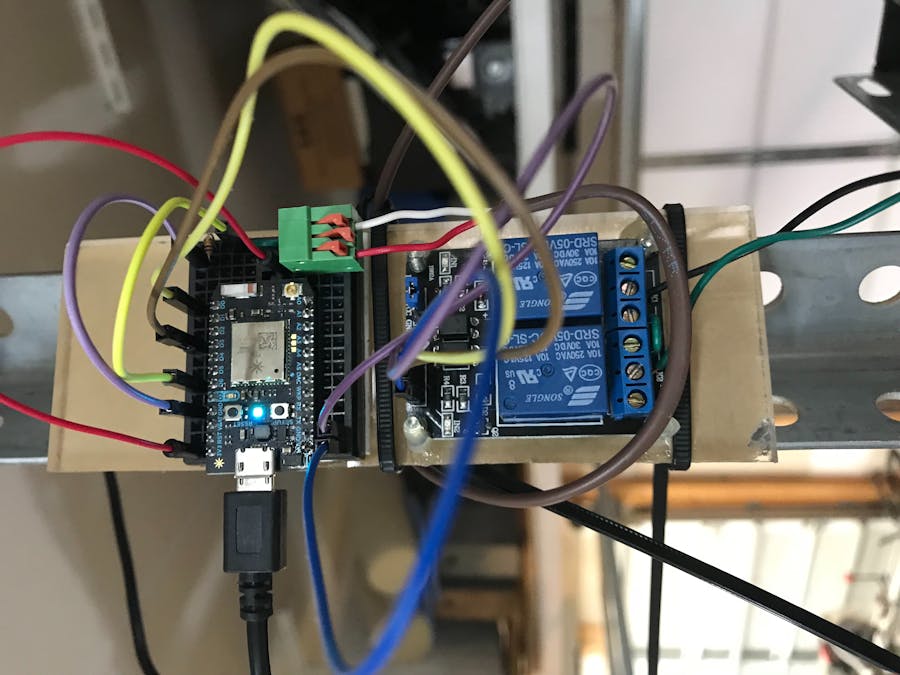
Building your own garage door remote is an easy and moderately priced first project for any one interested in the world of hackers and makers. Personally this modification is the most useful of the projects that I have attempted. Over the last few years it has been updated and improved so that the radio remote that came with the door is almost never used. Plus, with the added sensors, I can check the closed status of the door and open or close it from anywhere there is internet access.
Controlling the Garage DoorThe standard electric garage door opener with safety sensor beams has a simple momentary trip system to start and stop the motor. Screw terminals are on the outside of the box so there is no need to break it open when adding a new switch in parallel.
The switch I used is a double relay module connected to the push button and the com terminals as seen in the image above.
All that is needed to start or stop the motor is to briefly close the connection.
Sensing If the Door Is OpenThe hardest part of adding the sensor for me was running the wire from the motor where the photon is to the door. I don't like having wires running across walls and ceilings and pulling wire through the walls can be a big project. I had put off this upgrade to the project until recently.
The 5v relay module is an electrically operated switch. The type used in my project powers an electromagnet to change the state of the switch. Each of these relays has 3 terminals. They are NO (normally open), NC (normally closed) and common. While in the unpowered state the common is connected to NC.
To control the relay I chose the Particle Photon
I have been using them for a few years in many of my IOT projects. They are easy to setup with a smart phone and can be flashed and managed from the Particle IDE. In my experience they have been very reliable and being able to check the status of and update the code remotely has been convenient. The Particle website has lots of great documentation and guides to get you started.
To see how to set up a new Photon follow this link. https://docs.particle.io/guide/getting-started/start/photon/
To set up an account and get started writing code go here:
https://docs.particle.io/guide/getting-started/build/photon/
SoftwareThe code for this project will be flashed to the photon using the Particle IDE. The coding language used is C++. If you have experience programing an Arduino, the Particle IDE is similar and the code is interchangeable.
Start by creating a new app. Give it a name and save. The Blynk library will first need to be included in the code. Select the Libraries tab on the left (it looks like a book mark) and type 'blynk' into the search bar.
Select blynk then press INCLUDE IN PROJECT
Select the app you want to include the library in and confirm. It will now have added #include <blynk.h> at the first line of your blank code.
The rest of the code can now be added.
The user interface for this project is handled by Blynk. Blynk is easy to use application for building a project interface, simply by dragging and dropping widgets. It is available for iOS and Android and can control a large number of devices including Arduino, Raspberry Pi, Esp8266, and Photon. Like the Photon I have been using this service for a couple of years now. Blink has been very dependable and well supported by it developers. They also keep adding new and interesting widgets for better and more versatile projects.
The Blynk app can be downloaded free from the Apple App Store or Google Play. You will need to set up a new account with an email address to use this service.
Name your project; choose Particle Photon from a long list of supported devices; and click Create Project.
The Auth Token will be sent to the email that you used to set up your Blynk account. You will add this key to the beginning of your code.
The widgets we are going to use for this project are the Button and the Value Display.
Select the button widget to enter its settings menu.
Name the button and set the Output Pin to Virtual and V1. Leave the mode on PUSH. Hit ok.
Next select the Value Display Widget and set the Input Pin to Virtual and V5. Then set the Refresh Interval to 1 sec. Hit OK.
Your interface is complete and when you are ready to test it press the triangle play button in the upper right hand corner. If all goes well the display value widget should update with either open or closed. The button can now be pressed to start or stop the garage door.


Comments
Please log in or sign up to comment.