


Hardware components | ||||||
 |
| × | 1 | |||
 |
| × | 1 | |||
 |
| × | 1 | |||
| × | 1 | ||||
| × | 1 | ||||
 |
| × | 1 | |||
 |
| × | 1 | |||
| × | 1 | ||||
| × | 1 | ||||
| × | 1 | ||||
Software apps and online services | ||||||
| ||||||
 |
| |||||
_4YUDWziWQ8.png?auto=compress%2Cformat&w=48&h=48&fit=fill&bg=ffffff) |
| |||||
 |
| |||||
Hand tools and fabrication machines | ||||||
 |
| |||||
 |
| |||||
 |
| |||||
 |
| |||||
During our studies, our project was to realise a system to monitor a beehive. This'll help beekeepers to check on their beehive and its health.
The data we choose to collect are :
- the weight of the beehive, which helps the beekeeper to follow honey production over the year.
- the indoor and outdoor temperature, which may indicates if bees are still alive and at a decent temperature
- the outdoor humidity
- a few frequencies used by bees to communicate, it indicates if the colony is healthy, if the Queen Bee is present or even an hornet intrusion
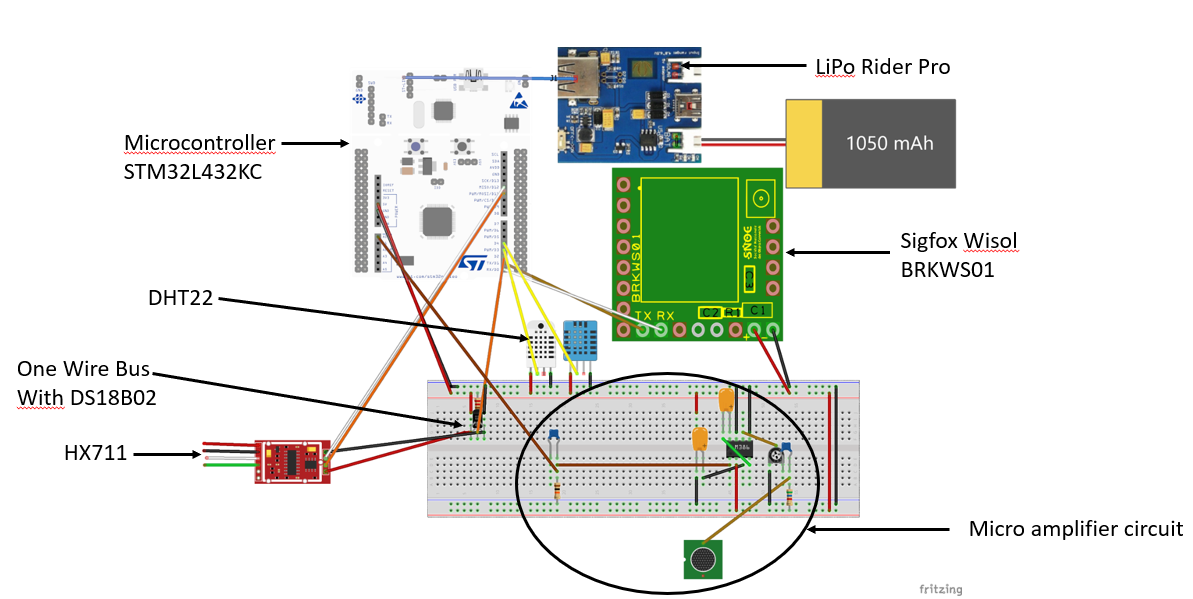
All the components will be put in a waterproof box. The microphone, the weight sensor, the box and the temperature & humidity (DHT22) sensor will be under the beehivThee. temperature sensors (DS18B20) will be put inside the beehive. The solar panel will be placed on the roof.
As it is an embedded system, it needs to be automonous for a large amount of time until the sun comes out and load the battery.
In addition, we used a Sigfox module communication to receive our data on Ubidots platform.
Prerequisites- Microcontroller (programming language C/C++)
- Electronics (Numeric & Analogic)
- PCB
- Computer science
It took us 3 months to almost complete this project.
Amplifiyer circuit and frequency analysisWe have to amplify the signal received by the microphone so the microcontroller can use it.
Here is the amplifier circuit for the microphone we chose, design on PSpice :
R1 is the pull-up resistor, as the microphone is a passive component. We chose a value of 5.6 kΩ, but it can be modified to suit your microphone.
R4 is a potentiometer. It regulates the input on the LM386 OP Amp to avoid saturation.
C5 improves the stability of the LM386 amplifier to prevent issues such as oscillations.
C6 acts as a current bank for output.
C7 capacitor will increase the gain of the LM386. The gain is 200 in this case (the lowest gain is 20).
We selected 4 frequencies to observe :
- Queen quacking, around 343Hz, indicate that other queen bees in their cell are ready and waiting to take over the actual queen bee.
- Queen tooting, 453Hz, the new queen bee starts tooting to indicate that the other potential queens should be left in their wax prisons so the workers don't release them.
- Unhealty colony : 515Hz & 1kHz
The maximum frequency generated by bees is around 2 kHz. Hence, the sampling frequency is equal to 4 kHz, to respect the Shannon theorem (fs >= 2 fmax = 2*2000 Hz = 4000 Hz).The number of samples of the FFT is 256. This number is limited by the microcontroller. Thus, the gap between 2 frequencies will be equal to 4000/256 = 15.625 Hz, which is pretty fine for our selection.
We use the library UIT_FFT_Real and the namespace Mikami by Naoki Mikami, which can be found on Mbed.
For each frequency, we will also calculate the gain in dB.
We used a library available on Mbed to program the HX711.The HX711 is connected to an electronic load weight sensor.
The electronic load weight sensor is fixed to a frame on which a beehive can stand.
A library for this sensor is available on Mbed.We also used the OneWire library, which allows to put several sensors in series. This allows us to use 2 DS18B20.
We connect these sensors to the PCB with Grove connectors.
Temperature & Humidity SensorA library is available on Mbed for the DHT22.
This sensor is placed outside the beehive, preferably under it to avoid rude weather. We recommand to surround the sensor with a thin cloth in case bee find it and place propolis on it.
Power Management UnitWe used Adafruit PMU TPL51150 to save battery power. The microcontroller is in standby state whereas the sensors still are supplied. With this component, the system can last up to 2 days on battery.
Solar panelThe solar panel is connected to the LiPo Rider Pro board.
We recommand to strengthen the panel with plastic and also strengthen the connection behind it.
Data are received on our Sigfox account. A callback is needed to redirect data on Ubidots platform. This can be done in the Sigfox account.
After creating an account on Ubidots, add a device and create variables. On the dashboard, add graphs. Following the limitations of your application, some internal variables can be used in ubidots to process the incoming data.
The dimension are 9 cm x 8 cm. We used KiCad.
The 4 holes allow the PCB to be fixed to the box.
Final prototypeThe LiPo Rider Pro is fixed to the other part of the box.


_Ujn5WoVOOu.png?auto=compress%2Cformat&w=40&h=40&fit=fillmax&bg=fff&dpr=2)

_3u05Tpwasz.png?auto=compress%2Cformat&w=40&h=40&fit=fillmax&bg=fff&dpr=2)

Comments
Please log in or sign up to comment.