


Hardware components | ||||||
 |
| × | 1 | |||
 |
| × | 1 | |||
| × | 1 | ||||
 |
| × | 1 | |||
Software apps and online services | ||||||
 |
| |||||
 |
| |||||
| ||||||
Hi There, in this Project I have made a Remote Door Monitor and Control System using Bolt Iot platform and Arduino.
The System is Fairly Simple, All it does is Monitors if Door Lock/latch (*aka kundi in hindi ) is Open or not and lets user Control The Door Lock/latch using the Bolt Iot Platform via Mobile or Laptop.
This System is a Cheap alternative to many Expensive Smart home Lock gadgets. It really comes in handy if you already have a Heavy duty Locking System and do not want to change it all for a really Expensive Fancy Setup.So without Further Ado, Let's Start Building this Project.
The Above is the final Image after Fnishing.
First of all You need to Sign up for the Bolt Iot Platform in order to use its Cloud Features. One Way to do that is By Purchasing the Bolt Internet of Things and Machine Learning Training.
Once you have Access to The Training Mentioned Above You can Easily make this and many Such Projects. Do Complete the Training Before Going Further as you might get Confused At some Parts Otherwise.
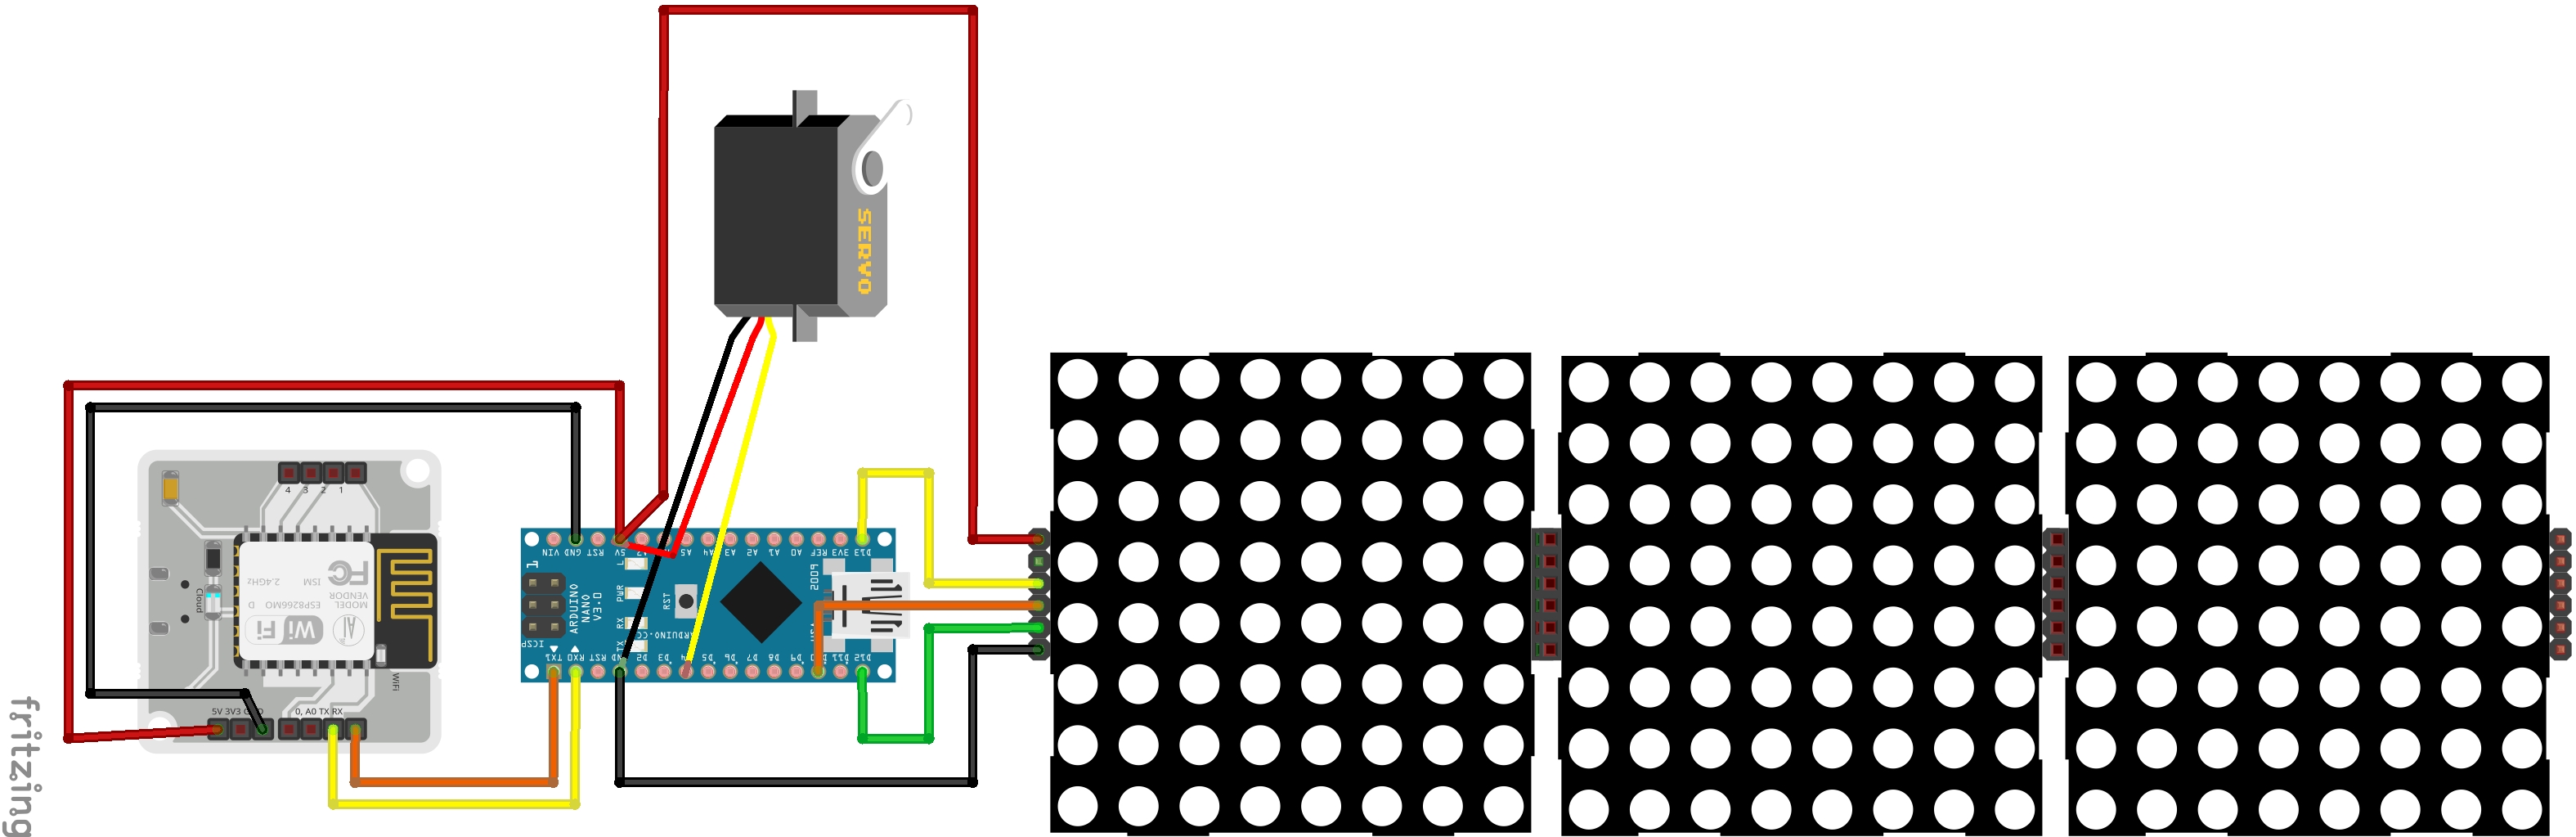
The next Step would be to Assemble the Parts as per the Fritzing Diagram Shown Below.
Here the Servo will be attached to the Lock or latch (kundi), which will then be controlled by the Arduino, which on the other hand shows the Status of the Door Based upon the Servo Motor's Alignment.
This is helpful in case you forgot to lock the door before Sleeping.
The Arduino is then in turn Signalled by Bolt IoT Wifi Module which is connected to the Bolt Iot Cloud. You can set the Status of the Door in the Cloud using Bolt iot Application or the Bolt Iot Cloud Console.
The Above is the HTML code which is to be Uploaded to the Bolt Iot Cloud Platform.
While Below is the C Code which is to be Uploaded to Arduino via Arduino IDE.
<!DOCTYPE html>
<html>
<head>
<meta name="viewport" content="width=device-width, initial-scale=1.0">
 <title>Control Center</title>
<style>
 //Your CSS HERE...
</style>
     <script type="text/javascript" src="https://cloud.boltiot.com/static/js/boltCommands.js"></script>
        <script>
        setKey('YOUR-API-KEY','YOUR-Bolt-Device-ID');
        </script>
</head>
In the above Code a JavaScript page is called, if you have completed the training you would Know what is this for. This is for basic IO Functionality like serialRead, serialWrite, digitalRead/Write, analogRead etc. These are the Basic Functions that are used to operate a micro-controller. Followed by your "Api-key" and "Bolt Device ID".
<body>
    <center>
         <div class="button_div">
        <div><h1>Status:</h1></div>
        <div id="show"><h1>...</h1></div>
        <br>
        <button class='button' onclick='opendoor()'>open</button><br><br>
        <button class='button' onclick='closedoor()'>close</button>
        </div>
    </center>
Inside the Body tag there re Three Divs, one Parent div containing two more divs and two Buttons. the first div is static, the second div shows the Status of the Door, while the two Buttons Open and Close are mapped to the functions opendoor() and closedoor() respectively.
These Functions are responsible for the actual functioning i.e Signalling the Device to open or close the door and telling its status on the display as well as UI.
<script>
    function opendoor(){
            serialWrite("OPEN");
            document.getElementById("show").innerHTML="<h1>Door Open</h1>";
    }
    function closedoor(){
            serialWrite("CLOSE");
            document.getElementById("show").innerHTML="<h1>Door Close</h1>";
    }
</script>
</body>
</html>
The Function opendoor() is defined to Send the Command serialWrite("OPEN") and Then display it on the UI. This Command serialWrite("OPEN") sends the String "OPEN" to the Arduino via the Bolt iot Device which are co,, unicatinng to each other via UART (Tx-Rx) similar to what we have on Arduino IDE aka Serial Monitor. A similar Statement can be said for function closedoor()
The Arduino Code is Set to read the Serial Data from the Bolt Wifi Module and According to it Perform Certain Actions, such as Displaying the Door status and Locking or unlocking the Door.
The Arduino Code is as Follows:#include <BoltDeviceCredentials.h>
#include <BoltIoT-Arduino-Helper.h>
#include <MD_Parola.h>
#include <MD_MAX72xx.h>
#include <SPI.h>
#include <Servo.h>
#define API_KEY "YOUR_API_KEY"
#define DEVICE_ID "YOUR_DEVICE_ID"
#define HARDWARE_TYPE MD_MAX72XX::ICSTATION_HW
#define MAX_DEVICES 4
#define CLK_PIN 13
#define DATA_PIN 11
#define CS_PIN 10
#define Door 4The initial part is where libraries are included. Here I have included BoltDeviceCredentials.h and BoltIot-Arduino-Helper.h Libraries so as to use with Bolt WiFi Module. Along with Libraries for LED Matrix Display and Servo.
The Credentials Library allows you to set your "API key" and "Device ID" while the Arduino Helper library is the one with actual Functions Inside.
The next two line Define your API KEY and DEVICE ID. Followed by Definition of pins for Display and Servo.
MD_Parola P = MD_Parola(HARDWARE_TYPE, CS_PIN, MAX_DEVICES);
Servo myservo;

String stat="";
String command = "";
char buf[30];

String opendoor(String *data) {
  int pos;
  for (pos = 0; pos <= 180; pos += 1) {
    myservo.write(pos);
  }
  delay(10);
  P.displayClear();
  stat="Door Open";
  return "Success:open";
}
The Objects of Display Library and Servo are Initialised. A Flag for Door Status is Defined along with a var for storing the Command Received in Serial Data via Bolt Module and a Buffer array for printing data on Display.
A Function of type String is Defined where it takes Serial Data as input. It is defined to sweep the Servo so as to pull the Lock / latch backwards, in order to open it. Followed by a Function to Clear the Display, and Update the value of status flag to "Door Open". The Function Returns String "Success:Open". which are the values for the JSON.
Similarly the function closedoor() does the Opposite of the function opendoor() as it sweeps the servo in reverse Direction and Updates the flag as "Door Close".
String closedoor(String *data) {
  int pos;

  for (pos = 180; pos >= 0; pos -= 1) {
     myservo.write(pos);
  }
  delay(10);
  P.displayClear();
  stat="Door Close";
  return "Success:close";
}

void setup(void)
{
  myservo.attach(Door);
  boltiot.begin(Serial);
  boltiot.setCommandString("OPEN",opendoor);
  boltiot.setCommandString("CLOSE",closedoor);
  P.begin();
  P.displayClear();
  P.displayScroll(buf, PA_LEFT, PA_SCROLL_LEFT, 25);
}
The Setup Function Does the usual like Attaching the Servo Object to the pin where motor is attached, Starting a Serial etc. Here I have used boltiot.begin() function to to start Listening to the serial from Bolt Device.
The next Line is where the actual magic happens, The boltiot.setCommandString() Configures or binds the Functions opendoor() and closedoor() to be triggered when the Serial Data is equal to "OPEN" and/or "CLOSE" respectively.
The next Few Lines are to setup the LED matrix Display. It takes Buffer as input to show the data on display.
void loop(void)
{
   stat.toCharArray(buf,stat.length()+1);
   boltiot.handleCommand();
    if(P.displayAnimate()){
    P.displayReset();}
}
AND FINALLY comes the Loop Function, in here I have First Converted the status flag from string to character array and stored in Buffer as it is the input for our scrolling display. Why in here and not inside the Setup Function, You ask?
The answer is because whenever the Command gets executed the flag changes but the Setup Function is called only once. And therefore we need to update the buffer regularly.
The boltiot.handleCommand() function Handles the Commands Received and performs Desired Action like calling a function implicitly.
The next line Updates the display with new text.
AND JUST LIKE THAT WE HAVE COMPLETED OUR PROJECTHere's The Working Video:
Thank You Guys For Reading This 😊


Comments
Please log in or sign up to comment.