


Hardware components | ||||||
 |
| × | 1 | |||
 |
| × | 1 | |||
 |
| × | 1 | |||
| × | 1 | ||||
Software apps and online services | ||||||
 |
| |||||
In this project, we will be making a weather station which measures temperature, air humidity and soil moisture using SLabs-32 board. We also send this data to the Cayenne cloud for data acquisition and if you have seen the previous project I made on this board which gets the current weather information from the internet and displays it on the TFT screen (link), I have combined that with this project as-well, just to do as many things as possible I could do on this board. All this on just one single board, which is SLabs-32 an ideal board for IoT-based projects.
To get your own SLabs-32 click on the link given below:
https://www.fabtolab.com/slabs-32
SLabs-32 has 2 onboard processors which are ESP8266 and Atmega328p. This board combines the high processing capabilities of 32 bit microcontroller L106 and numerous GPIOs available for HMI on the Atmega328p. With I2C as interprocessor communication, Slabs-32 board facilitates a combination of processing power and sufficient GPIOs for all your complex prototyping needs.
List of Materials:For this project you would require:
- SLabs-32
- DHT 11 temperature and humidity sensor
- Soil moisture sensor
- PIR sensor (Optional)
- Jumper Wires
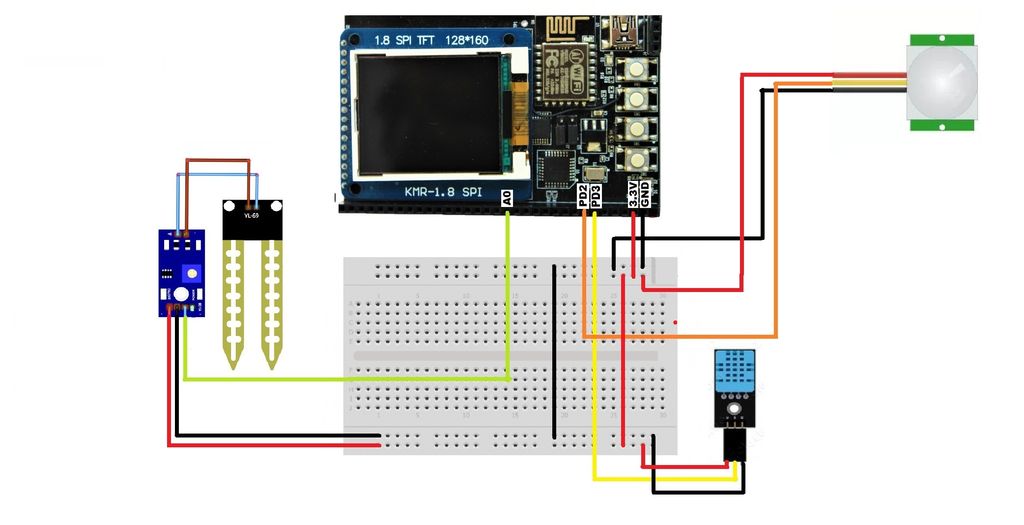
The connections are very simple. Follow the instructions and the circuit diagram given above, and you should have no problems.
Connecting DHT11 :
- Vcc pin to SLabs-32's 3.3V output
- GND to SLabs-32's GND pin
- Data pin to 3
Connecting Soil moisture sensor:
- Vcc pin to SLabs-32's 3.3V output
- GND to SLabs-32's GND pin
- Data pin to A0
Connecting PIR sensor:
- Vcc pin to SLabs-32's 3.3V output
- GND to SLabs-32's GND pin
- Data pin to 2
The soil moisture sensor's data pin-out can either analog or digital, it's up to us to decide. In our case, we have used the analog data pin-out.
Make an Account in Cayanne:Create an account in Cayenne. To do that go the link below:
https://cayenne.mydevices.com/cayenne/login
Sign up for an account and enter your Name, Email and create a Password.
Once you create an account, you then have to add your device so it can be accessed in the online dashboard. From your dashboard, you can remotely monitor and control your IoT devices.
Cayenne supports multiple devices and also a range of sensors, extensions and actuators.
In our project, we will select “Bring your own thing” as we are using a custom board. Once you click that it will show you the “MQTT USERNAME”, “MQTT PASSWORD” and “CLIENT ID” all these credentials are unique and is used to detect your device. Make sure you make note of these because you need to use these parameters in your code.
Programming SLabs-32:Download the sketch files attached to this step.
After downloading the file, open the sketch of the Esp8266 module and do the following things :
- Enter your WiFi credentials by editing the "SID[]" and "PASSWORD[]" variables in the code
- Enter your MQTT username and password of provided by cayenne.
- Enter your clientID provided by cayenne.
Once this is done, upload the code for both Atmega 328p and Esp8266 and get your weather station start working.
To know more about how to program SLabs-32 click on the link given below :
http://startoonlabs.com/Getting%20started%20with%20SLabs-32.pdf
Once you have uploaded the code, it should run smoothly. Open your Cayenne account to see your sensor values being updated periodically. It's up to you how you want to customize your Cayenne dashboard, for demonstration purposes we have selected a simple widget.


_3u05Tpwasz.png?auto=compress%2Cformat&w=40&h=40&fit=fillmax&bg=fff&dpr=2)


Comments