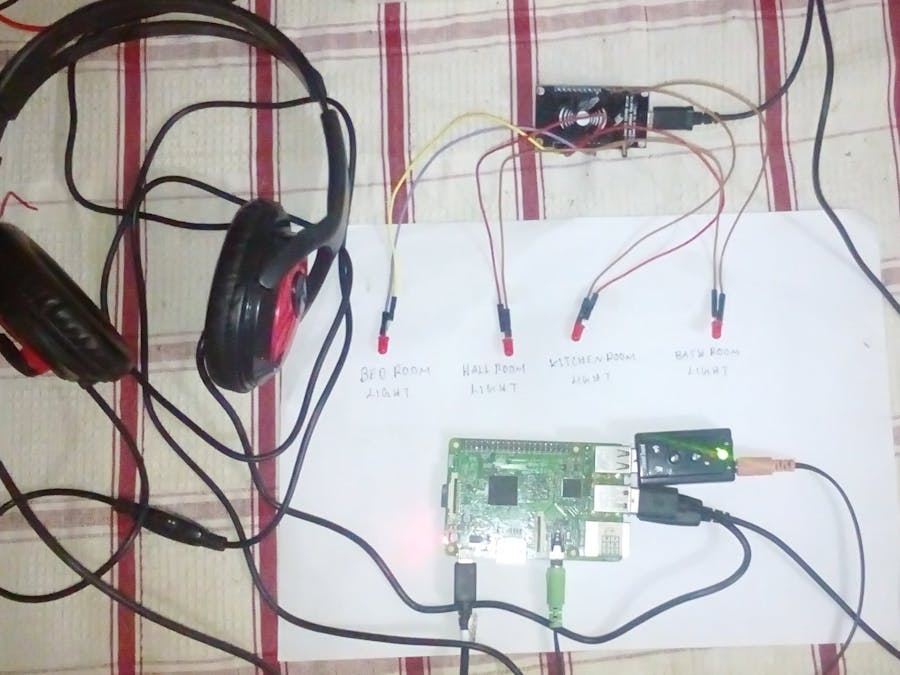
Amazon Alexa is pretty cool artificial intelligence that helps user to create their own skill. Amazon provides Alexa voice service(AVS) to help developers to make install Alexa on their own devices. It will helps user to make it simple as much. Those people not having echo device or dot device and use this way to access Alexa. we have Alexa on our Raspberry pi3 board using amazon voice service(AVS). Let's make it...we made simple automation ie., controlling an LED light over voice. No worry about making our raspberry pi as Alexa device all details are given below.
we made simple automation ie., controlling some home appliances(LED's for prototype) over voice using Alexa. you can replace those LED's with relays and real appliances. No worry about making our raspberry pi as Alexa device all details are given below. So do it with full of enjoyment.
This is our skill that have been published.
Here is our skill published link: https://alexa.amazon.in/spa/index.html#skills/beta/amzn1.ask.skill.429aeb0d-5bfb-4b8e-9d07-52799ae75778
Our Skill ID: amzn1.ask.skill.429aeb0d-5bfb-4b8e-9d07-52799ae75778
DEMO VIDEO:
Hope you guys seen our demo video and get inspired on it. Then why waiting full detailed instruction are provided here and let's start building our own.
STEP 1: Make your Raspberry pi as Alexa Client
Here is the video on making your raspberry pi as alexa device client. This video will help in clear to make it.
STEP 2: Configure Alexa on raspberry pi
you can download and install alexa app from the github repository.
Alexa Github link: https://github.com/alexa/alexa-avs-sample-app
then create an account on amazon developer console. link is here: https://developer.amazon.com/
Log in to developer console and the click on to Alexa Voice service. Follow the video in step 1, after downloading the alexa app from the above Guihub link. After that make sure that you have noted down your own app ID, client ID, client secret. Because it wil be needed at the time of running.
It is not such complicated one to run alexa its pretty simple. Just take few seconds. Just run the below command on your pi device.
$ cd Downloads/alexa-avs-sample-app-master/. automated_install.sh
provide the information what it ask like app ID such things it will automatically configure with your account.
STEP 3: Time to wake Alexa
$ cd Downloads/alexa-avs-sample-app-master/samples
#three tabs will be open#
#In Tab 1#
$ cd companionService/npm start
#In tab 2#
$ cd javaclient
$ mvn exec:exec
#In tab 3#
$ cd wakewordAgent/src/
$ ./wakewordAgent -e sensory
that's it now alexa is ready to use.!
Alexa will be wake up by saying a wake work "alexa" and then ask whatever you want to ask. Still sticky in the codes. Detailed process is shown in the step 1 video have a look you will get a clear view.
STEP 4: Creating new skill
1. Log in to amazon developer account. Not having account just sign up few steps.
developer account link: https://developer.amazon.com/home.html
2. click on tab Alexa and choose Alexa skill kit.
3. click add a new skill it take to skill page.
- select skill type as custom interaction model
- choose language and then provide names. keep rest as it is
4. move to interaction model
- just copy and paste our intent provided below and the sample utterances and then click save and move to configure model.
- choose HTTPS on configuration. we have used heroku as https client. It is easy in use and deployment. Link is provided below.
heroku link: https://www.heroku.com/
STEP 5: Creating a Heroku client
- Log in to heroku account. if not having account just create it with few easier steps. link is above.
- click on create new app and choose the programming language convenient to you. we have choose python language.
- In deployment method, connect you heroku account with your github repository.
Github link: https://github.com/
if anyone feel messy in reading with the above wording and pictures can go with video on Heroku account creating and deployment: https://youtu.be/qZtsPJa2yzQ
STEP 6: Connect Github with heroku
- Now log in to github account and then create a new repository.
- And then upload the files to your new repository by clicking upload files inside the repository. Files are provided below you can directly upload to your repository.
- save changes and the copy the URL of your selected repository.
- then come back to heroku and the connect your github repository.
- click on connect to github and then paste the copied URL of your github repository.
if sticky in getting the points in above steps just go for video. Each and every step is clearly given. here is the video link on Connecting Github repository with Heroku client: https://youtu.be/_YtZTXd_Cio
STEP 7: Connecting NodeMCU to Heroku
- Log in to heroku and the go to your created app.
- then go to setting -> Domains and certification and then copy the domain URL
- come back to skill configuration choose HTTPS and the paste the copied URL in the below box.
Detailed process are shown in the video have a look on it: https://youtu.be/om5vBcZjDrY
STEP 8: Run Arduino code on NodeMCU
Do connection of LED's as shown in schematic below.
Final step, arduino code is provided with this. It need some libraries for the execution no worry. Libraries also provided in our Github repository just simply go with it.
All set just execute the Arduino code in NodeMCU board and our project is ready.
cool... our Alexa device is ready to assist us.


Comments
Please log in or sign up to comment.