#25projectsofchristmas
When you are at home, chilling in the living room, you like to have it cozy and warm. Especially in winter. Central heating systems give us warmth without having to cut down trees and chop wood. Very practical! And since the apartment is not needed so warm when you are not at home, or when you lie in bed at night, you can simply turn down the heating system at these times. And really convenient is that this can be controlled automatically by a switching time clock thermostat.
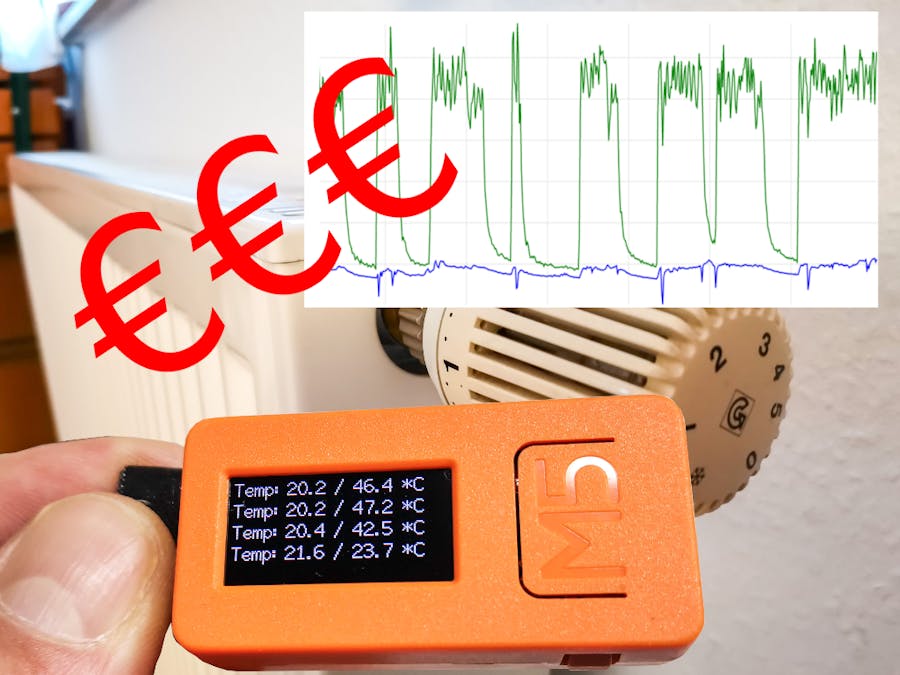
Imagine that you measure the room temperature in your living room and at the same time the temperature of the radiator. Then you will get the following picture for typical winter days:
At the times of night setback the apartment is not heated. This is not necessary, because I lie in bed and sleep under my warm blanket. And when the heating is not on, I save money! (indicated by the EURO Symbols). The graph shows a weekend when I was at home during the day. During the week I am at work during the day. Then I don't need to heat my apartment either, because my boss heats the office at my workplace. This means that I can also turn down the heating during the day. And that saves me more money:
By the way, the short dips in the living room temperature always occur when I briefly ventilate the apartment by opening the windows. Good to see, isn't it?
Failure detectionMy central heating has a main valve through which the night setback is controlled. And one day, exactly this valve broke! It stayed open permanently. As a result, I was constantly heating my apartment. Even if the room thermostat with the switching time clock should actually switch off the heating:
I burned money on those days but I discovered the error in time and was able to fix it quickly. Therefore, it is important to keep an eye on the heating and check its operation. And this is where IOT comes into action.
Sensors and data acquisitionThe M5StickC is the perfect choice for recording temperatures. He can be easily integrated into the WiFi of my apartment to transfer the data to an IOT server. There are plug-on modules (HATs) with which the device can be easily expanded. For example with the M5StickC ENV HAT which contains the following sensors: DHT12, BMP280 and BMM150. The DHT12 is a digital temperature and humidity sensor that is controlled via I2C. However, the temperature I measured with the DHT12 of the ENV-HAT was a few degrees too high:
It turns out that the heat from the M5StickC affects the sensor's measurements when the sensor is too close to the electronics and the screen of the M5StickC. If the sensor is connected with cables so that it is placed a bit away, then the readings make sense:
However, for the measurements of the room temperature and the temperature of the radiator, I decided to use sensors with a higher precision.
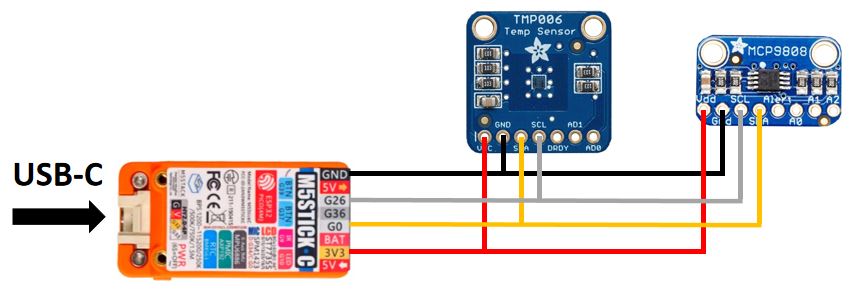
For the measurement of the room temperature I decided to use the MCP9808 High Accuracy I2C Temperature Sensor. The sensor is available as a breakout board from Adafruit. It is very precise and can be easily addressed via a library. The sensor only needs to be positioned at a good place in the room and then measures the ambient temperature in my living room.
To measure the temperature of the radiator I decided to use the Contact-less Infrared Thermopile Sensor TMP006. This sensor was also available as a breakout board from Adafruit. The contact-less measurement simplified the installation: The sensor only has to be mounted in such a way that it is directed to the supply pipes of the radiator. It does not need to touch the radiator itself.
Both sensors are controlled via I2C and have different I2C addresses. Important: The sensors are not connected to the M5StickC via the Grove connector, because the I2C inputs of the ESP32 are not 5V tolerant. The Grove-Connector has 5V power output. The breakout boards can handle 5V as supply voltage, but then the I2C signal lines are also at 5V. Therefore it is better to supply the boards with 3.3V.
Circus-of-ThingsEvery 10 minutes the measured values from both sensors are sent to the Circus-of-Things server. There they are stored and can be viewed via a web interface. The time range of almost two years looks like this:
To use the Circus-of-Things service you must first create an account. In the account information you will then find the necessary data for the connection via the REST API (token).
Then you have to create a signal in the web interface, to which the data will be sent.
The code starts with including the libraries for the sensors and the declaration of the sensor objects:
// MCP9808 sensor library:
#include "Adafruit_MCP9808.h"
// MCP9808 sensor object:
Adafruit_MCP9808 tempsensor1 = Adafruit_MCP9808();
#define MCP9808_I2CADDR 0x18
#define MCP9808_RES 3

// Required for all Adafruit Unified Sensor based libraries.
#include <Adafruit_Sensor.h>

// TMP006 sensor library:
#include "Adafruit_TMP006.h"
#define TMP006_I2CADDR 0x40
// TMP006 sensor object:
Adafruit_TMP006 tempsensor2(TMP006_I2CADDR);
Followed by the configuration data for the local WiFi and the connection to the Circus-of-Things Server:
// WiFi network configuration:
const char* ssid     = "YourWiFi";
const char* password = "Your_Password";

// circusofthings.com configuration
const char* Circus_hostname = "circusofthings.com";
const char* Circus_key1 = "your-key#1";
const char* Circus_key2 = "your-key#2";
const char* Circus_token = "your-token";
For the output of information and data on the display of the M5StickC I used my textbuffer library.
The setup() function is simple: First the M5StickC and the display are initialized. Then a scan is performed on the I2C bus and the devices found are displayed. This is useful to find errors with the I2C wiring. After that the sensors are initialized and at last the connection to the WiFi is established.
In the main loop(), a check is made every 10 minutes to see whether the connection to the WiFi still exists. Then the data of the sensors are read out and shown on the display as well as sent to the Circus-of-Things server.
For the connection to the Circus-of-Things Server, you can find good documentation on the website and also libraries to learn how to use the service. But don't worry: it's really easy! To make the upload work best in my code, I wrote a small custom function that connects to, and uploads the measured value to the Circus-of-Things Server:
// =============================================================
// Circus_write(double value)
// send value to circusofthings.com website
// the hostname, token and key need to be configured
// The function returns the number of received lines
// =============================================================
int Circus_write(const char* Circus_key, double value) {
// Use WiFiClient class to create TCP connection
WiFiClientSecure client;
// Needs to be set Insecure, otherwise sometimes errors will occur
client.setInsecure();
const int httpsPort = 443;
if(verbose_output) Serial.printf("--> connect to: %s:%i\r\n",Circus_hostname,httpsPort);
int n_lines = 0;
// check the connection
if (!client.connect(Circus_hostname, httpsPort)) {
Serial.println("[ERR] Circus Connection failed!!!");
return 0;
} else {
char value_char[15];
dtostrf(value,1,4,value_char);
// We now create a URI for the request
char url_char[250];
sprintf_P(url_char, PSTR("/WriteValue?Key=%s&Value=%s&Token=%s\r\n"), Circus_key, value_char, Circus_token);
String url_str = url_char;
if(verbose_output) {
Serial.print("Requesting URL: ");
Serial.println(Circus_hostname+url_str);
}
// We need to manually create the HTTP GET message
// client.print() will send the request to the server
client.print(String("GET ") + url_str + " HTTP/1.1\r\n" +
"Host: " + Circus_hostname + "\r\n" +
"Connection: close\r\n\r\n");
//Wait until a response is available
int n_trials = 500;
while(!client.available() && n_trials > 0){
n_trials--;
delay(10);
}
// Read all the lines of the reply from server
// force timeout to 1000ms (ESP8266 = 5000ms default value)
client.setTimeout(1000);
while(client.available()){
String line = client.readStringUntil('\r');
n_lines++;
if(verbose_output) Serial.print(line);
}
if(verbose_output) Serial.printf("\n[OK] %i lines received\n",n_lines);
}
return n_lines;
}
Every 10 minutes, both data from the sensors are sent to the server by calling this function for both values:
// Write the measured speed to circusofthings.com
Circus_write(Circus_key1, temperature1);
Circus_write(Circus_key2, objtemp2);When I started the project in early 2020, the sensors were still up to date. In the meantime, the TMP006 sensor is no longer available. Also the follow-up model TMP007 is "discontinued" at Adafruit. But there is a NCIR Non-Contact Infrared Thermometer Sensor Unit from M5Stack. This one would be suitable for rebuilding this project and can be connected directly to the Grove port.
The MCP9808 breakout board is still available, but from M5Stack you can get the ENV III unit. This Unit can also be connected directly to the Grove port. With the Grove-T connector both units can be connected in series and no soldering is necessary. All you need are long Grove cables.
FeedbackI hope this project can prove to be useful to the wider community. Feel free to message me here if you have questions or comments.
Enjoy and let's save money and resources!
Regards,
Hans-Günther


Comments
Please log in or sign up to comment.