


Hardware components | ||||||
| × | 1 | ||||
 |
| × | 1 | |||
| × | 1 | ||||
 |
| × | 1 | |||
 |
| × | 1 | |||
Software apps and online services | ||||||
 |
| |||||
The SAMA7G54-Ek is the latest low-power MPU 32-Bits of Microchip. This tutorial will explain how to run the Object recognition demo made by the MPU32 Marketing Team. In this demo, the SAMA7G5 runs a Machine Learning Model trained to recognize 1000 objects, animals and other things in images.
I) Prepare the setup1)Flash the SD CardFirst of all, you have to flash your SD card with the “sdcard_blank.img” image included with this documentation. This Linux4SAM 2022.04 image has been adapted to allow the running of AI/ML Applications.
Hint:
If you need instructions about how to flash a SD Card, follow this link : Linux4Sam – Flash SD Card
The SD Card is the same as the one used for keyword recognition demo.2) Copy the files
Once the SD card is flashed, with a Linux Distribution on your host, copy at least the directories : “dependencies” and “Image_classification”to the root file system of the SD Card.
Hint:
If you need a tutorial about the creation of a Linux Virtual Machine, follow this link.
You should have this folder structure :
root/
├─ Image_classification/
│ ├─ MIPI_Camera/
│ ├─ USB_Camera/
├─ dependencies/
│ ├─ tflite_runtime-2.8.0-cp38-cp38-manylinux2014_armv7l.whl
│ ├─ argparse-1.4.0-py2.py3-none-any.whl
#ls
Image_Classification dependencies
#ls Image_Classification/
MIPI_Camera USB_Camera
#ls dependencies/
tflite_runtime-2.8.0-cp38-cp38-manylinux2014_armv7l.whl
argparse-1.4.0-py2.py3-none-any.whlNow you have to setup hardware, this image describes how to do so.
The debug console has a baud rate of 115 200.
This is how to connect the MIPI Censor :
For this demo, the MIPI CSI IMX219 Sensor will be used. To make it usable by the Linux image, you will have to update the boot configuration.
Once your setup is ready, follow these steps:
- Reset the system by pressing the “nRst”button, this is the middle one.
- While your system is booting, keep pressing any key, you should enter the U-Boot mode :
U-Boot 2022.01-linux4sam-2022.04 (Jun 09 2022 - 10:02:15 +0200)
CPU:   SAMA7G5
Crystal frequency:       24 MHz
CPU clock        :      800 MHz
Master clock     :      200 MHz
Model: Microchip SAMA7G5-EK
DRAM:  512 MiB
MMC:   mmc@e1204000: 0, mmc@e1208000: 1
Loading Environment from FAT... OK
In:    serial@200
Out:   serial@200
Err:   serial@200
Net:   eth0: ethernet@e2800000, eth1: ethernet@e2804000
Hit any key to stop autoboot:  0
=>- Type printenv and press “Enter”
- ·You can see the bootcmd variable, this is the one you will update :
- Type edit bootcmd and press “Enter”
- At the end of the line, type : #imx219 and press “Enter”
- Type saveenv and press “Enter”
- Type boot to reboot the system
Warning:
Perform the previous steps carefully and follow the instructions precisely, not doing so can cause damage to the image, and make it unusable.
II)Configure and launch the demo
1) Install some dependenciesNow, you have to install two dependencies: argparse and tflite_runtime. Argparse is a python library which supports passing arguments during the interpretation of a python script.
tflite_runtime is a lighter version of TensorFlow and is mostly used for inferencing (running).tflite machine learning models.
To do so you can use one of the two methods described below:
a) Using the whl files included :- Go to the “dependencies” directory
- Type :
#pip install tflite_runtime-2.8.0-cp38-cp38-manylinux2014_armv7l.whl
#pip install argparse-1.4.0-py2.py3-none-any.whlThis section is only an example about how to install python packages using the “pip install package-name” command.
To install tflite_runtime and argparse you will have to use “pip”. But first of all, you need to connect the board to the internet:
- Plug an ethernet cable to the “1Gbps Ethernet” module.
- Activate the interface :
#ifdown eth0
#ifup eth0- Setup the current date and time (for SSL certificate compatibility reasons):
#date YYYY-MM-DD
#date HH:MM:SS- Install the packages
#pip install tflite_runtime
#pip install argparseNow that everything is setup, you can run the demo, to do so :
#cd Image_Classification
#cd MIPI_Camera
#python3 ./mipi_object_reco_flask.py
You should see something like :
This demo runs a webserver, to stream the MIPI Camera images. To connect to this webserver, open a web browser (OS independent) and browse to the indicated IP Address:
Warning:
To be able to connect to the webserver, host and target have to be in the same network.
Hint:
If you want to run the demo, without the webserver (no streaming video), you can type this command :
#python3 ./mipi_object_reco_flask.py -s 0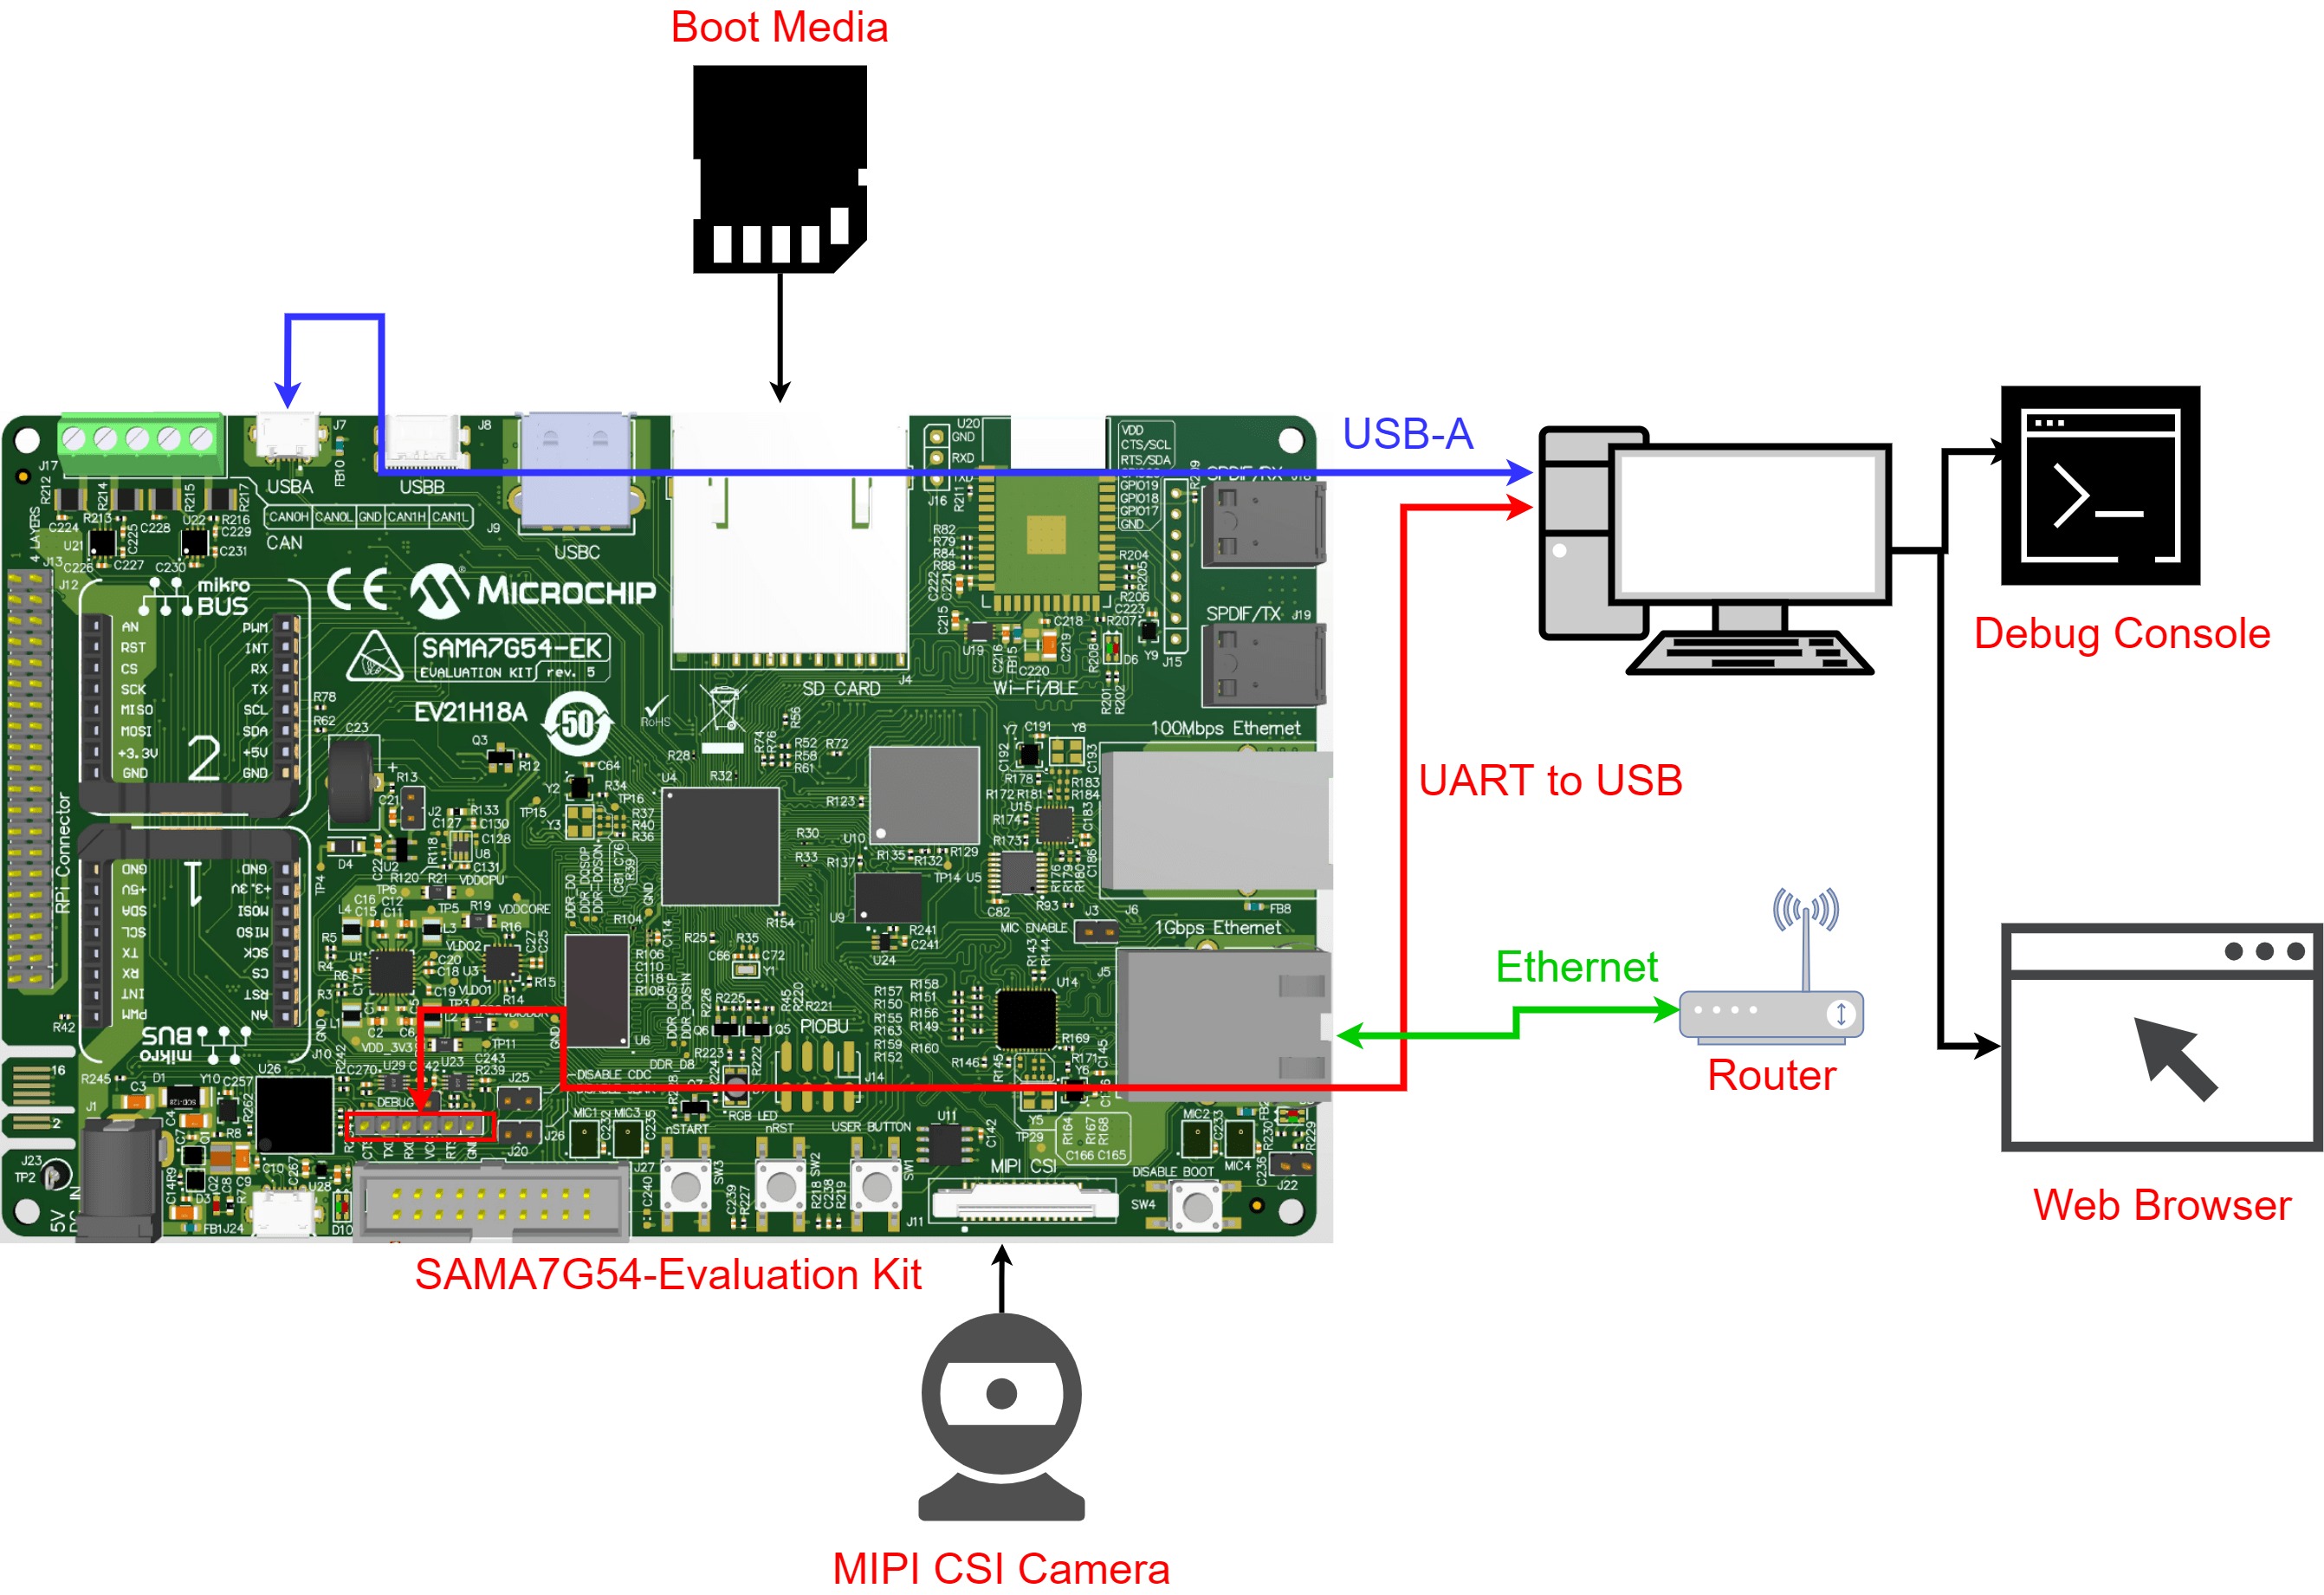


Comments
Please log in or sign up to comment.