Hackster is hosting Hackster Holidays, Ep. 6: Livestream & Giveaway Drawing. Watch previous episodes or stream live on Monday!Stream Hackster Holidays, Ep. 6 on Monday!
Hardik Rathod
Published © GPL3+

Create GUI To Visualize Temp And Humidity For Arduino

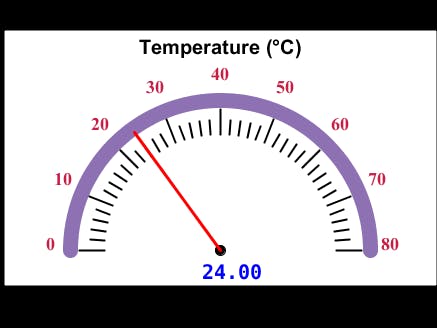
Simplest way to create a Graphical User Interface (GUI) to visualize Temperature and Humidity using Arduino and DHT sensor in Processing.

BeginnerFull instructions provided30 minutes30,340
Create GUI To Visualize Temp And Humidity For Arduino

Things used in this project

Hardware components

Arduino Nano
×1
DHT22
×1
Breadboard (generic)
×1
Jumper Wires
×1

Software apps and online services

Arduino IDE
Arduino IDE
Processing

Story

Read more

Schematics

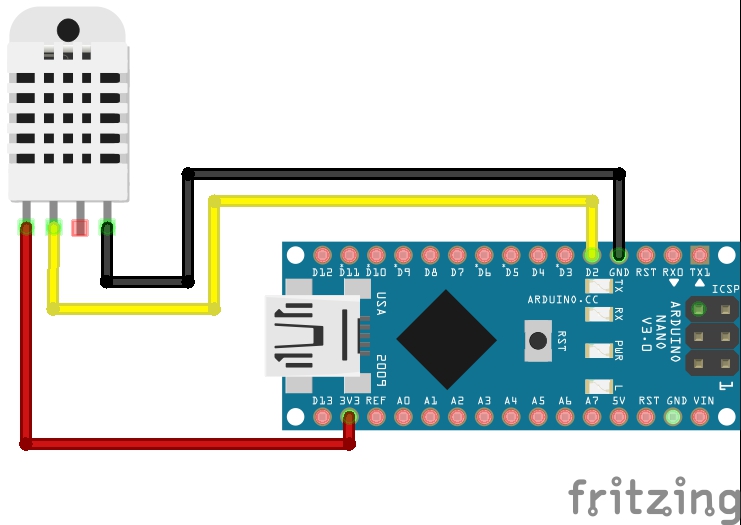
Schematic

You can use 5 V also

Code

Arduino code

Arduino
You need 'SimpleDHT' library to run this code successfully. Just go to library manager and search for 'SimpleDHT'. Very simple, Right?
// Download 'SimpleDHT' library from the library manager to run this
// code successfully.
#include <SimpleDHT.h>

// for DHT22, 
//      VCC: 5V or 3V
//      GND: GND
//      DATA: 2
int pinDHT22 = 2;
SimpleDHT22 dht22;

void setup() {
  Serial.begin(9600);
}

void loop() {
  // start working...
  
  // read without samples.
  // @remark We use read2 to get a float data, such as 10.1*C
  //    if user doesn't care about the accurate data, use read to get a byte data, such as 10*C.
  float temperature = 0;
  float humidity = 0;
  int err = SimpleDHTErrSuccess;
  if ((err = dht22.read2(pinDHT22, &temperature, &humidity, NULL)) != SimpleDHTErrSuccess) {
    Serial.print("Read DHT22 failed, err="); Serial.println(err);delay(2000);
    return;
  }
  
  Serial.print((float)temperature);
  Serial.print(",");
  Serial.println((float)humidity);
  
  // DHT22 sampling rate is 0.5HZ.
  delay(2500);
}

Processing code

Processing
/***********************************
 First upload the Arduino code to the Arduino and then run this code.
 Make sure that the Port number and baudrate are the same.
***********************************/
import meter.*;
import processing.serial.*;

Serial port;
String[] list;

Meter m, m2;

void setup() {
  size(950, 400);
  background(0);
  
  port = new Serial(this, "COM4", 9600);

  fill(120, 50, 0);
  m = new Meter(this, 25, 100);
  // Adjust font color of meter value  
  m.setTitleFontSize(20);
  m.setTitleFontName("Arial bold");
  m.setTitle("Temperature (C)");
  m.setDisplayDigitalMeterValue(true);
  
  // Meter Scale
  String[] scaleLabelsT = {"0", "10", "20", "30", "40", "50", "60", "70", "80"};
  m.setScaleLabels(scaleLabelsT);
  m.setScaleFontSize(18);
  m.setScaleFontName("Times New Roman bold");
  m.setScaleFontColor(color(200, 30, 70));
  
  m.setArcColor(color(141, 113, 178));
  m.setArcThickness(10);
  m.setMaxScaleValue(80);
  
  m.setNeedleThickness(3);
  
  m.setMinInputSignal(0);
  m.setMaxInputSignal(80);

  // A second meter for reference
  int mx = m.getMeterX();
  int my = m.getMeterY();
  int mw = m.getMeterWidth();
  
  m2 = new Meter(this, mx + mw + 20, my);
  m2.setTitleFontSize(20);
  m2.setTitleFontName("Arial bold");
  m2.setTitle("Humidity (%)");
  m2.setDisplayDigitalMeterValue(true);
  
  String[] scaleLabelsH = {"0", "10", "20", "30", "40", "50", "60", "70", "80", "90", "100"};
  m2.setScaleLabels(scaleLabelsH);
  m2.setScaleFontSize(18);
  m2.setScaleFontName("Times New Roman bold");
  m2.setScaleFontColor(color(200, 30, 70));
  
  m2.setArcColor(color(141, 113, 178));
  m2.setArcThickness(10);
  m2.setMaxScaleValue(100);
  
  m2.setNeedleThickness(3);
  
  m2.setMinInputSignal(0);
  m2.setMaxInputSignal(100);
  
}

public void draw() {
  
  textSize(30);
  fill(0, 255, 0);
  text("Temperature and Humidity", 270, 50);
  
  if (port.available() > 0) {
    String val = port.readString();
    list = split(val, ',');
    float temp = float(list[0]);
    float hum = float(list[1]);
    
    println("Temperature: " + temp + " C  " + "Humidity: " + hum + " %");
    
    m.updateMeter(int(temp));
    m2.updateMeter(int(hum));
  }
}


/*
// Arduino code

#include <SimpleDHT.h>

// for DHT22, 
//      VCC: 5V or 3V
//      GND: GND
//      DATA: 2
int pinDHT22 = 2;
SimpleDHT22 dht22;

void setup() {
  Serial.begin(9600);
}

void loop() {
  // start working...
  
  // read without samples.
  // @remark We use read2 to get a float data, such as 10.1*C
  //    if user doesn't care about the accurate data, use read to get a byte data, such as 10*C.
  float temperature = 0;
  float humidity = 0;
  int err = SimpleDHTErrSuccess;
  if ((err = dht22.read2(pinDHT22, &temperature, &humidity, NULL)) != SimpleDHTErrSuccess) {
    Serial.print("Read DHT22 failed, err="); Serial.println(err);delay(2000);
    return;
  }
  
  Serial.print((float)temperature);
  Serial.print(",");
  Serial.println((float)humidity);
  
  // DHT22 sampling rate is 0.5HZ.
  delay(2500);
}
*/

Processing code

Processing
// Lets create a simple meter

// Import Meter library
import meter.*;

// Import serial library
import processing.serial.*;

Serial port; // Define a port

Meter m, m2;

void setup(){
  // First we need to create a empty window
  size(950, 400); // Size of the window (width, height)
  background(0, 0, 0); // Background color of window (R,G,B)
  
  // Create new port
  port = new Serial(this, "COM3", 9600); //name of the port would be different for linux
  
  // Lets add a default meter to empty window
  // TEMPERATURE METER
  m = new Meter(this, 25, 80);  // here 25, 10 are x and y coordinates of meter's upper left corner
  
  m.setTitleFontSize(20);
  m.setTitleFontName("Arial bold");
  m.setTitle("Temperature (C)");
  
  // Change meter scale values
  String[] scaleLabels = {"0", "10", "20", "30", "40", "50", "60", "70", "80"};
  m.setScaleLabels(scaleLabels);
  m.setScaleFontSize(18);
  m.setScaleFontName("Times new roman bold");
  m.setScaleFontColor(color(200, 30, 70));
  
  // We can also display the value of meter
  m.setDisplayDigitalMeterValue(true);
  
  // Lets do some more modifications so our meter looks nice
  m.setArcColor(color(141, 113, 178));
  m.setArcThickness(15);
  
  m.setMaxScaleValue(80);
  
  m.setMinInputSignal(0);
  m.setMaxInputSignal(80);
  
  m.setNeedleThickness(3);
  
  // HUMIDITY METER
  // lets take some refference from first meter
  int mx = m.getMeterX(); // x coordinate of m
  int my = m.getMeterY(); // y coordinate of m
  int mw = m.getMeterWidth();
  
  m2 = new Meter(this, mx + mw + 20, my);
  
  m2.setTitleFontSize(20);
  m2.setTitleFontName("Arial bold");
  m2.setTitle("Humidity (%)");
  
  // Change meter scale values
  String[] scaleLabels2 = {"0", "10", "20", "30", "40", "50", "60", "70", "80", "90", "100"};
  m2.setScaleLabels(scaleLabels2);
  m2.setScaleFontSize(18);
  m2.setScaleFontName("Times new roman bold");
  m2.setScaleFontColor(color(200, 30, 70));
  
  // We can also display the value of meter
  m2.setDisplayDigitalMeterValue(true);
  
  // Lets do some more modifications so our meter looks nice
  m2.setArcColor(color(141, 113, 178));
  m2.setArcThickness(15);
  
  m2.setMaxScaleValue(100);
  
  m2.setMinInputSignal(0);
  m2.setMaxInputSignal(100);
  
  m2.setNeedleThickness(3);
}

void draw(){
  // Lets give title to our window
  textSize(30);
  fill(0, 255, 0); // Font color , (r,g,b)
  text("Temperature and Humidity", 250, 40); // ("text", x, y)
  
  if (port.available() > 0){
    String val = port.readString(); // read incoming string on serial port
    // First we need to separate temperature and humidity values
    String[] list = split(val, ','); // splits value separated by ','
    float temp = float(list[0]); // first value is Temperature
    float hum = float(list[1]);  // second value is Humidity
    
    m.updateMeter(int(temp)); // int is used due to updateMeter accepts only int values
    m2.updateMeter(int(hum));
    
    println("Temperature: " + temp + " C  " + "Humidity: " + hum+ "%");
  }
}

Credits

Hardik Rathod

Hardik Rathod

1 project • 33 followers

Comments