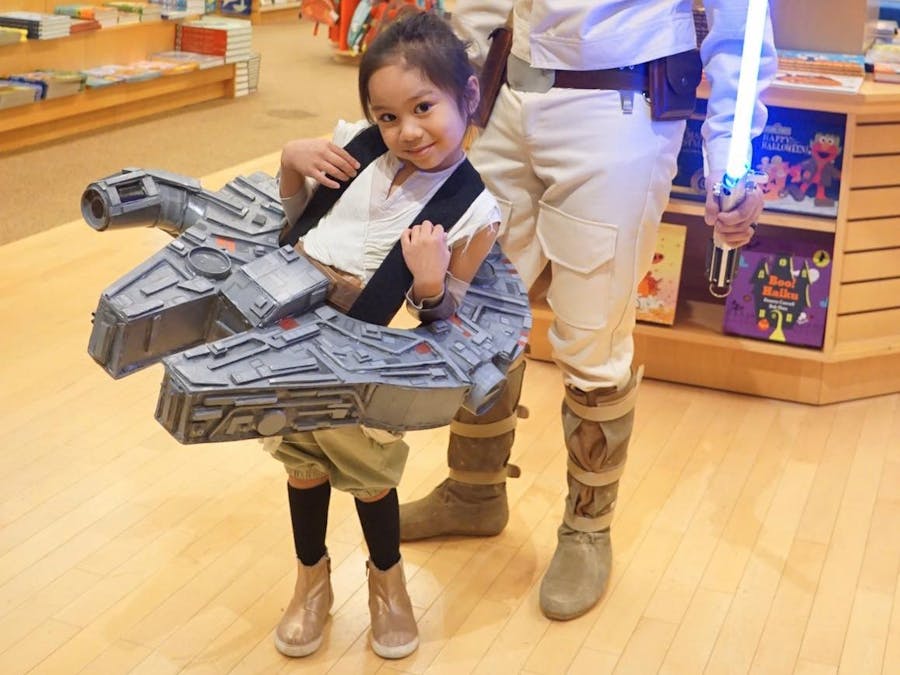
My daughter wanted to be Rey from Star Wars this Halloween. She specifically wanted a Millennium Falcon to go with her costume. As a Star Wars fan and a 501st member. I took the opportunity to build the Falcon for her.
It was important that the build be light, comfortable and durable. I decided to use foam core board as the base as I felt it was the perfect material for our needs.
This costume was built using the following materials:
-3 sheets of 20x30" foam core board
-assorted paper cups
-plastic twist-off bottle caps from assorted beverages
-plastic straws
-assorted plastic beads
-hot melt glue gun and glue sticks
-WATER BASED Spray paint (light grey for base color and dark grey for shadows)
-red, light grey and black acrylic paint for details
-window screen patching sheets
-Mod Podge clear coat -2" wide Hook and Loop (Velcro) strap
-Self-Adhering 2X4" Velcro patches
The Base ShapeThe base shape of the Falcon was cut out of foam core. I made the outer circular part as wide as the widest possible circle I could cut out of the sheet. The board was 20x30" so the main circle is a 20x20" circle.
I added the prong shaped front of the ship and the slightly angled cuts on the side of the circle.
I also cut a circle from the center of the base shape. The diameter of this circle is 11". I made 2 of these base shape pieces by cutting one out and tracing it onto the other sheet.
Here's a basic diagram of the base shape.
I then cut five 30x3" strips of foam core.
I took 3 of these strips and lightly scored them on one side vertically at 1" intervals.
This allowed me to snap them along the score lines and bend the foam core into a curve.
Using a glue gun and starting with the inner circle first; I glued on the curved foam core along the edges of the base model. I used the scored strips along the curved parts and the flat strips along the straight areas.
We cut different sized scrap pieces of foam core into little squares, rectangles and other angular shapes.
My daugher and I had fun gluing them onto the base structure along with some plastic straws, beads and plastic caps. We added fun details like this all over the ship. We didn't bother adding anything to the bottom.
I cut some paper cups and glued the bottoms of the cups on the back of the base model. The real Falcon has six of these exhaust ports. I could only fit 5 on there. Maybe you can use smaller cups.
I used bigger paper cups and glued them together to make the cockpit on the left side of the base shape. I glued some supporting foam core strips to the top and bottom of the cockpit to make sure it doesn't snap off.
We also added a couple more cups (cut 1/3 from the bottom) to the sides of the base model.
This is the fun part. Add as much detail as you can at this stage.
We also put in 4 hook side self-adhesive Velcro strips to the inside of the model at this stage. This will be used to attach the loop side Velcro straps we will use to carry the ship over my daughter's shoulders.
The Test FitHere's the Velcro straps I mentioned.
UPDATE: We replaced the Velcro straps with cotton wraps with Velcro glue gunned to the ends. These made the costume more comfortable.
We used Liquitex water based spray paint. DO NOT USE REGULAR SPRAY PAINT! It will melt the foam core!
I used a light grey spray paint to cover the whole ship and added some bursts of a darker grey to add some shadows. I then went back to with the light grey to even it out.
(Make sure you cover the Velcro you added to the inside with some blue tape while you paint.)
WeatheringUsing some acrylic paint, I dry brushed and painted some fun details. I also added some shadows and accents.
After all the details, I also added a coat of Mod Podge to lock the paint in and give it a slight sheen. I used the satin coat Mod Podge. You may not need to do this. I did this because it rains a lot here in Seattle.
Optional upgradesI added some window screen patching sheets to the exhaust ports to add some detail and glued some EL-wire to illuminate the back.


Comments
Please log in or sign up to comment.