The majority of IoT applications revolve around the use of sensors to automate practically anything. Be it a home automation system, a weather monitoring station, or even a remotely controlled water pump for agriculture. In such applications, sometimes it is required to have the sensor data logged in a way that can, later on, be easily interpreted. No matter which platform or database you collect your data in, most people usually export the data to a spreadsheet for further analysis. Google Sheets is one such widely used spreadsheet application that provides easy integration with Google Apps Script. It has an upper limit of 5 million rows. So if you are logging sensor data at an interval of 1 minute then Google Sheets will allow you to log data for 9 years!
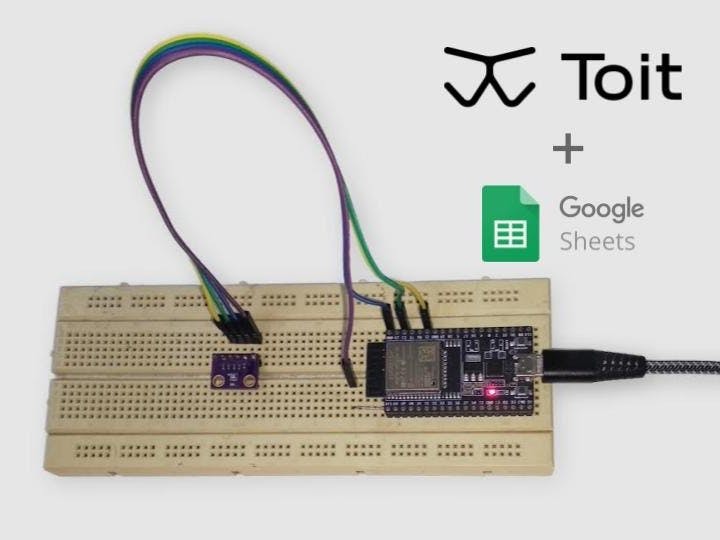
In this article, we’ll be using an ESP32 Dev module that will log temperature and pressure readings from a BMP280 sensor to Google Sheets. The system will also send email alerts if the temperature is above a specified threshold. And to make the development quicker and easier, we’ll be using the Toit platform. Toit allows an ESP32 to work as a full computer and can handle multiple apps running on the same device with ease.
Provisioning your device with ToitThis is a one-time process for new users. If you’ve already provisioned your ESP32 device with Toit, you can skip to the next step. If not, then it would just take a few mins to get it done. Toit does not charge any fees for provisioning your device, so you don’t have to worry about it.
Sign up on the Toit website, connect your ESP32 to your PC, and follow the quick start guide to install Toit on your device. You can also provision your device quickly with the Web serial interface.
After the installation is completed, head over to the Toit console and you should see your device under the Devices tab. Make sure the status is Healthy which indicates that your device is connected and ready to use.
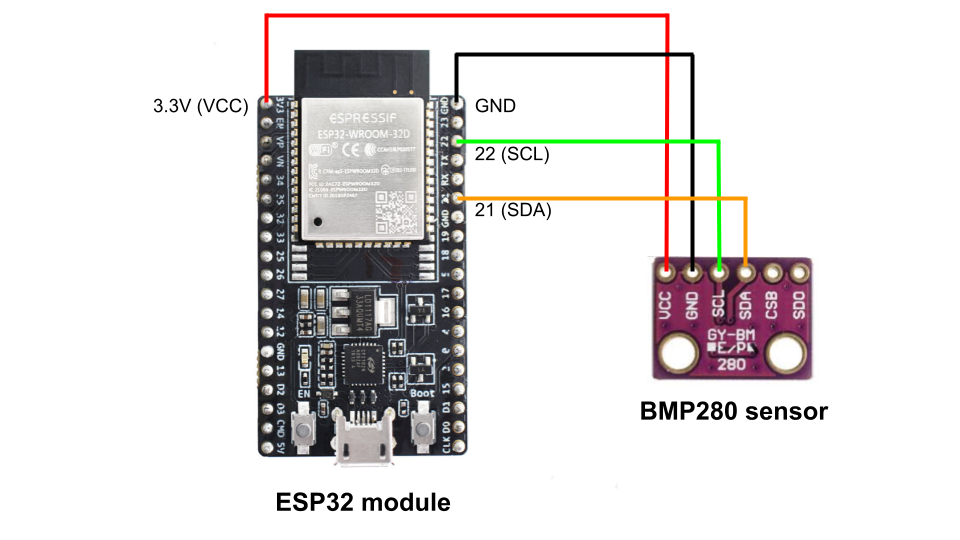
Setting up the hardwareThe circuit is pretty simple, requiring only four wires to be connected. BMP280 sensor can communicate with the microcontroller through either I2C or SPI protocol. Here, we’ll be using I2C as it requires a lesser number of wires to be connected. ESP32’s GPIO 21 will go to BMP280’s SDA pin and GPIO 22 to SCL pin. We will power the sensor with 3.3V from ESP32 and finally connect the GND pins to complete the circuit.
Setting up Google SheetsHead over to Google Sheets and create a blank spreadsheet. Give it a suitable name, I’ll name it BMP280_data. Name the first three columns as Timestamp, Temperature, and Pressure (all case sensitive). Now, go to Extensions, and click on Apps Script which will open up a new tab.
Google Apps Scripts supports programming in JavaScript only, but you don’t have to worry about it for now if you’re not familiar with it. Just copy the code from this GitHub link and paste it into your Apps Script code editor. We’ll not go into the details of how this code works but if you’re familiar with programming then you can skim over it. Finally, make sure to save the project before moving further.
Now with the code done, it’s time to Deploy it as an application. On the top right corner, click on Deploy, then New deployment, and select type as a Web app.
Now, give a suitable name for this version of the Web app, select “Me” in the “Execute as” field, and “Who has access” to “Anyone”. Finally, click on Deploy
As the code needs to edit the spreadsheet and send emails through your account, it would require your authorization to do so. A new window asking for the same will show up, so click on “Authorize access” and choose your Google account. Then go to “Advanced” and click on “Go to <your_script_name> (unsafe)”.
Now, click on allow to give access to the Web app.
Finally, the Deployment ID will be displayed which is what we are interested in.
To test whether the Apps Script is working or not, copy the following link, put your Deployment ID and email address in the specified place, and hit enter.
https://script.google.com/macros/s/<-Your-Deployment-ID->/exec?email=<-Your-email-address>&thresh=50&id=Sheet1&Temperature=123&Pressure=234
For example,
https://script.google.com/macros/s/AKfycbhhuwsw_wsAdh43434eHGoqytyubLYcwiqwdtv0x_mY7vLR/exec?email=jon.doe@gmail.com&thresh=50&id=Sheet1&Temperature=123&Pressure=234
You should receive a “success” message and the Google Sheet should be updated with Temperature as 123 and Pressure as 234. At the same time, an alert email should’ve been sent to the specified email address.
With this, the Google Sheets part is done and ready to take in sensor data.
Programming ESP32 using ToitFirst of all, make sure that you have the latest Toit firmware installed on your device. The firmware does not have a driver for the BMP280 sensor; instead, it has a driver for the BME280 sensor which has an almost identical implementation. So I copied and modified the BME280 sensor’s driver for the BMP280 sensor and it works just as expected.
Toit also recently released a public Toit package registry. As said in their blog post, it is a place “where you can explore existing packages, search for a given package, and even publish your own package via the publish page.” So I simply formatted my package as told in the package tutorial and got my driver easily available for others to use. Just run the following command and the driver will be installed in your system.
toit pkg install bmp280
The Google Apps website relies on the GlobalSign Root CA certificate for completing a secure HTTPS request. Toit has a handy package for it which includes almost all of the necessary certificates under a package named certificate_roots. We'll use it and can be installed using the following command:
toit pkg install github.com/toitware/toit-cert-roots
All other required packages are available in the firmware by default.
We first import the necessary libraries for our program. For updating the Google Sheets, we’ll be required to send HTTPS requests and for BMP280 we need to use GPIO pins for I2C communication.
// Import libraries for HTTPS.
import certificate_roots
import http
import net
import encoding.json

// Import libraries for BMP280 sensor
import gpio
import i2c
import bmp280 as drivers
Next, we define a few global variables which are the parameters to be sent along with the HTTPS request. The code snippet below itself is pretty straightforward. “TEMP_THRESHOLD” specifies the temperature level above which the application will start sending email alerts to the specified “EMAIL_ID”. Now put your Deployment ID which you obtained from Apps Script in the “APP_ID” field.
HOST ::= "script.google.com"
APP_ID ::= "< Your Web app Deployment ID >" // Webapp deployment ID.
EMAIL_ID ::= "< Your e-mail address >" // Email address for sending alerts.
TEMP_THRESHOLD ::= "28" // Temperature threshold in degrees.
Coming to the main function, the GPIO pins 21 and 22 are configured for I2C communication. The BMP280 sensor can have the address as 0x76 or 0x77 which are already defined in the driver. I2C_ADDRESS corresponds to 0x76 and I2C_ADDRESS_ALT corresponds to 0x77, so set the one which works for you. Here, the address is 0x76 which is set as the device address. Finally, we create an object for the BMP280 sensor and turn it on.
main:
// Create an object for BMP280 sensor class
bus := i2c.Bus
--sda=gpio.Pin 21
--scl=gpio.Pin 22
device := bus.device drivers.I2C_ADDRESS
bmp := drivers.Bmp280 device
// Turn on BMP280 sensor.
bmp.on
Now, we create variables and store the current temperature and pressure readings. We have also put a print statement just for testing it later on. Finally, we call a function to send the temperature and pressure data to the Google spreadsheet.
temp := bmp.read_temperature
pres := bmp.read_pressure
// Debug.
print "Temperature: $temp C,  Pressure: $pres Pa"
// Store current temperature and pressure readings.
send_to_spreadsheet temp pres
The function “send_to_spreadsheet” handles everything related to sending the HTTPS request and passes temp and pres values as arguments. Going into its definition, we first need to set up the network interface, set Google Apps Script as our host, and open the connection. Then we combine all the parameters into a single string in the HTTPS format. Finally, we create and send the new request along with the parameters.
// Sends the given temperature $temp and pressure $pres to the Google server.
send_to_spreadsheet temp pres:
network := net.open
client := http.Client.tls network
--server_name=HOST
--root_certificates=[certificate_roots.GLOBALSIGN_ROOT_CA]
parameters := "email=$EMAIL_ID&thresh=$TEMP_THRESHOLD&id=Sheet1&Temperature=$temp&Pressure=$pres"
response := client.get HOST "/macros/s/$APP_ID/exec?$parameters"
// Drain the response.
while response.body.read:
With this, the programming part is done and we can move on to the final step i.e. running and deploying the application.
Running and deploying on ESP32For making things easy, we’ll be using Toit’s VS Code extension to run and deploy our application. Make sure that the BMP280 driver and the main program are in the same folder and open the folder in VS Code. After opening the Toit extension, you should see the names of all the devices provisioned and their status on the top left corner. Now go to sens.toit and run the program on whichever device you want to.
The output should be like-
Now check the Google Sheet for the updated temperature and pressure values, along with the timestamp.
To test out the email alert functionality, I had set the temperature threshold as 29. So, the Apps Script will also send a High temperature alert mail to the specified email address.
With this, we’ve confirmed that the code works well. Before deploying it, comment out the print statement in the main program to avoid spam in your Toit console’s logs. Now click on the deploy button and a window will pop up asking you to save a.yaml file. Save it and you should see a “Successfully deployed” message in the output.
If you open that.yaml file, you’ll see content similar to what’s shown below.
name: BMP280 sensor
entrypoint: sens.toit
triggers:
on_install: true
on_interval: 15s
The “on_interval” parameter will define how frequently the sensor will log data into the spreadsheet. Finally, deploy the app with the command below:
The deployed apps should be visible in the “Apps” section on the Toit console as well as under the devices section in the VS Code extension. With this, the tutorial comes to an end. You can find all the programs used on this GitHub repository.


Comments
Please log in or sign up to comment.