According to the video from Professor Jean Marc Hero there are research on how Frogs response to climate change. Few of the important key on that research are detectability and probability meaning there are a lot of fieldwork to monitor where the frogs are and what kind of environment they are living in.
With those problem I am trying to make a solution to help the research more efficiently.
A few points that need be in the solution are:
- Frog classification
- Frog Detection
Building a trap cam could be a solution but sometimes there are small frogs that are difficult to see on cam and a few of them are good on camouflage. So its better to make a sound monitor that work like a trap camera.
So in this project I am going to build a device that can detect and monitor the frogs based on it sound.
2. Hardware and FrameworkIn Order to build the device I need a hardware that are capable to record sound from various species of frogs and a platform that are capable to make a model to classify those sound. The hardware also need to have the ability to classify the frog species based sound on the spot with minimum power.
Based on that I need a hardware that are capable of doing machine learning task on a small device.
The hardware that fit to the things I need is the QuickFeather development Board because not only because it come with on board microphone with great sensitivity but it also bundle with the SensiML platform, an easy to use and understand machine learning platform for microcontroller
Making custom firmware from the repo for audio data recording
In order to use and make the quickfeather have the ability to capture sound we need to make the firmware on our own.
In this tutorial I am using two Operating System which are windows 10 and Ubuntu 20.04 running on WSL. I also install the latest Python 3 software on the windows 10 that is necessary for uploading the firmware
Firstly we need to clone the qorc SDK, assuming you already have git installed do
C:\>git clone --recursive https://github.com/QuickLogic-Corp/qorc-sdkOpen your Ubuntu and change the directory to the qorc SDK
$ cd /
$ cd mnt/c
/mnt/c$cd qorc-sdk
/mnt/c/qorc-sdk$ _
on the qorc-sdk directory do the following Pre-requisite installation steps from the qorc-sdk Repo
Download tarball according to the system configuration from: https://developer.arm.com/tools-and-software/open-source-software/developer-tools/gnu-toolchain/gnu-rm/downloads
Current stable version tested with is 9-2020-q2-update
- Download tarball according to the system configuration from: https://developer.arm.com/tools-and-software/open-source-software/developer-tools/gnu-toolchain/gnu-rm/downloadsCurrent stable version tested with is
9-2020-q2-update
Extract the tarball to a preferred path(/BASEPATH/TO/TOOCHAIN/)
sudo tar xvjf gcc-arm-none-eabi-your-version.tar.bz2 -C /BASEPATH/TO/TOOLCHAIN/
The usual preferred path is for example /usr/share
sudo tar xvjf gcc-arm-none-eabi-9-2020-q2-update-x86_64-linux.tar.bz2 -C /usr/share/
- Extract the tarball to a preferred path(/BASEPATH/TO/TOOCHAIN/)sudo tar xvjf gcc-arm-none-eabi-your-version.tar.bz2 -C /BASEPATH/TO/TOOLCHAIN/The usual preferred path is for example /usr/sharesudo tar xvjf gcc-arm-none-eabi-9-2020-q2-update-x86_64-linux.tar.bz2 -C /usr/share/
Add the /BASEPATH/TO/TOOLCHAIN/gcc-arm-none-eabi-your-version/bin/ to PATH (only for current terminal session)
export PATH=/BASEPATH/TO/TOOLCHAIN/gcc-arm-none-eabi-your-version/bin/:$PATH
For the preferred path of /usr/share and current tested stable version 9-2020-q2-update for example:
export PATH=/usr/share/gcc-arm-none-eabi-9-2020-q2-update/bin/:$PATH
- Add the /BASEPATH/TO/TOOCHAIN/gcc-arm-none-eabi-your-version/bin/ to PATH (only for current terminal session)
export PATH=/BASEPATH/TO/TOOLCHAIN/gcc-arm-none-eabi-your-version/bin/:$PATHFor the preferred path of/usr/shareand current tested stable version9-2020-q2-updatefor example:export PATH=/usr/share/gcc-arm-none-eabi-9-2020-q2-update/bin/:$PATH
If the path settings need to be permanent, it can be added to the ~/.bashrc or ~/.bash_profile.
Examples and illustrations are for example here: https://stackabuse.com/how-to-permanently-set-path-in-linux/
- If the path settings need to be permanent, it can be added to the
~/.bashrcor~/.bash_profile.Examples and illustrations are for example here: https://stackabuse.com/how-to-permanently-set-path-in-linux/
Follow the step completely since it all needed to make our custom firmware
Next still on the ubuntu change the directory to the qf_ssi_ai_app
/mnt/c/qorc-sdk$ cd qf_apps/qf_ssi_ai_app/
/mnt/c/qorc-sdk/qf_apps/qf_ssi_ai_app/$ _
In this folder we need to tweak a few file in order to make the quickfeather audio recording mode active. Here are the modification that you need to do based from Chris Knorowski post. To edit the file you can use any text/code editor you want. For this I am using Notepad++
- Open the file qf_ssi_app/include/sensor_ssss.h
- Modify Lines 75 & 76 to enable SENSOR_SSSS_RECOG_ENABLED
- Open the file sensor_audio/inc/sensor_audio_config_user.h
- Modify Lines 29 & 30 to enable audio SENSOR_AUDIO_RECOG_ENABLED
- Open the file inc/Fw_global_config.h
- Modify the line 78 & 79 to enable the AUDIO_SEnSOR_SELECT_AUDIO
After you modify all the above then we are ready to make the firmware by doing the following step.
Navigate to the GCC_Project folder and then type make
/mnt/c/qorc-sdk/qf_apps/qf_ssi_ai_app/$ cd GCC_Project
/mnt/c/qorc-sdk/qf_apps/qf_ssi_ai_app/GCC_Project$ make
Wait for the firmware to compile, if you getting any error to repeat Pre-Requisite step above. If anything goes accordingly you will have the firmware on the GCC_Project/output folder. Try to type ls on that folder and search for qf_ssi_ai_app.bin
/mnt/c/qorc-sdk/qf_apps/qf_ssi_ai_app/GCC_Project$cd output
/mnt/c/qorc-sdk/qf_apps/qf_ssi_ai_app/GCC_Project/output$ls
If you find the firmware file then congratulation you have make the firmware on your own and Ready for the Next Step.
UploadingThe audio recognition firmware
For this Step I am back on my windows 10 os and using Python 3 on the Command prompt. So on the command prompt Navigate to the qorc-sdk folder and go to TinyFPGA-Programmer-Applicatiion folder
C:\> cd qorc-sdk
C:\qorc-sdk> cd TinyFPGA-Programmer-Application
C:\qorc-sdk\TinyFPGA-Programmer-Application>
This folder have the files necessary to upload the firmware that we make before. Before uploading the firmware we need to make the quickfeather into the upload mode by pressing the RST button then hold the USR button for 3-4 second until the onboard LED turn green then open the Device Manager on the Windows 10 to check serial/COM address of the quickfeather
back to the command prompt do the following command to upload the firmware to the quickfeather board
C:\qorc-sdk\TinyFPGA-Programmer-Application> python tinyfpga-programmer-gui.py --port COMX --m4 C:\qorc-sdk\qf_apps\qf_ssi_ai_app\GCC_Project\output\qf_ssi_app.bin --mode m4wait around 1-2 minutes for the program to upload the firmware. after all that Finish the we are ready to capture the audio data
Data Capture Lab setup
Open new project and name it
Dataset collection
Setting up the quickfeather device sensor to capture audio data
Segmenting and Labelling
Next we need to label the audio data we want to classify
For this I try to label 2 species of frogs
- fejervarya limnocharis
- duttaphrynus melanostictus
- microhyla butleri
to sample the audio data I am using this link below that has various kind of frog voices. Real environment data would so much better, but since it's still in the pandemic situation and my movement is limited this the best I can do
https://soundcloud.com/frogvoicesofborneo
After you finish capturing the data now you need to segment the data
configure the labelling session, you can choose manual or auto if you are confidence with your data
choose the segment where you think something is happening at certain time
After repeating all the process to all data recorded now we are ready to train the data
4. Model Creation And TestingPreparing the data
Open the analytic studio and login with your account
there you will see the data you've been captured
prepare the data for training
Building the model
Set the adjustment, this part is trial and error in order to get the best model that you want
Explore the result of your training
if you are not satisfied with the result you can try re-train the model and change the setting
Testing the Model
make sure get good confusion matrix result
Download the Model
Now we are ready to download launch the model back to our device
Deploy it on the quickfeather
after you download the model repeat the step above to upload the firmware back to your quickfeather device
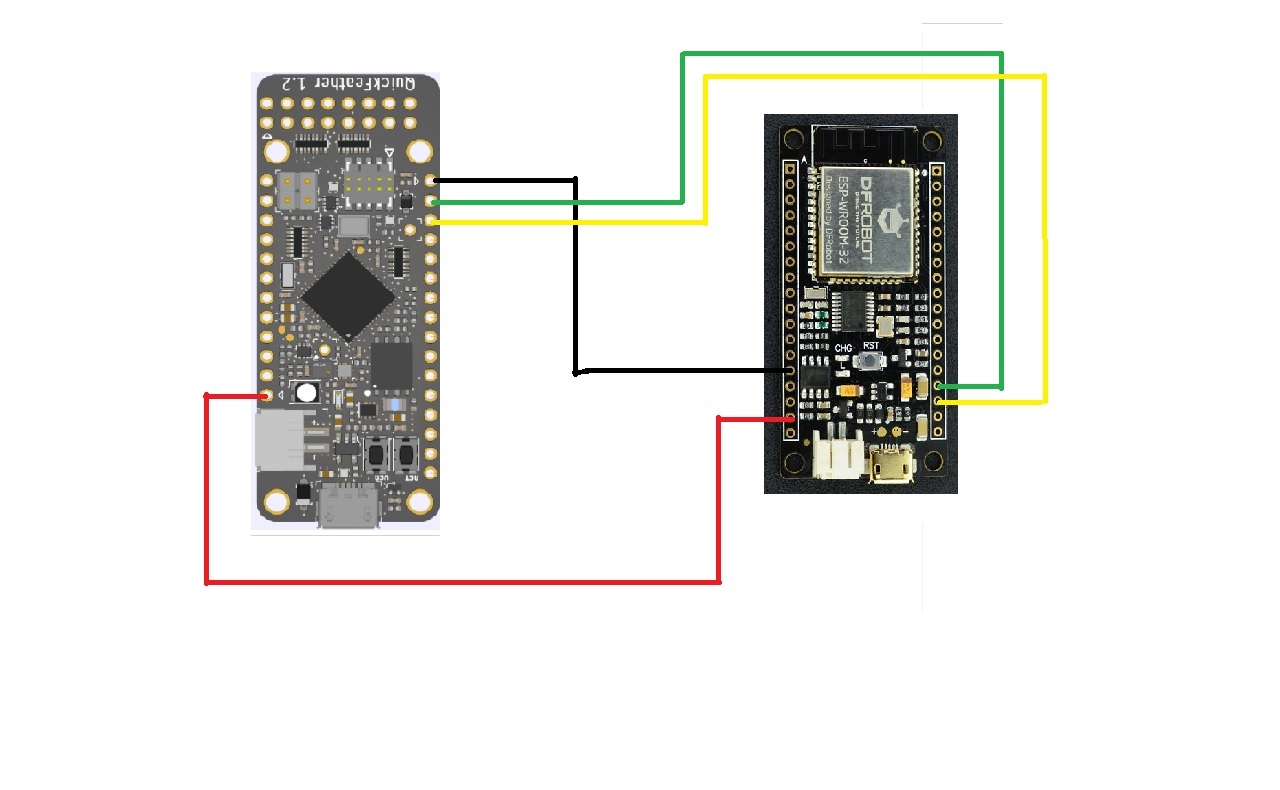
Prepare an ESP32 dev board and connect your quickfeather UART Pin to esp32 Uart Pin.
To read the serial data from the quickfeather you can either use Arduino or micropython.
For this I am gonna use micropython, you can download the firmware and try to flash it using the link below
https://micropython.org/download/esp32/
Micropython Serial reading from quickfeather
Download the thonny IDE since it is the best so far to code with micropython
and try the code below to get a reading from the quickfeather
from machine import UART
from time import sleep

uart = UART(2, 460800)
uart.init(460800, bits=8, parity=None, stop=1)
serialString = ""
buf = bytearray(100)
while True:
    try:
        if uart.any() > 0:
            serialString = uart.readline()
            print(serialString.decode('utf-8')[34])
            #sleep(2)
    except KeyboardInterrupt:
        break
By using the code above you can forward the data to any IOT Server you want using the wifi connectivity or maybe even a lora esp32 if you want place the the device in a remote location
6. ConclusionThis is a another step to help the biologist to classify and monitor the existing frog in a certain environment that could help early climate change detection.


Comments
Please log in or sign up to comment.