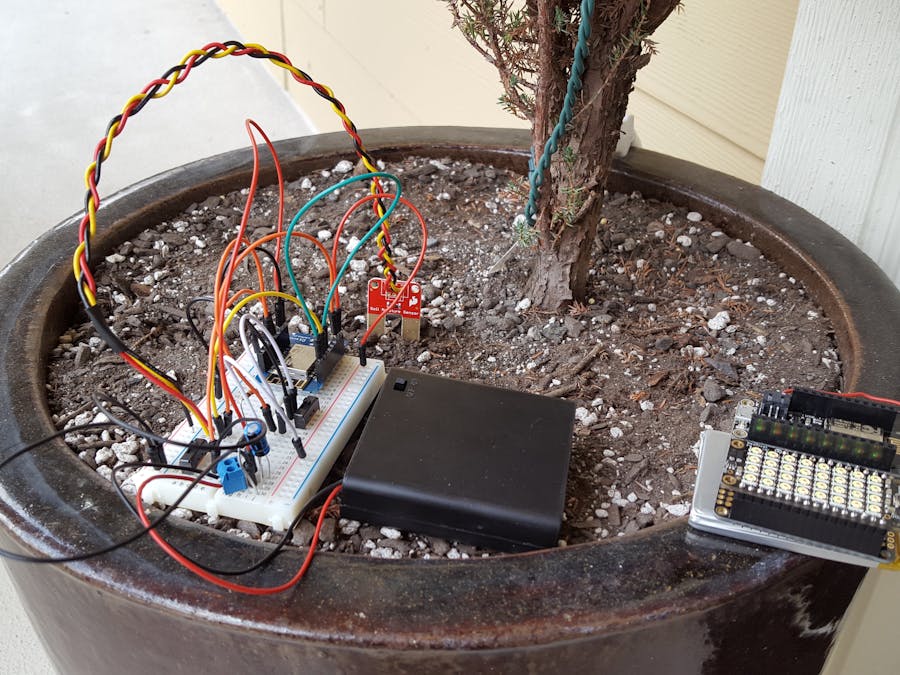
We have a couple of potted plants around the house which aren't always kept well watered as they're a little out of the way. I have some more ambitious garden monitoring projects on my list but as a small stepping stone in that direction I thought I'd start with with a couple of ESP8266 based modules and try using AWS IoT to bring it all together.
The initial system consists of three main components:
- a battery powered WeMos D1 mini based soil moisture monitor for the potted plant
- an Adafruit Feather HUZZAH ESP8266 based monitor module with a NeoPixel FeatherWing for an at-a-glance display
- AWS IoT for publishing and retrieving sensor data
Everything turned out as expected with a small exception on the AWS IoT side. Where I had initially wanted to use MQTT to publish and subscribe to sensor data I had to fall back to the REST API because the ESP8266 can't handle the specific requirements for the AWS IoT MQTT connection. More on that later, let's start with the hardware.
Most of the device work is on the sensor side. There's still not a lot to it but a few switches were added to help with usability a bit. Oh, and the specific battery pack is a little much but it's all I had.
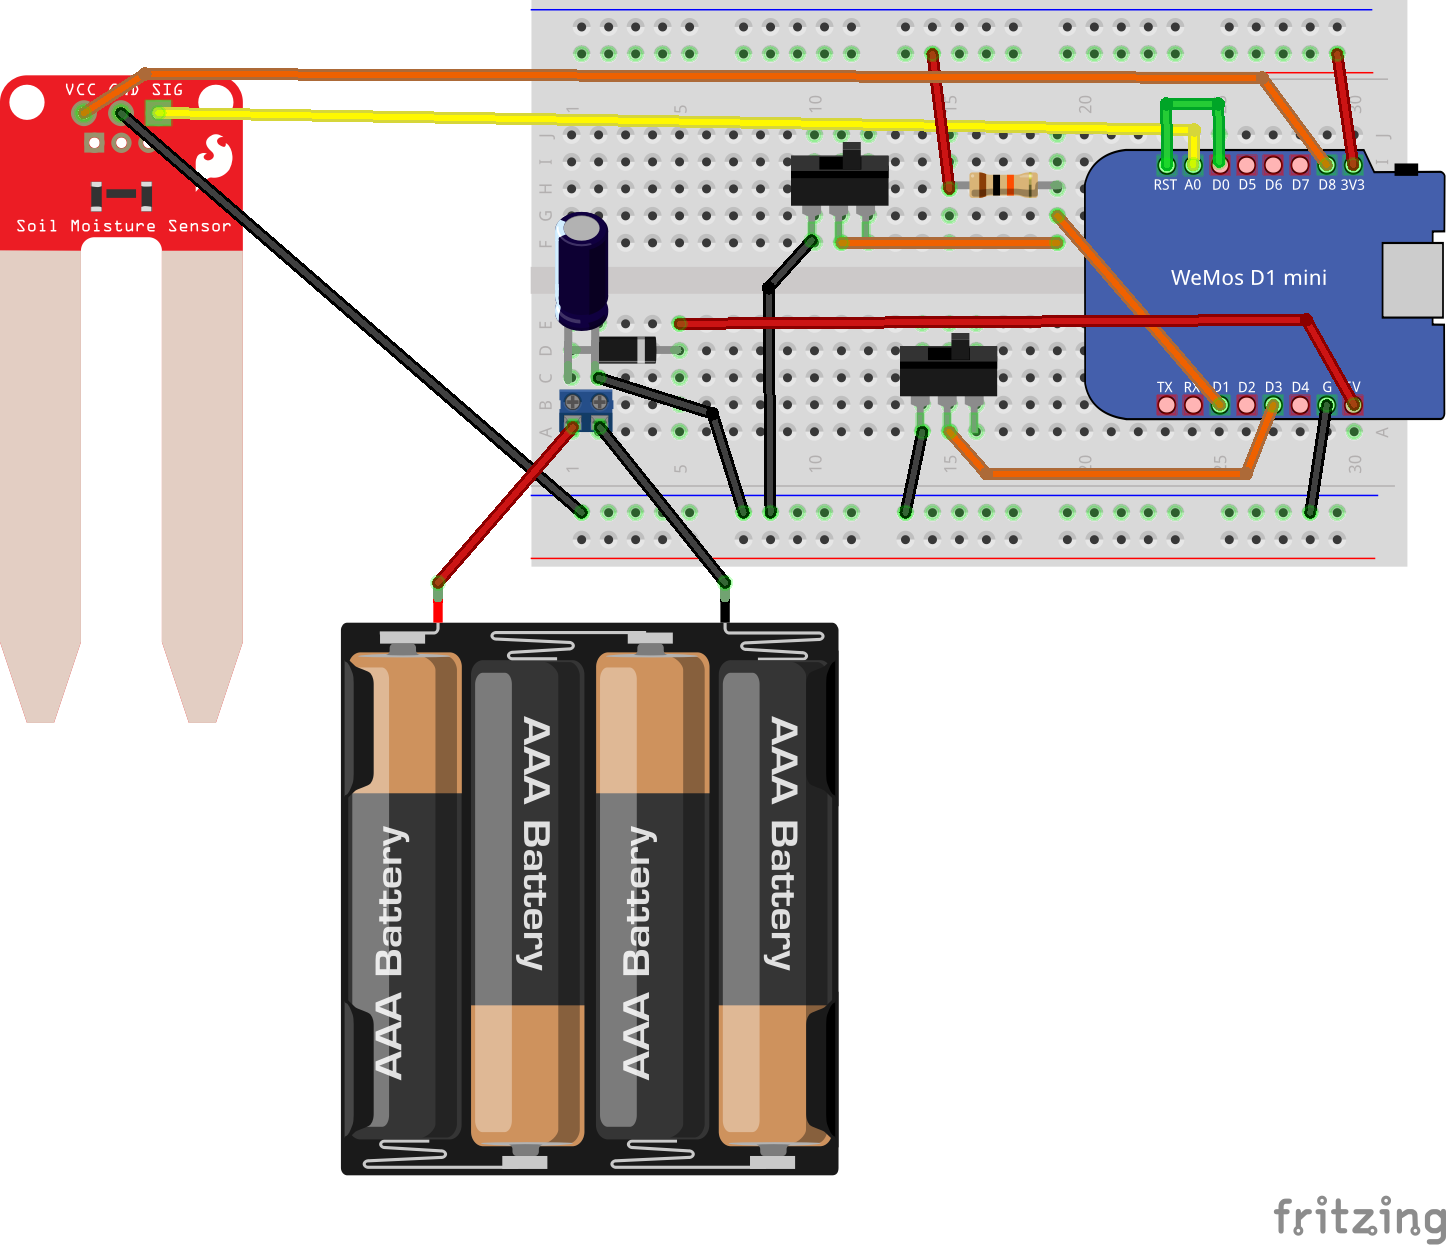
The brain of the soil moisture sensor module is the pretty neat little WeMos D1 mini which is based on the ESP-8266EX. I soldered on the stacking headers which came with the WeMos here but it is small enough to use the breadboard terminals on either side.
The soil moisture sensor itself is a really simple sensor from SparkFun. I soldered on a few wires to get it connected to the WeMos.
I added two switches to help with usability (there's also a third switch built into the battery pack which is nice to have).
The first switch is to enable/disable the soil moisture check and data publish in case I don't want the sensor to be enabled and/or the wifi connect and data publish process to be active. When off the module just goes back into a deep sleep for the configured amount of time. To immediately (re) enable the sensor, flip the switch back on and press the reset button on the WeMos.
The second switch is to put the WeMos into flash mode so it's not a race to attempt to flash the device before it enters it's deep sleep mode. When the switch is 'on', or towards the WeMos, the module is ready for normal operation. When 'off', or away from the WeMos, the module is ready to flash. The switch can be turned back 'on' while the firmware is being uploaded so as soon as it resets after the upload the module is ready for regular use.
Once the sensor module is all wired up (there's a fritzing diagram below) it's time to get this flashed. But first, let's cover the hardware for the monitor and get the AWS IoT bit configured.
The display quite a bit more simple than the sensor module, in part because I'm only showing colors for various moisture levels (red -> yellow -> green -> blue) and also because this is entirely built using Adafruit Feather components so it's almost just a simple solder, plug and play.
The NeoPixel FeatherWing needed the default closed jumper cut and another soldered (to align with the Feather HUZZAH ESP8266 #15 pin).
The NeoPixels are plenty bright to get anyone's attention, even when lit at their lowest level.
And that's pretty much it before getting into the firmware. But first, some setup needs to be done for the AWS IoT sensor and user because we'll need some information from there to get things wired up correctly.
If you haven't done so already you'll need to 'get started' with AWS IoT:
Once you can see the AWS IoT Dashboard we can add a 'thing'.
First, click 'Create a resource'.
Then click 'Create a thing'.
Name the thing 'soil-sensor-one' and click 'Create'.
Click on the 'thing' you just added to view its details and make note of the 'REST API endpoint' towards the top of the detail pane.
As I mentioned earlier, the MQTT endpoint can't really be used with the ESP8266 because it won't be able to do the cert based auth required. Instead we can the REST API with a version 4 signature (some related info in context of the UpdateThingShadow endpoint
http://docs.aws.amazon.com/iot/latest/developerguide/API_UpdateThingShadow.html). A 'shadow' is basically the persistent state of a thing.
So in order to use the REST API we need to add a new user which has permissions to AWS IoT. To do this, click 'Services' up at the top of the page then 'IAM' towards the left.
Click 'Users'...
...then 'Create New Users'.
Enter a username (the name itself doesn't matter) then click 'Create'.
With the user created, click 'Show User Security Credentials'...
...and make note of the key and secret. These will be needed for the keys.cpp files in the firmware later. Don't share these values with anyone!
Download the credentials too if you want then click 'Close' (it'll warn on close if you don't download).
Now the new user needs to be given permission to access AWS IoT. Click on the newly created user.
Click 'Attach Policy'.
Enter 'iot' in the filter, select 'AWSIoTDataAccess' then click 'AttachPolicy'.
, This will give the user the following permissions.
{ "Version": "2012-10-17", "Statement": [ { "Effect": "Allow", "Action": [ "iot:Connect", "iot:Publish", "iot:Subscribe", "iot:Receive", "iot:GetThingShadow", "iot:UpdateThingShadow" ], "Resource": "*" } ]}
'UpdateThingShadow' and 'GetThingShadow' are what will be used for the REST API access.
AKA, installing Arduino boards, installing USB drivers and grokking general device specific Arduino configurations.
The WeMos D1 mini getting started page was pretty clear but the recommended upload speed didn't seem to work so try 115200 instead of 921600.
The Adafruit Feather HUZZAH ESP8266 Arduino setup info is great and nothing needed to be varied AFAIK. It is mentioned on that page that some versions of the Arduino IDE might be cause some difficulties but I had no problem with 1.6.7 (which is newer than those singled out as being potentially difficult to work with).
First, you'll need an AWS IoS Arduino library for the ESP8266. This one in particular which started in Amazon Web Services - Labs org but took a fork of a fork to get some ESP8266 support and some minor refinement on top of that.
One way to get the library made available to the Arduino IDE is to download this branch
https://github.com/heskew/aws-sdk-arduino/archive/iot-get-shadow-and-cleanup.zip, unzip it to some location on your drive and symlink the src/esp8266 folder it into ~/Documents/Arduino/libraries (on OSX -- location probably varies per OS).
Once you have that dependency in place then grab the sensor code from
https://github.com/heskew/things-aws-iot-soil-monitor/tree/master/sensor, add a keys.cpp and add values for everything that's in keys.h. Do the same for the monitor, using https://github.com/heskew/things-aws-iot-soil-monitor/tree/master/monitor, and do the same for the keys.cpp there.
Flash each device, it could take some fiddling with the 'Port' and 'Upload Speed', and that's about it.
By default the sensor module will take a reading, connect to the wifi and update the sensor shadow with the normalized value (0-100 scale) then sleep for 30 seconds (and repeat).
The monitor module will take a reading every 5 seconds at the time of writing this and update the NeoPixel color depending on the value (using a currently made up set of ranges for the red -> yellow -> green -> blue scale).
Basically:
- red: the plant is probably hurting
- yellow: the plant could use some water
- green: the plant is doing well on the water level
- blue: you're drowning the plant
With some continued refinement this has the potential to be pretty useful. I'd want to waterproof the sensor side a bit and make it more compact (ditch the solderless breadboard and drop the battery size down a bit). The monitor I could make work with multiple sensors (i.e. break the NeoPixel into smaller chunks to support up to 32 sensors). It doesn't give me actual values of sensor levels but that's not really necessary when all I need to know is if the plants have enough water.
Feel free to post any questions/comments here or on the github repo.


_3u05Tpwasz.png?auto=compress%2Cformat&w=40&h=40&fit=fillmax&bg=fff&dpr=2)
Comments