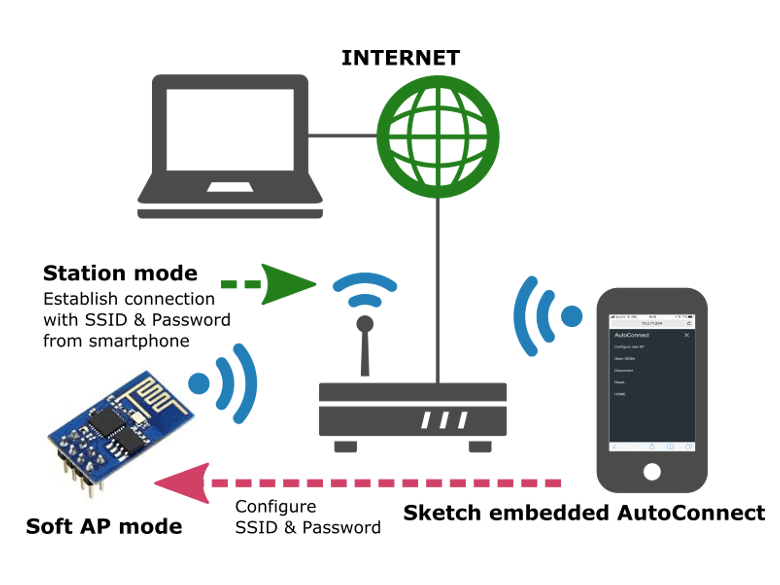
If you use ESP8266 or ESP32 with Arduino Core you will certainly be issuing instructions: WiFi.begin(SSID, Password). It can connect WLAN easily but the access point to be connected is fixed and inflexible.
Whenever the access point to be connected changes, do you rewrite the sketch and upload it?
You use AutoConnect as an Arduino library, you forget time and effort for the revising the sketch.
It an Arduino library united with ESP8266WebServer class for ESP8266 and WebServer class for ESP32. Easily implementing the Web interface constituting the WLAN for ESP8266/ESP32 WiFi connection. With this library to make a sketch easily which connects from ESP8266/ESP32 to the access point at runtime by the web interface without hard-coded SSID and password.
Overview
No need pre-coded SSID & password
It is no needed hard-coding in advance the SSID and Password into the sketch to connect between ESP8266/ESP32 and WLAN. You can input SSID & Password from a smartphone via the web interface at runtime.
Simple usage
AutoConnect control screen will be displayed automatically for establishing new connections. It aids by the captive portal when vested the connection cannot be detected.By using the AutoConnect menu, to manage the connections convenient.
Store the established connection
The connection authentication data as credentials are saved automatically in EEPROM of ESP8266/ESP32 and You can select the past SSID from the AutoConnect menu.
Easy to embed in
AutoConnect can be embedded easily into your sketch, just "begin" and "handleClient". The AutoConnect API is the same for between ESP8266 and ESP32.
Lives with the your sketches
The sketches which provide the web page using ESP8266WebServer for ESP8266 or WebServer for ESP32 there is, AutoConnect will not disturb it. AutoConnect can use an already instantiated ESP8266WebServer or WebServer object, or itself can assign it.
Step #1 - InstallationArduino IDE
The current upstream at the 1.8 level or later is needed. Please install from the official Arduino IDE download page.
ESP8266 Arduino core
This library as the AutoConnect targets sketches made on the assumption of ESP8266 Community's Arduino core. Install third-party platform using the Boards Manager of Arduino IDE. The package URL is http://arduino.esp8266.com/stable/package_esp8266com_index.json
It can be introduced according to the following procedure.
- Open Arduino IDE, Go menu [File] > [Preference]
- Enter the [Additional Boards Manager URLs:] as http://arduino.esp8266.com/stable/package_esp8266com_index.json
- Click OK.
If you want to use both ESP8266 and ESP32, add multiple URLs into Additional Board Manager URLs field, separating them with commas. The arduino-esp32 core package URL is https://dl.espressif.com/dl/package_esp32_index.json
Install the AutoConnect library
AutoConnect is available on the Arduino IDE Library manager. You can install the AutoConnect library from it easily.
- On Arduino IDE, Go menu [Sketch] -> [Include Library] -> [Manage Libraries...]
- Then pop up the Library manager, choose [Topic] and [Communication] from drop down list.
- Enter the Filter: AutoConnect.
- Library manager will show the like as display below.
- Select a latest version, click [Install].
You also need an additional library called PageBuilder. It can be installed from the library manager too, the procedure is same as the above. It's [Communication] for [Topic], Filter is [PageBuilder].
Upload the sketch
Open the Arduino IDE, wrtie the "simple.ino" sketch and upload it. The feature of this sketch is that the SSID and Password are not coded.
#include <ESP8266WiFi.h>
#include <ESP8266WebServer.h>
#include <AutoConnect.h>
ESP8266WebServer Server;
AutoConnect      Portal(Server);
void rootPage() {
  char content[] = "Hello, world";
  Server.send(200, "text/plain", content);
}
void setup() {
  delay(1000);
  Serial.begin(115200);
  Serial.println();
  Server.on("/", rootPage);
  if (Portal.begin()) {
    Serial.println("HTTP server:" + WiFi.localIP().toString());
  }
}
void loop() {
  Portal.handleClient();
}
The above code assumes ESP8266. The include directives and ESP8266WebServer class can be modified and applied to ESP32 as follows.
#include <WiFi.h>
#include <WebServer.h>
WerServer Server;
Run at first
Once reset the ESP8266, starts it. After about 30 seconds, please take the smartphone and open Wi-Fi setting Apps. You can see the esp8266ap in the list of "CHOOSE A NETWORK...". Then tap the esp8266ap and enter password 12345678, a something screen pops up automatically as shown below.
The hamburger icon is the control menu of AutoConnect seems at the upper right. You can connect to the access point any placed by using this menu.
Join to the access point
Here, tap "Configure new AP" then SSID configuration screen would be shown. Enter the SSID and Passphrase and tap "apply" to start connecting.
Connection establishment
After connection established, the current status screen will appear. It is already connected to WLAN.
After connection established, you have two choices for the next step.
For one, continues execution the sketch action while keeping this connection. You can access the ESP8266 with connected IP address from the browser on PC which is participating in the same WLAN. You will see the web page as "Hello, world".
Or, "RESET..." can be selected from the menu. The ESP8266 resets and starts rebooting. After the rebooting complete, ESP8266 will restore the connection which was established previously.
Run for usually
Once established connection can be used continuously. You can operate from the AutoConnect menu if you want to connect to another access point.
AutoConnect also remembers past access points. It can be selected from the AutoConnect menu. You do not need to re-enter the password.
The effect of AutoConnect is not only for ESP8266 as the Web server. It has a benefit for something WiFi client too.
AutoConnect is effective too when publishing with MQTT from various measurement points. Even if the SSID is different for each measurement point, it is no need to modify the sketch.
This step tries to publish the WiFi signal strength of ESP8266 with MQTT. It uses the ThingSpeak for MQTT broker. ESP8266 publishes the RSSI value to the channel created on ThingSpeak as MQTT client. This example is well suited to demonstrate the usefulness of AutoConnect, as RSSI values are measured at each access point usually. Just adding a few lines of code makes it unnecessary to upload sketches with the different SSIDs rewrite for each access point.
Advance procedure
- Arduino Client for MQTT - It's the PubSubClient, install it to Arduino IDE from here. If you have the latest version already, this step does not need.
- Create a channel on ThingSpeak.
- Get the Channel API Keys from ThingSpeak, put its keys to the sketch.
The ThingSpeak is the open IoT platform. It is capable of sending data privately to the cloud and analyzing, visualizing its data. If you do not have an account of ThingSpeak, you need that account to proceed further. ThingSpeak is free for use within the scope of this example. (As of March 21, 2018). You can sign up with the ThingSpeak sign-up page. (But you are entrusted with the final judgment of account creation. Create an account at your own risk.)
From here onward, the steps will proceed on the premise that ThingSpeak account is available.
Create a channel on ThingSpeak
Sign in ThingSpeak. Select [Chanels] to show the My Channels, then click [New Channel].
At the New Channel screen, enter each field as a below. And click [Save Channel] at the bottom of the screen to save.
- Name: ESP8266 Signal Strength
- Description: ESP8266 RSSI publish
- Field1: RSSI
Get Channel ID and API Keys
The channel successfully created, you can see the channel status screen as a below. Channel ID is displayed there. (454951 in the example below, but your channel ID should be different.)
Here, switch the channel status tab to [API Keys]. The API key required to publish the message is the Write API Key.
The last key you need is the User API Key and can be confirmed it in the user profile. Pull down [Account] from the top menu, select [My profile]. Then you can see the ThingSpeak settings and the User API Key is displayed middle of this screen.
Now, publishing the ESP8266 signal strength to MQTT broker is ready. Next will upload the sketch to publish the message to the channel you just created. Of course, it includes connection assistance by AutoConnect.
The sketch, Publishes messages
The complete code of the sketch is mqttRSSI.ino. Replace the following #define in a sketch with User API Key, Write API Key and Channel ID.
#define MQTT_USER_KEY        "****************"  // Replace to User API Key.
#define CHANNEL_ID           "******"            // Replace to Channel ID.
#define CHANNEL_API_KEY_WR   "****************"  // Replace to the write API Key.
After Keys updated, compile the sketch and upload it.
Connect WiFi
Run the sketch after resets once. If it fails the first WiFi.begin, you can see the esp8266ap as an access point of the WiFi settings with your smartphone. Let connects the esp8266ap and invokes AutoConnect menu. Configure the SSID you want to connect and resets by [RESET...] menu.
Publish messages
After reboot complete, the message publishing will start via the access point now set. The message carries RSSI as the current WiFi signal strength. The signal strength variations in RSSI are displayed on ThingSpeak's Channel status screen.
I think you are already aware that SSID & Password is missing and WiFi.begin() is not coded. The code required to connect to WiFi is the following four parts only.
1. #include directive
2. Declare AutoConnect
3. Invokes "begin()"
4. Performs "handleClient()" in "loop()"
You can easily add your own web screen that can consist of representative HTML elements as the styled TEXT, INPUT, BUTTON, CHECKBOX, RADIO, SELECT, SUBMIT into the menu. It can be invoked from the AutoConnect menu and parameters can be passed. These HTML elements that make up the user-owned screen can be easily loaded from the JSON description stored in PROGMEM, SPIFFS or SD.
The above sketch is available in GitHub AutoConnect repository.
Appendix - More usage and FAQsFull documentation is available on https://hieromon.github.io/AutoConnect/, some quick links at the list:
- The Installation is the installation procedure and requirements for AutoConnect library.
- Getting started with the most simple sketch for using AutoConnect.
- The Basic usage guides to using the library correctly.
- Details are explained in the Advanced usage.
- Details and usage of custom Web pages are explained in the Custom Web pages.
- The API reference describes the AutoConnect functions specification.
- There are hints in Examples for making sketches with AutoConnect.
- FAQ.


Comments
Please log in or sign up to comment.