My free NXP Rapid IoT Prototype Kit has arrived. Thanks for the product and quick delivery. Images show device testing for the basic model "Rapid IoT Kit Out Of Box Demo firmware.bin"
I made communication with Rapid IoT Prototype Kit and Android application. This communication is realized through the connection between NodeMCU and Google Firebase. Rapid IoT Prototype Kit sends data via BLE to NodeMCU. NodeMCU this data sends to Google Firebase via WiFi. My Android application picks up data of Google Firebase and sends control button value to Firebase. If button in application is active, this will trigger the opening of the window and/or activate water pump. The complete communication between certain devices of my project is shown in the following picture:
Create design of project in NXP Rapid IoT Studio. Bellow photo is schematic in this Studio.
NXP Rapid IoT Studio project is added on attachmenth. We see that NXP Rapid IoT Prototype will send sensor data (temperature, humidity, air quality, pressure, ambient light) using BLE. The way of loading.bin file on NXP Rapid Prototype Kit is specified in NXP documentation.
Step 2: NXP Rapid IoT Prototype KitConnecting additional components to the NXP Rapid IoT Prototype Kit is achieved using the docker station.
This components include:
- Water pump,
- Window control motor,
- Soil moisture,
- Rain sensor (optional).
The way the connection is made is shown on photo:
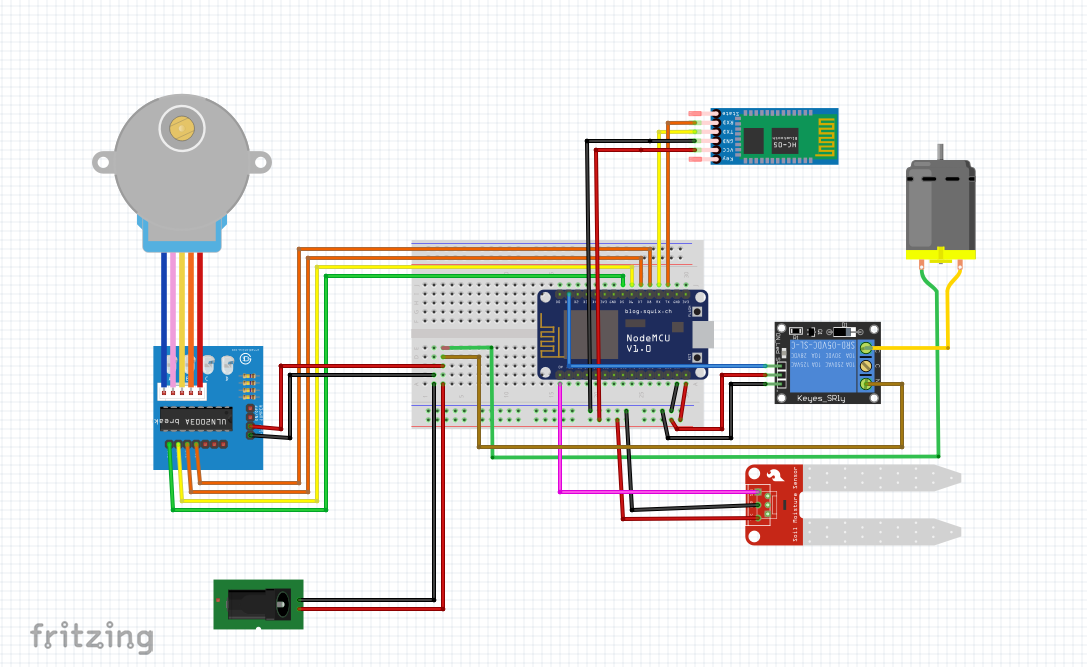
If you don't have a docker station for the NXP Rapid Prototype Kit, the scheme with NodeMCU that will receive data from the NXP Rapid Prototype Kit via BLE and control other components, is listed below.
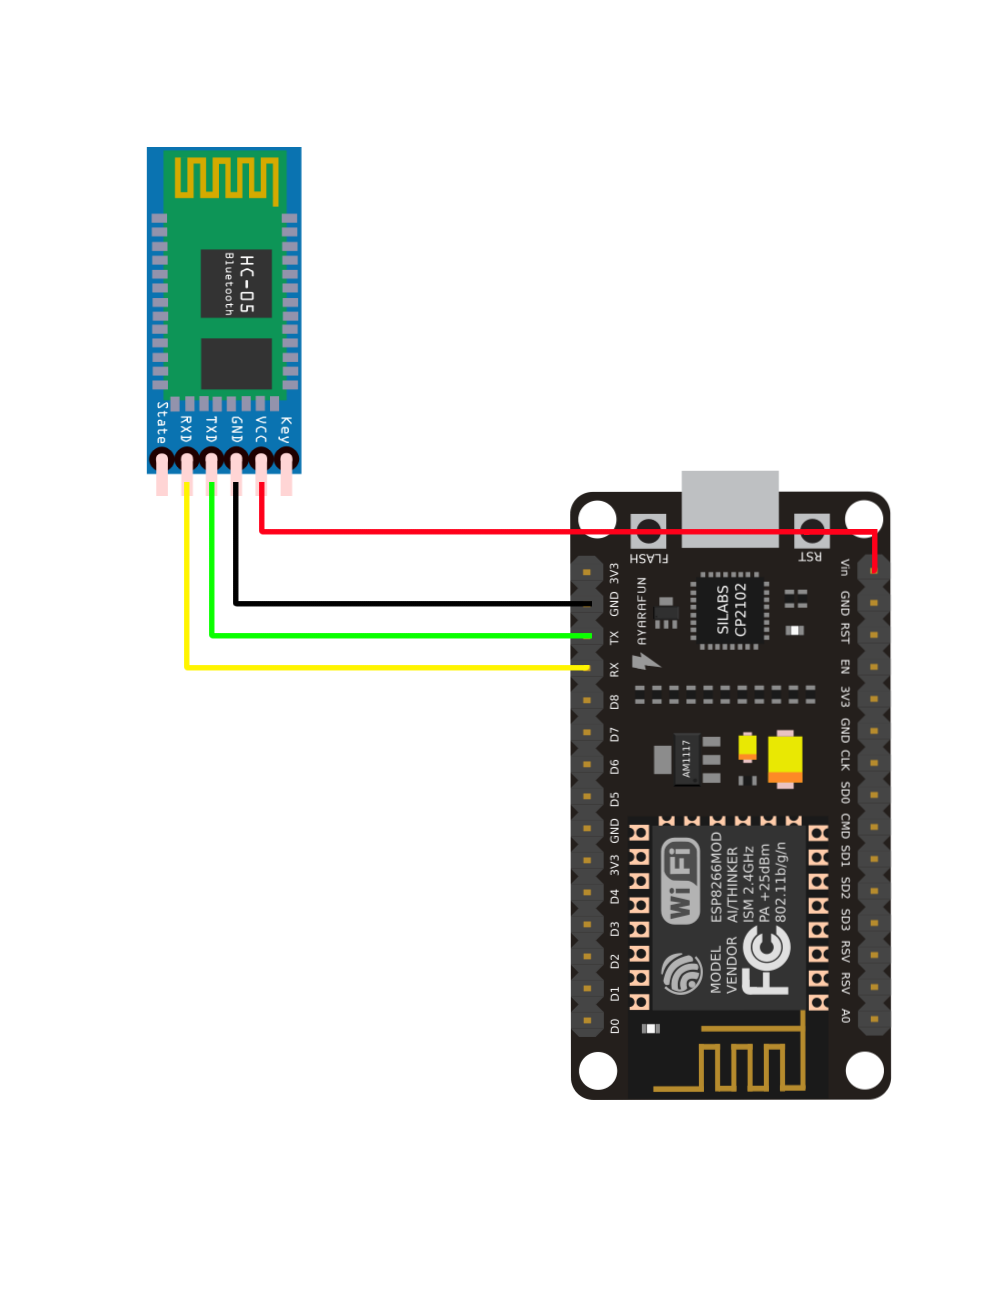
Now that connection is made, it is necessary to connect, via BLE, NXP Rapid IoT Kit and NodeMCU. The schematic below illustrates the connection of HC-05 (HC-06) and NodeMCU. Code needed to upload on NodeMCU is added as nodemcu_code_for_ble_senddata_to_firebase.ino.
NodeMCU also connects to a Wi-Fi that is defined at the beginning by the name wifi_name and password wifi_password. The code also stated that the data that is present on NodeMCU is sent to Google Firebase.
Step 4: Google FirebaseGoogle Firebase serves to store data collected on the NodeMCU and NXP Rapid IoT Prototype Kit. These datas can be further used on websites, mobile applications and anywhere they can access the Internet. Sign in using your Google Account and follow the steps below.
After login follow the next steps:
1. Click on "+ Add project"
2. Fill information and click "Create"
3. After loading, click "Develop" in left navigation bar. Then click "Database"
4. Click "Create database" then chack "Start in test mode" and click "Enable"
5. Next of "Database" title in the drop-down menu, select "Realtime Database"
6. Click on "Roles" tab. In code delete "false" and add "true".
7. Back to "Data" tab. Copy link of your database and insert in Arduino code.
8. Click on icon gear (left navigation bar) choose "Projects settings" and click on "Service accounts" choose "Database secrets".
9. On right copy "Secret" code and insert in Arduino code.
Now, we've connected NodeMCU and Google Firebase. After upload Arduino code in NodeMCU in Google Firebase will appear variables as on this photo:
- "S1" is control for Servo motor.
- S1 = 0 - servo motor is OFF,
- S1 = 1 - servo motor is turn ON for OPEN window,
- S1 = 2 - sevo motor is turn ON for CLOSE window.
- "S2" is control for water pump.
- S2 = 0 - Water pump is OFF,
- S2 = 1 - Water pump is ON.
- airquality, ambientlight, hum (humidity), pressure, soilmoisture, temp (temperature) is sensor data from NXP Rapid IoT Prototype.
Names for this variables in FireBase come from NXP Rapid IoT Prototype Kit. There names are defined in NXP Rapid IoT studio.
Example for temperature:
In activity_main.xml is presented implementation appearance of the application. For each variable, RelativeLayout and background color are defined. A title is also placed within RelativeLayout and the TextView of the models for entering the value of the obvious is added. Buttons for controlling the servo motor and water pump are added. Model for this Andriod application is shown on photo.
MainActivity.java is the way to link TextView plugins to an XML file with Google Firebase data.
Step 6: Testing projectI don't have a docker station, but I managed to make the entire system that will be controlled by NodeMCU for window control and water pump (yellow LED).
And at the end of video functionality:
Step 7: ConclusionStyrofoam is set as an example of a construction (which should be metal), covered with transparent nylon or glass windows. The roof would also be transparent (nylon or window).
In conclusion, with more investment, a smart greenhouse (Smart Plant House) could be built with using the NXP Rapid IoT Prototype Kit as basic system for communicating around the environment.


Comments
Please log in or sign up to comment.