


Hardware components | ||||||
 |
| × | 1 | |||
| × | 1 | ||||
| × | 1 | ||||
| × | 1 | ||||
| × | 1 | ||||
| × | 1 | ||||
| × | 1 | ||||
 |
| × | 1 | |||
Software apps and online services | ||||||
| ||||||
| ||||||
 |
| |||||
 |
| |||||
 |
| |||||
| ||||||
| ||||||
| ||||||
| ||||||
Hand tools and fabrication machines | ||||||
 |
| |||||
| ||||||
| ||||||
While looking for interesting electronic and coding projects for my 2 sons and I to work on, we've discovered the wonderful world of Pi's, Arduino's, DHT's, etc. As many who have gone before us, we opted to do the often replicated temperature/humidity IoT project as one of our first forays as makers. We did, however, add a couple of custom features beyond the basic temp/humidity logger.
** WARNING - this is an especially long write-up with many moving parts. However, the more advanced functions are optional. We've tried to mark a couple points in the process where you could stop and have a perfectly viable, full-functional project. Of course you have the option of forging ahead into the more complicated, and interesting enhancements!
The BasicsParticle Photon
We're using a Particle Photon as the controller. The Photon is essentially a mini-Arduino with built-in WiFi and some supporting infrastructure (a cloud and smartphone apps) for managing it. The Photon universe also includes an Arduino-like IDE (online version, off line version, and hybrid version) which includes a baked-in library that makes it easy to get your Photon-based "Thing" talking to it's cloud.
We had futzed around with an actual Arduino and ESP8266, but struggled to get a consistent WiFi connection. I ran across the Photon while searching the interwebs for solutions to our issues with the Arduino/ESP8266 platform. Although it cost almost 3x as much, the Photon seemed like a much easier path to success. And it was!
DHT22
Tried and true temperature & humidity sensor. An inexpensive no-brainer.
Particle Cloud
As part of the Particle universe, the Photon can easily publish events, variables, and functions to the Particle Cloud. This is where our IoT would park its data. Temporarily. Read on...
(If one were to stop right here, this is an easy project that could be completed in 30-40 minutes. The spicy bits described below add complexity and time.)
The Special SauceHere are the features that we added to our implementation beyond the basics.
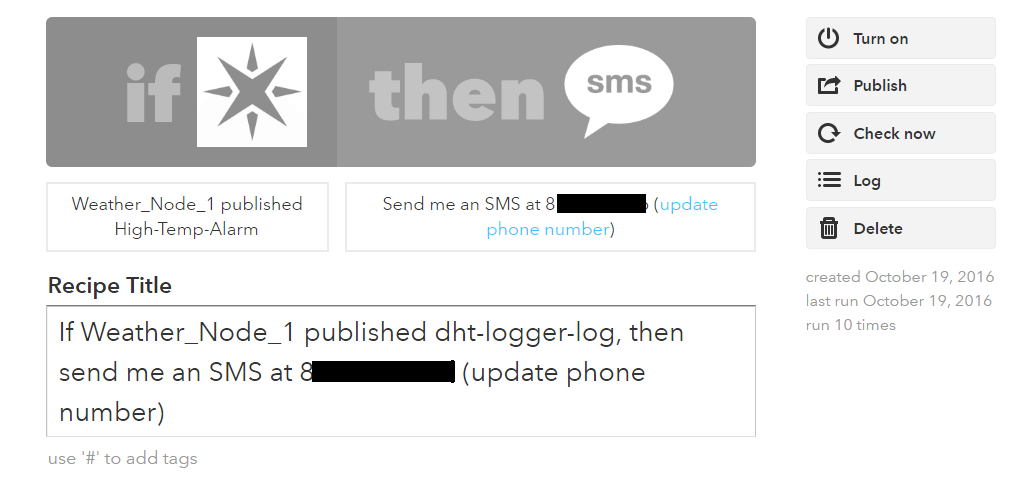
Alarms
I wanted to be able to receive a notification if the temperature or humidity exceeds a specified threshold. A few lines of code were added to the sketch to enable/disable alarms, compare current temp/humidity against the thresholds, and publish an event to the Particle Cloud if thresholds were exceeded.
An IFTTT recipe watches the Particle Cloud for one of these alarm events and sends me a text if/when an alarm is published.
Data Persistence
We wanted to be able to record temperature and humidity data over time so that it can be published via many channels (web site, smart phone app, custom desktop app, etc.) as well as be examined and analyzed in the future. This requires the ability to persistently store the temperature and humidity values at specific time intervals (say, every 15 minutes).
The Particle Cloud does not offer persistent data storage. Events that are published to the Particle Cloud have a limited lifespan. You can specify that lifespan when you publish an event, but at some point in time, the event and its data is gone forever. Not very persistent!
You can also expose variables (e.g. "temperature") to the cloud. The variables "persist" in that you can always examine their value, however, you can only examine the current value. That would work for exposing current data to various channels. However, you can't examine what a variable's value was in the past, so there would be no ability to analyze historical data.
So the Particle Cloud offered no way to record temperature and humidity readings over time.
Amazon Web Services (AWS) to the rescue! Using AWS relational database services (RDS) we were able to create a MySQL database server on which we created a database that would persistently store data readings over time, and make that data easily accessible to a variety of tools.
How to get the data from the Particle Cloud to the Amazon Cloud?
The AWS Lambda feature is a way to write web services/functions that execute in, and act upon, other objects within the Amazon cloud. So, we wrote a Lambda function that accepts a JSON data package as input and then inserts that data into a table in our MySQL database.
That's great, but that's all within the Amazon Cloud. How do we access that functionality from the Particle Cloud?
The AWS API Gateway is a mechanism that exposes AWS Lambda functions to the world outside of the Amazon Cloud. So we configured an API that exposed our Lambda function and made it callable as a web service to the outside world. Hooray!
We're almost there! Now we just need a way for the Particle Cloud to talk to our API Gateway.
The Particle Cloud has a feature called "Web Hooks". Web hooks allow you to call web services in response to Particle Cloud events. Perfect! We configured a web hook to invoke our AWS API/Lambda function every time the Photon publishes temp/humidity data. Now we have persistent data!!
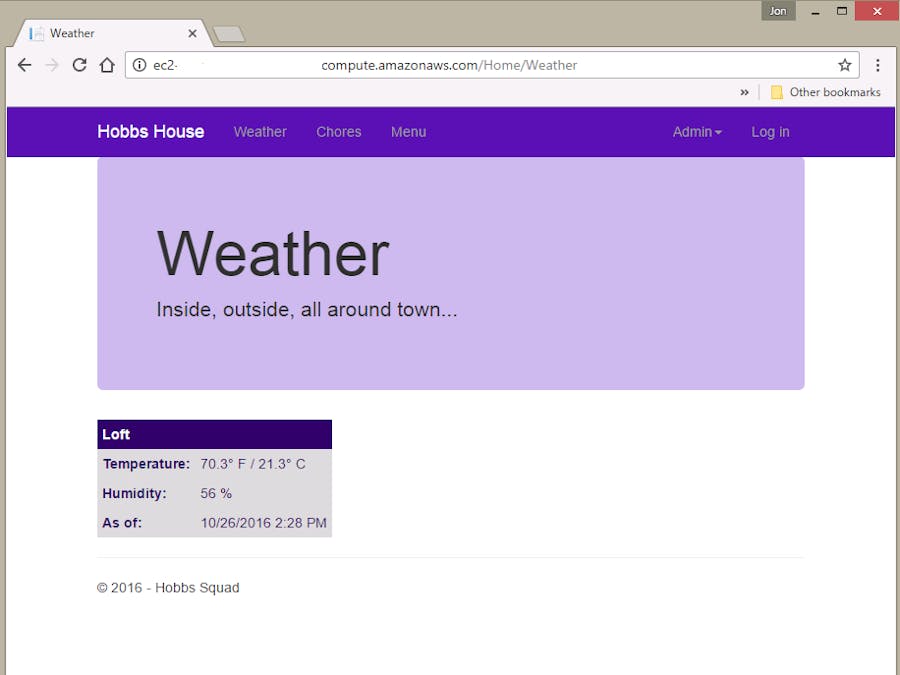
Web Site Access to Data
The final twist in our current implementation is to expose the temp/humidity data via a web page. I was already in the process of building a web site/portal for our household. So it made sense to add an indoor weather feature to our portal.
I was using Microsoft Visual Studio Community 2015 to build our web site using the MVC model and Entity Foundation 6 tools. Amazon publishes a free VS add-in that makes it easy to access your AWS assets from VS tool bars as well as access and manipulate AWS assets from your VS code.
So it was fairly straightforward to add a page to our web site and connect it to the MySQL database and display the current temperature and humidity data published by our IoT weather node.
Future FeaturesMore nodes! If one weather IoT is good, more is better, right? We are currently in the process of building many more nodes. They will be placed in various rooms in the house. We also hope to build a super-node to be placed outdoors. In addition to temperature and humidity, it will report barometric pressure, wind speed and direction, and possibly rainfall amounts.
Apps! Although our household portal can be accessed via a browser on a smartphone or tablet, I'd like to build a dedicated cross-platform app so smart devices can access data sans browser.
Analytics! The main reason for storing historical data is for analysis purposes. I'd like to use this indoor weather data to analyze the performance of our home's HVAC system, and evaluate any modifications we make to it.
Alexa! Once you've entered the Amazon jungle, it's not too hard to add voice interaction via the Alexa Skills Kit or the Alexa SDK. "Alexa, how hot is it in Bobby's bedroom?"
ConstructionStep 0 - Create Particle Account
While waiting for the mailman to deliver our Photon, I setup a Particle account and installed the Particle iPhone app on my phone. Both are easy, straightforward processes.
Your Particle account grants you access to several things:
- A console for monitoring your devices and creating webhooks
- An online IDE for developing custom firmware and flashing your device(s) over-the-air
- Support, documentation a forum, etc....
Useful links:
- Here is the Particle home page
- Here is the console login page
- Here is the page to create a new account
Follow the online instructions for creating a new account and you'll be Particled in no time!
The smartphone app is also easy to install and configure.
- Download and install the app.
- Connect the app to the Particle universe with the username and password you created above.
Step 1 - Set-up the Photon
Setup of the Photon couldn't have been much easier. Power it up, use an iPhone app to configure it's WiFi connection, and we were off and running. (official set-up doc is here)
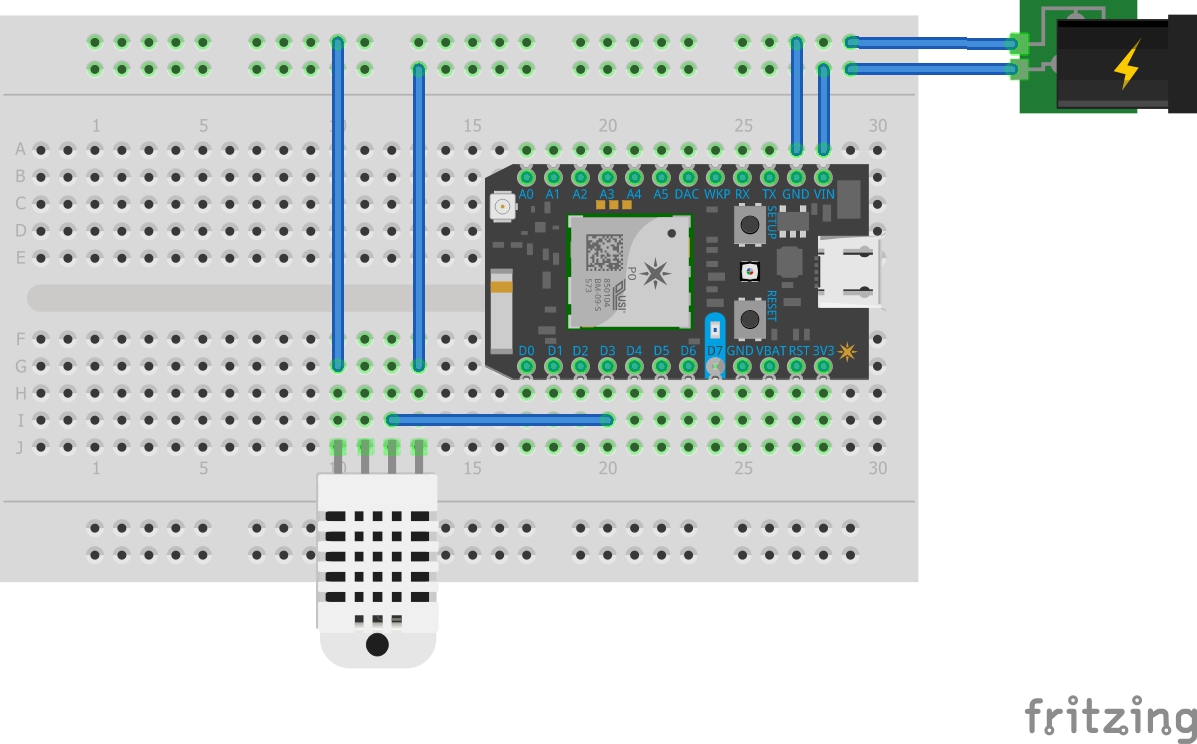
Step 2 - Breadboarding
Once our Photon was set-up, it was a simple matter to connect a couple jumper wires between the Photon and the DH22.
Step 3 - Add Custom Firmware
Now it's time to add custom programming to read the values from the sensor and publish them to the Particle cloud. I found a sketch on github (shout-out to Nic Jansma) which provided a great leaping off point for our code.
After tweaking the code for our specifics (device ID, etc.), a quick flash using Particle's online Build tool, and we were publishing temperature and humidity data to the Particle cloud! Easy, breezy!
- Launch Particle's online "Build" tool
- Create a new app - set the title. "Indoor_Weather_Node" has a nice ring to it.
- Copy-paste code from Nic's dht-logger/firmware/dht-logger.ino file into the new Indoor_Weather_Node.ino file.
- Save! Click on the folder icon on the toolbar to save your work.
We also need to include the DHT library that makes it easy to deal with the DHT sensor.
- Add a file by click on the plus "+" symbol in the upper-right. This will automatically create a .h and a .cc file.
- Name the .h file "DHT" The IDE will automatically name the .cc file "DHT.cc"
- Copy-paste code from Nic's dht-logger/firmware/dht.h and dht.cc files.
- Save!
Now edit the Indoor_Weather_Node.ino file
- Modify for your specific needs. You'll want to change your device name, and you may need to adjust the pin definition:
// device name
#define DEVICE_NAME "YOURDEVICENAME"
// sensor type: [DHT11, DHT22, DHT21, AM2301]
#define DHTTYPE DHT22
// which digital pin for the DHT
#define DHTPIN A4
We also opted not to use the Adafruit, Thingspeak, and HTTP-POST logging the Nic's code has. Comment or delete the lines of code for these services.
Compile your code, resolve any issues (status and errors are reported at the bottom of the screen). Rinse and repeat until you get a clean compile (note: compiling automatically saves your code as well)
- Choose your device in the Build IDE
- Flash! Progress and final status of the flash process will be reported at the bottom of the screen. The onboard LED on the Photon will perform a little disco light show during the flashing process as well.
We now have a fully-functional IoT device publishing temperature and humidity data to the Particle cloud! At this point, you could stop, grab a cold one, and pat yourself on the back. Job well done, and a good beginner project.
We opted to forge ahead and take it to the next level. We chose to assemble our circuit in a more "permanent" manner, stuff it into a nice enclosure, and then added some features via software and integrations.
Step 4 - Assemble the PCB
I discovered the joy of custom PCB's while working on fairly simple project (Remote Control Death Star) that required low-voltage power be distributed to 4 different devices inside a small project box. I used Eagle design software to create the board design, and OSH Park to do the manufacturing. OSH Park provides high-quality PCB's at very reasonable prices directly from your Eagle files. Delivery can take 10-14 days, so if you're in a hurry, they may not be a good option.
We decided to use a custom PCB for our weather nodes as well. Given that we plan to make up to a dozen or more of this little buggers, a custom PCB was very economical and a no-brainer. The board would allow for mounting a JST PH jack to accept input power, the Photon, and a 3-pin header to connect to the DHT sensor. The board distributes power to the photon and the DHT, and connects our chosen signal pin from the Photon to the DHT.
Assembling the PCB is fairly straightforward:
- Solder a 2-pin male header to the Photon's input power
- Solder a 1-pin header to Photon pin A3
- Solder the Photon to the PCB
- Solder the 2-pin JST PH jack to the PCB
- Solder a 3-pin male header for the output to the DHT sensor
Step 5- Wiring Harness
While the custom PCB greatly simplified the physical connections of our project, we still need a little bit of old fashioned wiring. Using pre-crimped wires from Pololu and some Dupont housings sourced on Amazon, it was quite simple to create a 3-wire harness that would connect the header on our PCB to the DHT sensor. This not only made assembly a snap, but it makes it easy to swap components out if anything were to fail (which never, ever happens, right?)
We leave the PCB end of the wiring harness disassembled at this point. The DHT sensor will be mounted to the exterior of a small project box. We want to pass the wires through a hole in the project box to be connected to the PCB inside the box. We want to keep that hole as small as possible, so during final assembly, we'll pass the loose wire ends through the hole, insert them into the Dupont housing, then connect to the PCB.
Step 6 - Final Soldering
Once the PCB is assembled, the remaining soldering needs of this project are very minimal. All we need to do is solder a pre-assembled 2-wire JST PH lead to the DC input jack.
Step 7 - Project Box Prep
Time to stuff all the hardware bits & pieces into a small project box for safe keeping. We sourced a small project box from our local Microcenter. The only work we had to do to it was to drill a hole in one end for the panel-mount DC jack, a hole in the other end for the wire harness to pass through, and 2 holes in the box's bottom plate to mount the PCB.
Using a step-bit and patience, we punch the 4 holes in the project box. 3 of these holes require a fair amount of precision here, so slow and steady was the name of the game.
Step 8 - Final Assembly
First step is to mount the DC power jack into the project box. A little poke, add a nut, tighten it down, good to go!
Next, we mount the PCB to the bottom plate of the box. A couple standard M2.5 standoffs, screws, and nuts lock it into place.
Now we finish off and connect the wiring harness. Pass the loose wires from the outside of the box to the inside. Insert the pre-crimped Dupont connectors into the Dupont housing (Pay attention to which order they go in!). Now, connect the end of the harness to the 3-pin header on the PCB (Again, pay attention to which way it goes on. Two of these wires are carrying power, so we don't want to cross positive and ground wires!)
Now we can close up the box.
The final step is to secure the DHT sensor to the top of the box. We wanted the sensor outside the box so that any heat generated by the Photon would not skew our readings.
The connection between the sensor's leads and the connector on the wiring harness is very, very loose. Left to its own devices, it'll fall apart. So, we used a piece of padded, double-stick tape to secure the connector to the project box. Finally, we dab a couple drops of super-glue (cyanoacrylate) to the back of the sensor, plug it into the wiring harness, and press it down against the project box. Once the super-glue sets, everything is nice and secure.
Plug in a 5v DC wall adapter into the power jack, and we're off!
Now that our hardware is squared away, it's time to juice up the software end of things.
Step 9 - Create a Database
Our desire was to record the indoor weather data on a periodic basis (every 15 minutes) for review and analysis. The Particle cloud does not offer persistent storage so we turned to Amazon Web Services (aka Amazon Cloud). One of the many services offered in the Amazon Cloud is Relational Database Services.
** NOTE ** - there may be an additional cost for using Amazon Web Services. They do have a free tier/trial option, but please make sure you understand the potential costs that may be incurred.
The details of signing up for AWS and getting started with RDS will not be detailed here. Here is a "Getting Started" doc for RDS.
Using RDS, we created a MySQL database in which we were able to store our indoor weather data. In this database, we created 2 tables: one to log the periodic temperature and weather readings, and one to track our multiple nodes. Table creation/DDL is included in attachments section.
Now it's time to create a database and add our 2 tables. You can use many database management tools. We chose to use MySQL Workbench. The install is fairly straightforward and can be found here.
Once you have MySQL Workbench installed, you will need to create a connection to your shiny, new MySQL server. You will need some information from your instance in AWS to create the connection. Once your connection has been created, you can use it to add a new database to your RDS instance:
Now that we have a new schema, we need to add 2 tables to it. Here are the design of the 2 tables:
Table 1: LocalNodeLog
Columns:
- LocalNodeLogID - unique identifier for each log entry
- NodeMAC - unique identifier for each node. We're using the Particle device name for this
- LocalNodeTemp - the temperature being logged
- LocalNodeHumidity - the humidity being logged
- LogTimeStamp - the date and time the data was collected and logged
Table 2: LocalNode
Columns:
- LocalNodeId - unique identifier for each node (generated by the database)
- LocalNodeMAC - human-friendly identifier for each node. Matches the NodeMAC column in table 1
- LocalNodeLocation - human-friendly text indicating where the node is located (e.g. "Billy's Room")
Step 10 - Create AWS Lambda Function
Now that we have a place to store our weather logs, we need a mechanism to actually write those log entries. For this, we utilized another Amazon Cloud feature: Lambda Functions. AWS Lambda functions allow you to write simple functions in Node.js, Phython, Java or C#. These functions can act upon other resources and objects in your Amazon cloud.
We created a Node.js function that accepts as input a node identifier, a temperature value, and a humidity value as a JSON package. It then takes that data and formulates a SQL INSERT statement which creates a new log entry in our LocalNodeLog table. The full code of this function is available in the attachments section.
Step 11 - AWS API Gateway
At this point, our Lambda function is only available and accessible within the Amazon cloud. However, our temperature and humidity data is being collected and published in the Particle cloud. Time to get these 2 clouds talking to each other!
On the AWS side, this conversation is enabled using yet another services: API Gateway. Using the API Gateway, we were able to create a REST interface to our Lambda function. Now, any application can make a POST call to our Lambda function (assuming it has the correct API key).
Ok, that was a fair bit of work. But we still have a bit more to do. We want to protect our API so that only you, or persons you authorize, can invoke your API. You don't want the unwashed masses poking data into your database! These next steps are a little involved, but if you go slowly, step by step, you can do it!!
WHEW! That was quite a journey. At this point, your API can be used to invoke your lambda function from outside of AWS. You can fire up your favorite REST API testing tool and take it for a spin. I'll leave the format and content of the body of the POST call as an exercise for the reader :)
If you made it this far, grab an iteration of your favorite beverage, put your feet up, and bask in the glow of your accomplishment!
Step 12 - Particle Webhook
Now we have our Amazon cloud ready to talk. Time to bring the Particle cloud to the party. Particle provides webhooks, which is it's mechanism for invoking/consuming external web services.
It was fairly straightforward to create and configure a webhook that is triggered whenever our indoor weather node posts new data to the Particle cloud. When the webhook is triggered, it grabs the temperature and humidity data that was just published by the node, and POSTs it to our Amazon API. The API invokes our Lambda function, passing it the temp/humidity data. The Lambda function inserts this data into our DB table. And bing, bam, boom, we have persistent weather data!
Step 13 - Web Page Access to Weather Data
Now that we have persistent weather data, we should probably do something with it. The first thing we chose to do with it is to make it accessible via a web portal we were building. The portal is still a work-in-progress, but is intended to provide easy access to family members and guests to information about our household (Whose turn is it to empty the trash?) We're using Microsoft Visual Studio 2015 and the Model-View-Controller framework.
This approach for building web pages is designed around accessing and modifying data in databases, so it wasn't too hard to expose our indoor weather data on a new page in our portal. The details of setting up Visual Studio 2015, the necessary add-ons, and connecting our pages to our MySQL database is beyond the scope of this write-up. Suffice to say, any basic tutorial on .net, MVC, Visual Studio 2015 will get you well on your way to displaying your IoT data on a web page. We didn't do anything particular extraordinary in designing our web page.
Step 15 - "Publish" our portal
Web pages aren't worth a hill of beans unless they're accessible over the internet. Once again we turn to Amazon Web Services for a solution. This time, we utilized AWS' Elastic Beanstalk to make our web pages available over the internet.
Amazon provides a Visual Studio add-on that makes it very easy to fire-up a new virtual web server and push your pages to it. A couple mouse-clicks is all it takes and a new web server is spawned and your pages uploaded to it. Easy breazy!
During the time that has passed between the completion of our project and the completion of this write-up, our project has already evolved. Many of the components described above are no longer being used. We have a new mechanism for persisting the data, as well as new toys for displaying it. Details will be documented in an upcoming Hackster project write-up, so stay tuned!


Comments
Please log in or sign up to comment.