


Hardware components | ||||||
| × | 1 | ||||
Software apps and online services | ||||||
| ||||||
| ||||||
Now it's time to make my first Wi-Fi project.
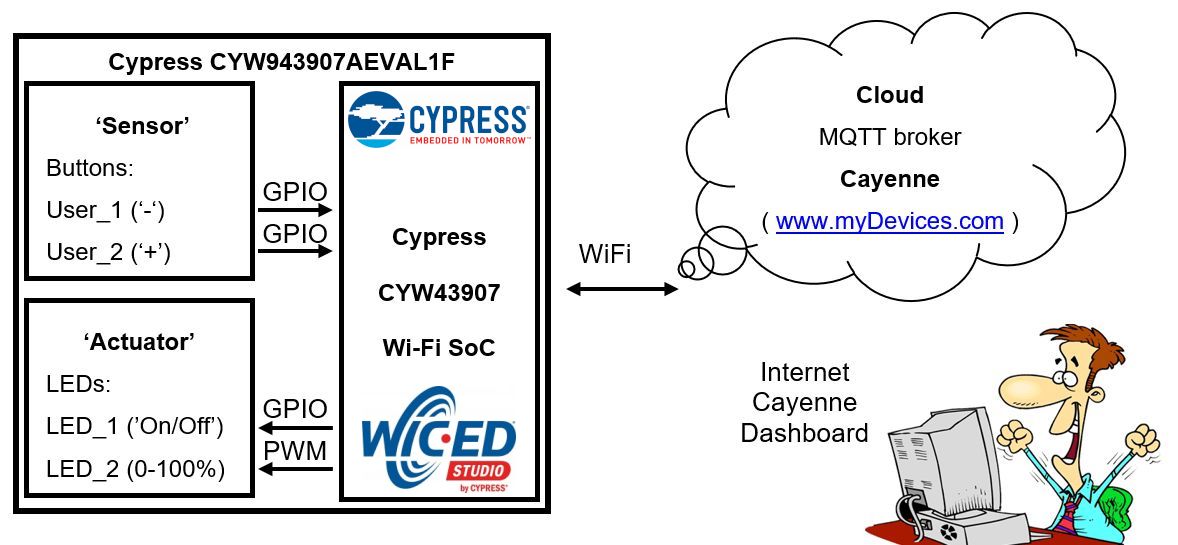
Cypress' WICED Studio is the only SDK for the Internet of Things (IoT) that combines Wi-Fi and Bluetooth into a single integrated development environment. A huge software library supports beside of Wi-Fi and Bluetooth many further peripherals (e.g.: PWM, UART, I2C, SDIO, etc.), components (e.g. graphics U8G/UGUI, etc.) and protocols (e.g. several file systems, HTTP, AMQP, COAP, MQTT, AWS, Azure, etc.) and includes driver libraries and code snippets up to demonstration examples.Several kits are available, I have got the CYW943907AEVAL1F Evaluation Kit, a single-chip 802.11n dual-band (2.4 GHz and 5 GHz) Wi-Fi SoC that features 320-MHz Arm Cortex-R4 MCU for application subsystem and various on-chip interfaces like Ethernet (RMII/MII), UART, SPI/QSPI and I2C that in totality offers a very small-footprint IoT solution. An on-board PCB antenna and Arduino compatible headers for hardware expansion makes the kit usable for many future projects... if the first steps will be successfully passed ;-)Cayenne from myDevices names itself the world's first drag-and-drop IoT project builder, that enables full control of your project by creating a custom dashboard with drag-and-drop widgets to visualize, manage, and control connected devices.
The demo-application shall be kept simple - two on-board LEDs shall be switched respectively dimmed remotely, and a sensor-value (simulated by the two on-board buttons to increase/decrease the simulated value representing e.g. a temperature value) shall be published into the cloud.
Isn't this a good starting point? After having the device hardware, application demo idea and the probably right cloud system found - how to connect it now?
Run the demo first - step-by-StepIt might be helpful to see the demo running, before the implementation is described in detail. (Note: Related to WICED you should already have some basic knowledge, otherwise watch the online tutorials, first!)
Now follow these steps:
- Register for myDevices, the host of Cayenne.https://mydevices.com/cayenne/signup/
- 'Bring Your Own Thing' to get the required access IDs.
- Copy the displayed credentials: Username, Password and Client ID
Now Cayenne will wait to see (= get connected by) the IoT device.
- Start WICED and copy the attached project folder (WiFi_MQTT_Cayenne) to your apps folder. Don't forget to edit the
WiFi_MQTT_Cayenne.mkand define the right name including path. Also, create a new Make-Target related to the project. - Open
WiFi_MQTT_Cayenne.cand enter Username, Password and Client ID to match your credentials
/******************************************************
*                    Constants
******************************************************/
/* <<< Change the Broker domain address to match the server address */
#define MQTT_BROKER_ADDRESS       "mqtt.mydevices.com"
#define MQTT_BROKER_USER_NAME     "PLACE YOUR GIVEN MQTT USERNAME HERE"
#define MQTT_BROKER_USER_PASSWORD "PLACE YOUR GIVEN MQTT PASSWORD HERE"
#define MQTT_BROKER_CLIENT_ID     "PLACE YOUR GIVEN CLIENT ID HERE"
- Open wifi_config_dct.h and enter your Wi-Fi credentials
/******************************************************
*                    Constants
******************************************************/
...
/* This is the default AP the device will connect to (as a client)*/
#define CLIENT_AP_SSID       "PLACE YOUR ACCESS POINT NAME HERE"
#define CLIENT_AP_PASSPHRASE "PLACE YOUR WIFI PASSWORD HERE"
- Build the project and program your target.
- Optional: Open a preferred serial terminal (115200, 8N1) and observe the start of your IoT device boot.
- After a successfully logged to the Wi-Fi network and after connecting to the MQTT-broker (Cayenne) the Cayenne registration screen will proceed to display the dashboard.
- Press now one of the user buttons on the CYW943907AEVAL1F and observe the dashboard. The published data (simulated temperature value) will be displayed and updated whenever you press one of the buttons.
- In order to control the LEDs, Add new... Device/Widgets and select a Button-Widget (channel = 1, select any preferred icon) for LED_1, and a Slider-Widget (channel=2, min=0, max=100) for LED_2.
- Both control widget should be visible now on your dashboard
- Click the button to switch the on-board LED_1 on/off or move the slider to change the brightness of LED_2.
- Again, when pressing a button, the Temperature widget will show up again. You can add the widget to fix its view.
- Cayenne supports much more widgets and features. But that's out of scope of this introduction.
My first Wi-Fi IoT device is successfully connected to the cloud. Learn now more about the firmware implementation done with WICED.
ImplementationRemember, to keep it simple, two on-board LEDs shall be switched respectively dimmed remotely, and a sensor-value (simulated by the two on-board buttons to increase/decrease the simulated value representing e.g. a temperature value) shall be published into the cloud.
Both software tools, WICED and Cayenne, are very well documented, so for this project I will focus just on the individual steps and settings needed to realize the IoT connection.
CayenneFirst, you need to register for a free account on myDevices. All required steps and also the technical documentation is very well available online in the Getting started guide.
Arduino and Raspberry are supported by default, but own devices can be added easily, too. Just choose 'Bring Your Own Thing' that allows to use the Cayenne API based on MQTT. Write down ('Copy&Paste') the Username, Password and Client ID as this is needed later for your IoT device firmware to be developed by WICED.
The IDE comes with a lot of code snippets, demo examples and libraries. For those who have not yet worked with it please watch the online tutorial videos or take a look to the WICED Wi-Fi 101 course material.
First, our IoT device needs to login to the local Wi-Fi network. Thanks to the library function, an easy job for the user:
- Open
wifi_config_dct.hand enter your Wi-Fi credentials
/******************************************************
*                    Constants
******************************************************/
...
/* This is the default AP the device will connect to (as a client)*/
#define CLIENT_AP_SSID       "PLACE YOUR ACCESS POINT NAME HERE"
#define CLIENT_AP_PASSPHRASE "PLACE YOUR WIFI PASSWORD HERE"
- Open
WiFi_MQTT_Cayenne.cand enter your Cayenne credentials
/******************************************************
*                    Constants
******************************************************/
/* <<< Change the Broker domain address to match the server address */
#define MQTT_BROKER_ADDRESS       "mqtt.mydevices.com"
#define MQTT_BROKER_USER_NAME     "PLACE YOUR GIVEN MQTT USERNAME HERE"
#define MQTT_BROKER_USER_PASSWORD "PLACE YOUR GIVEN MQTT PASSWORD HERE"
#define MQTT_BROKER_CLIENT_ID     "PLACE YOUR GIVEN CLIENT ID HERE"
In the following I will give a rough explanation on the important code sections. I did not take the Cayenne library, as WICED offers already a ready-to-use MQTT implementation. So Cayenne's raw MQTT API is used.
The complete application is controlled by a state machine that allows to implement easier a kind of error handling in case Wi-Fi or MQTT broker will not react as expected. But that kind of implementation is surely a matter of opinion or 'software religion'.
// Note: Just code extract is shown focusing on the major calls
typedef enum {
   APP_STATE_AFTER_RESET = 0,
   APP_STATE_CONNECT_TO_WIFI,
   APP_STATE_MQTT_FIND_BROKER,
   APP_STATE_MQTT_CONNECT,
   APP_STATE_MQTT_SUBSCRIBE1,
   APP_STATE_MQTT_SUBSCRIBE2,
   APP_STATE_MQTT_WAIT_FOR_ACTION,
   APP_STATE_MQTT_PUBLISH,
   APP_STATE_MQTT_PUBLISH_RESPOND
} enAppState_t;
void application_start( void )
{
   while (1)
   {
       switch (enAppState)
       {
         ...
       }//switch (enAppState)
   }//while(1)
}//void application_start( void )
Wi-Fi connection
Wiced already provides a powerfull library that allows easily to connect to your Wi-Fi network defined in wifi_config_dct.h.
// Note: Just code extract is shown focusing on the major calls
case APP_STATE_CONNECT_TO_WIFI:
ret = wiced_network_up( WICED_STA_INTERFACE, WICED_USE_EXTERNAL_DHCP_SERVER, NULL );
MQTT-CONNECTBefore any data can be exchanged the connection to the MQTT broker (here Cayenne) needs to be established. First, the IP address of the broker needs to be found, second, a connection by using MQTT protocol will be established.
// Note: Just code extract is shown focusing on the major calls
case APP_STATE_MQTT_FIND_BROKER:
// Resolving IP address of MQTT broker...
ret = wiced_hostname_lookup( MQTT_BROKER_ADDRESS, &broker_address, 10000, WICED_STA_INTERFACE );
case APP_STATE_MQTT_CONNECT:
// [MQTT] Opening connection...
ret = mqtt_conn_open( mqtt_object, &broker_address, WICED_STA_INTERFACE, mqtt_connection_event_cb, NULL );
MQTT-SUBSCRIBE and MQTT-PUBLISH
Cayenne defines a proprietary structure for topics and messages handled by MQTT. Each data that needs to be exchanged between Cayenne and the IoT device has to be assigned to a numeric channel, that has to be given with each MQTT topic. Let's freely define for my project:
Sensor value:Channel 0LED_1: Channel 1LED_2: Channel 2
MQTT-PUBLISHGenerally, each Cayenne topic is structures as follows for publishing:
Topic: v1/username/things/clientID/data/channel
hence, the sensor data easily can be published by using the topic
Topic: v1/username/things/clientID/data/0
and sending the data as message structured as follows:
Message: (string) type,unit=value
The data type is very powerfull in Cayenne and allows to display data in the right way. See Supported Data Types to choose the one best fitting for your data, in my example I have chosen Temperature in °C
Message: temp,c=value
The complete MQTT-PUBLISH of a temperature value of 25°C may look like this:
Topic: v1/username/things/clientID/data/0Message: temp,c=25
// Note: Just code extract is shown focusing on the major calls
case APP_STATE_MQTT_WAIT_FOR_ACTION:
  if (u8flag_CayennePublishSensorData0)
  {
    pCayenneTopic = (char *)CAYENNE_TOPIC_0_PUBLISH;
    sprintf(msg, "temp,c=%d", u8SensorValue);
    enAppState = APP_STATE_MQTT_PUBLISH;
    retry_cnt = 0;
    u8flag_CayennePublishSensorData0 = 0;
    enAppState = APP_STATE_MQTT_PUBLISH;
  }
MQTT-SUBSCRIBEIn order to receive control data from Cayenne, e.g. to change the status of the LEDs the IoT device has to MQTT-SUBSCRIBE to the related topic(s), first, here for our button (channel 1) and slider (channel 2):
Topic: v1/username/things/clientID/cmd/1Topic: v1/username/things/clientID/cmd/2
// Note: Just code extract is shown focusing on the major calls
case APP_STATE_MQTT_SUBSCRIBE1:
pCayenneTopic = (char *)CAYENNE_TOPIC_1_SUBSCRIBE;
ret = mqtt_app_subscribe( mqtt_object, pCayenneTopic, WICED_MQTT_QOS_DELIVER_AT_MOST_ONCE );
case APP_STATE_MQTT_SUBSCRIBE2:
pCayenneTopic = (char *)CAYENNE_TOPIC_2_SUBSCRIBE;
ret = mqtt_app_subscribe( mqtt_object, pCayenneTopic, WICED_MQTT_QOS_DELIVER_AT_MOST_ONCE );
Subscribed topics can receive control data from Cayenne, like the Button of Slider to change LED_1 and LED_2 on our target.
Control data needs to be confirmed by publishing the updated value, like the data publishing described above. Just the right channel must be given, e.g. confirming that the slider/PWM was set too 25%:
Topic: v1/username/things/clientID/data/2Message: 25
Additionally, the command response, that's same format for all channels, must be replied to Cayenne using the same sequence identifier that was sent by the command.
Topic: v1/username/things/clientID/responseMessage: ok,seq
// Note: Just code extract is shown focusing on the major calls
case APP_STATE_MQTT_WAIT_FOR_ACTION:
  if (u8flag_CayennePublishActuatorUpdatedValue)
  {
    if (0 == strcmp(acCayenneChannel, "1")) // Channel 1 (Cayenne button)
    {
      if (0 == strcmp(acCayenneValue, "0"))
      { // switch LED 1 off ... }
      else
      if (0 == strcmp(acCayenneValue, "1"))
      { // switch LED 1 on ... }
      // Publish new updated value to Cayenne
      pCayenneTopic = (char *)CAYENNE_TOPIC_1_PUBLISH;
      sprintf(msg, "%lu", u32LED1value);
      enAppState = APP_STATE_MQTT_PUBLISH;
    }
    if (0 == strcmp(acCayenneChannel, "2")) // Channel 2 (Cayenne slider)
    {
      // Set new PWM value to drive LED_2 ...
      // Publish new updated value to Cayenne
      pCayenneTopic = (char *)CAYENNE_TOPIC_2_PUBLISH;
      sprintf(msg, "%lu", u32LED2dutycycle);
      enAppState = APP_STATE_MQTT_PUBLISH;
    }
  }
  // Send the command response
  if (u8flag_CayennePublishCommandResponse)
  {
    pCayenneTopic = (char *)CAYENNE_RESPONSE;
    sprintf(msg, "ok,%s", acCayenneSeq);
    enAppState = APP_STATE_MQTT_PUBLISH;
    u8flag_CayennePublishCommandResponse = 0;
    enAppState = APP_STATE_MQTT_PUBLISH;
  }
  break;
case APP_STATE_MQTT_PUBLISH:

  ret = mqtt_app_publish( mqtt_object,                           WICED_MQTT_QOS_DELIVER_AT_LEAST_ONCE,                           pCayenneTopic, (uint8_t*) msg, strlen( msg ) );

  break;
Wiced MQTT handler
The MQTT protocol is handled by the Wiced library itself. For reception the function mqtt_connection_event_cb is used to filter the incoming messages where the channel, message/value and sequence ID is copied to be processed as described above in the state machine within the case APP_STATE_MQTT_WAIT_FOR_ACTION:
// Note: Just code extract is shown focusing on the major calls
static wiced_result_t mqtt_connection_event_cb( wiced_mqtt_object_t mqtt_object, wiced_mqtt_event_info_t *event )
{ ...
  case WICED_MQTT_EVENT_TYPE_PUBLISH_MSG_RECEIVED:

    wiced_mqtt_topic_msg_t msg = event->data.pub_recvd;

    // Cayenne -> Target
    if (strstr((char *)msg.topic, "/cmd/"))  // Cayenne command received
    {
      // Get Channel
      strncpy(acCayenneChannel, strstr((char *)msg.topic, "/cmd/")+5,
              (msg.topic_len - ((strstr((char *)msg.topic, "/cmd/")+5)
            - (char *)msg.topic)));

      // Get Value
      strncpy(acCayenneValue, strstr((char *)msg.data, ",")+1,
              (msg.data_len - ((strstr((char *)msg.data, ",")+1)
            - (char *)msg.data)));

      // Set SEQ ID
      strncpy(acCayenneSeq, (char *)msg.data,
              strstr((char *)msg.data, ",") - (char *)msg.data);
      u8flag_CayennePublishActuatorUpdatedValue = 1;
      u8flag_CayennePublishCommandResponse = 1;
    } //if (strstr((char *)msg.topic, "/cmd/"))
    break;
...
}
The complete project is attached. For those who have not yet worked with WICED please have a look to the WICED-online-video-tutorial and the Evaluation Kit User Guide of the evaluation kit CYW943907AEVAL1F.
SummaryHaving some bumpy start with WICED, it's good to watch first the online-tutorials, the huge library and given code snippets is amazing.
Cayenne is an easy-to-use MQTT broker with quite a lot of features and widgets available for visualization of nearly any kind of IoT data.
With both tools on the hand my first Wi-Fi IoT device was quickly and successfully connected to the cloud. What about yours?


Comments